Sand Training Part 1: Ladder Agility Drills


Cape Cod offers us some of the
world’s best beaches and with almost 560 miles of coastline we can use these
beaches to take our agility workouts to the next level.
Although research varies, training
on sandy surfaces can have many benefits such as reduced impact during training
on your joint surfaces, increased physical and metabolic demands, and
increasing proprioception (understanding where your body is in time and space).
It is also important to understand
that due to the unstable surface ground force production changes and
alterations in form may occur. Some research has proven that sprint times have
been shown to actually decrease due to altered running mechanics. It is highly
important to start slow and to maintain proper body alignment if you want to
reap the most benefit from your workout.
Clients should be primarily
focused on explosiveness and strength of the movements as this is where the
majority of benefits can be gained. With the exercises below, we are going to
focus on Ladder Agility Drills that can improve lower body agility and
explosiveness.

Forward 2 Feet In Each

Moving straight through the ladder
quickly get both feet into a box before moving to the next one.


Lateral 2 Feet In Each

Moving to the right through the ladder
quickly get both feet into a box before moving to the next one. Return back to
the left.


Diagonal 2 Feet In, 1 Foot Out
“Icky Shuffle”

Start with both feet out of the
ladder to the right, step in with the left foot then the right foot as you cross to
the other side of the ladder, touch the left foot outside of the ladder and
return back touching right foot then left foot back into the ladder.


Lateral Step In, Step Outs

Leading with the left foot
alternate stepping feet into the ladder and out of the ladder as you move to
the left. Return back to the right leading with the right foot.


2 Feet Out, 1 Foot Cross Behind
“Scorpion”

Stepping in place take your
outside leg and swing it behind your body and tap the foot inside of the ladder
as you move forward along the outside of the ladder.


Single Leg In Outs

Starting outside of the ladder on
your left leg, perform single leg hop in and out of the ladder as you move forward. Return
back on the right leg.


Single Leg Hop & Squat

Alternate performing a single leg hop
into the ladder to hopping onto both feet outside of the ladder and performing
a squat, return back into the ladder on the opposite leg.

Blog post by Craig Moody.

3 Beginner Barbell Landmine Exercises

You may be asking yourself what a
barbell landmine exercise is and first things first, there are no explosives
involved. Landmine exercises are performed by wedging one end of a barbell
either into a corner of the room or into a special floor mounted bracket that
allows for greater bar stability for the weight that is being lifted while
allowing the individual challenges in every plane of motion. This could prevent
injuries that some of the common mistakes caused by improper technique and core
instability can create.
When utilizing the landmine technique
clients can first begin by choosing the proper weighted barbell for the users
level of ability.  
Barbells come in 3 different sizes
here at Mashpee Fitness:
  • 84” Training Barbell: 16#
  • 84” Olympic Barbell: 45#
  • 60” Olympic Barball: 26#

Once you have selected the bar that
is comfortable for you to use place one end of the bar into the corner or
mounted bracket on the floor, get ready to try out my top 3 Beginner Barbell Landmine
Exercises.


Top 3 Beginner Barbell Landmine Exercises

*For a quick total body workout try
to perform 6-10 repetitions of each exercise for 3-5 sets at a controlled
tempo.

1. 
Landmine Squat


Keep weight through heels with feet
hip width apart. Avoid letting the knees bend over the toes, to do so walk your
feet back until a comfortable squat position is achieved. You should feel this
in your thighs and not in the knees. 

2. 
Landmine Split Stance Anti-Flexion

Split one foot forward and the other
back, shift your weight to your front thigh and control the weight using your core
over your front leg. Keep your abdominal muscles as tight as you can to keep
spine straight and aligned. Try to prevent any side bending (anti-flexion) of
your back as your hands travel away from the midline. 

3. 
Landmine Half Kneeling 1-Arm Overhead Press

Go down into a half kneeling position
and adjust the barbell to be on the side that has the knee down on the ground.
Keeping your core tight use the muscles in the top of your shoulder and arm to
press the weight in a straight line as you lean forward to achieve the full
overhead press. 
Blog
post by Craig Moody.

Perform a Better Prone Plank

Do you remember your first plank you
were asked to hold? Did it feel like the seconds were minutes and that someone
had lit a fire under muscles in your stomach that you never knew you had? Well
if you dread the plank or are having a difficult time maintaining good form
here are a couple methods to use to improve your experience.

Do you ever get pain in your lower back?
Set up is key!

When preparing to plank it is important
to remember the focus of the exercise is preventing hyperextension of the lower
back.  That being said, engaging the
muscles of the lower abdomen and pelvis properly before even lifting off of the
table is crucial in preventing any excessive motion in the lower spine. One
strategy is utilizing the Posterior Pelvic Tilt. This exercise will teach you
how to build tension in your lower abdomen and create a “flat back” to help aid
in any drooping or arching of the lower back when in the prone position.
Supine
Posterior Pelvic Tilt with Ball Squeeze
Begin by lying on your back with your knees bent and
feet flat on the floor. Place a ball between your knees and squeeze. Slowly
bend your low back and tilt your pelvis towards the floor. Return to start
position.


Do you feel more pressure in your
shoulders than your stomach?

Improper alignment of the shoulders over
the elbows can cause abnormal strain on the individual’s tendons and ligaments
of the shoulder joint leading to possible injury. It is just as important to
ensure to keep the weight of your torso from sinking to the ground as well as
shifting forward during the plank. This can again place a shearing force across
the joint line of the shoulder and needs to be avoided. One exercise that can
help is the Scapular Push Up on a Table.
Plank on
Table with Scapular Protraction Retraction
Place both hands on the edge of a table and step your
feet back into a plank position. Slowly round your upper back, pulling your
shoulder blades apart. Next, lower your back down, squeezing your shoulder blades
apart.


Remember to breathe!

How often do we tend to hold our breath
when performing strenuous exercise? This sometimes can hurt you more than help
you. In our case with the plank, a deep exhale through pressed lips can help
tighten your core just before you lift up and continue to hold the ribs down to
prevent hyperextension at the back during the hold. Quadruped Diaphragmatic
Breathing drills can help you establish a good spinal position as well as core
contraction just from breathing!
Quadruped
Diaphragmatic Breathing
Begin on all fours. Breathe in, pushing your abdomen
down, then exhale and repeat. Make sure there is no movement in your chest or
shoulders as you breathe.

 Plank Progressions: 


Plank with Elbows on Table –> Plank on Knees –> Standard Plank

Plank with Elbows on Table


 Plank on Knees


Standard Plank

Blog post by Craig Moody.

Heart Rate and Recovery: Why is it important?


Do you know that feeling once you have
made it past the point of just “warming up” and beginning to feel out of breath
during your workout? Once you get feel that feeling do you ever notice how your
heart rate begins to increase? This occurs when the demand for fresh oxygenated
and nutrient rich blood is needed to be transported to the muscles performing
the arduous tasks. However if your heart muscle is weakened due to lack of
exercise, heart disease, or a neurological disorder, it can affect how well you
can perform as well as recover.
A research study by Michael S. Lauer, MD, (director
of the Cleveland Clinic Exercise Laboratory in Ohio and the lead researcher of
the study) found that individuals who had a heart rate (HR) recovery score of
<12 beats per minute (bpm) were at a higher risk of heart disease than individuals
whom had a normal HR recovery of 15 to 25+ bpm during an exercise stress test. (1)

How
can I test my Heart Rate Recovery Time?


You
can perform many different tests to increase your HR like riding a bike for a
set amount of time, walking on a treadmill or the track for distance, ERG rowing
machine, or just marching in place for 2 minutes. Most importantly you will
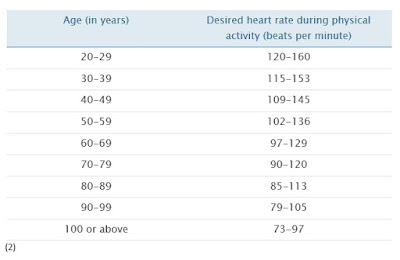
need to know your desired HR target should be.  The table below can give you an idea of
roughly where your target HR should be during test before completing the
exercise to measure your pulse for the recovery rate.

To
measure your recovery rate, take your pulse immediately upon finishing exercise
then measure 1 minute post and 2 minutes post exercise and compare your BPM
results. The bigger the difference the BETTER!

Here are a few
inferences:


  • If the difference between the two
    heart rates is less than 22, your real age of heart is slightly more
    than your biological age (that calls for lifestyle and dietary modification)
  • If the recovery heart rate difference
    is in between 22–52 beats per minute; your biological age (or calendar
    age) is approximately the same as that of your heart age/ real age
  • A recovery heart rate difference of 53–58
    beats per minute indicates optimal health, healthier heart and a real age of
    less than calendar age.
  • If the difference of your immediate
    post exercise heart rate and heart rate after 2 minutes is in the range of 59–65
    beats per minute, your heart is healthier and your real age is moderately less
    than your biological age.
  • With a difference of more than 66,
    your heart is very healthy and your physical age is a lot less than your
    calendar age. (2)

Blog post by Craig Moody.
References:
(1) https://www.webmd.com/heart-disease/news/20000919/researchers-find-heart-rate-worth-thousand-words#1

(2) https://www.med-health.net/Recovery-Heart-Rate.html

5 Quick Exercises to Help Correct Poor Posture

Look
Familiar?

We all know that we should all sit up
straight with our shoulders back and our feet under our knees, so why don’t we?
The effects of poor posture can include
but are not limited to:
  • Muscle
    spasms
  • Arthritis
  • Decreased
    Range of Motion
  • Nerve
    Entrapment
  • Spinal
    Disease/Dysfunction
  • Inability
    to Perform Daily Functions

Here are 5 quick exercises to strengthen
the core and help correct poor posture.

Pelvic Tilt

This exercise helps to flatten your
lumbar spine to help keep you from hyperextending your back while strengthening
your lower abdominal muscles.


Supine (Glute) Bridge

This exercise practiced with a pelvic
tilt, keeping a flat back, will ensure that you feel this in your gluteal
muscles rather than in your back from hyperextension.


1/2 Roll Thoracic Mobilizations

This exercise is used with deep
breathing so when you bring your elbows down and toward the table, exhale and
get as much stretch across the front of your chest and try to flatten your
upper back. This is where most individuals have rounded shoulders.


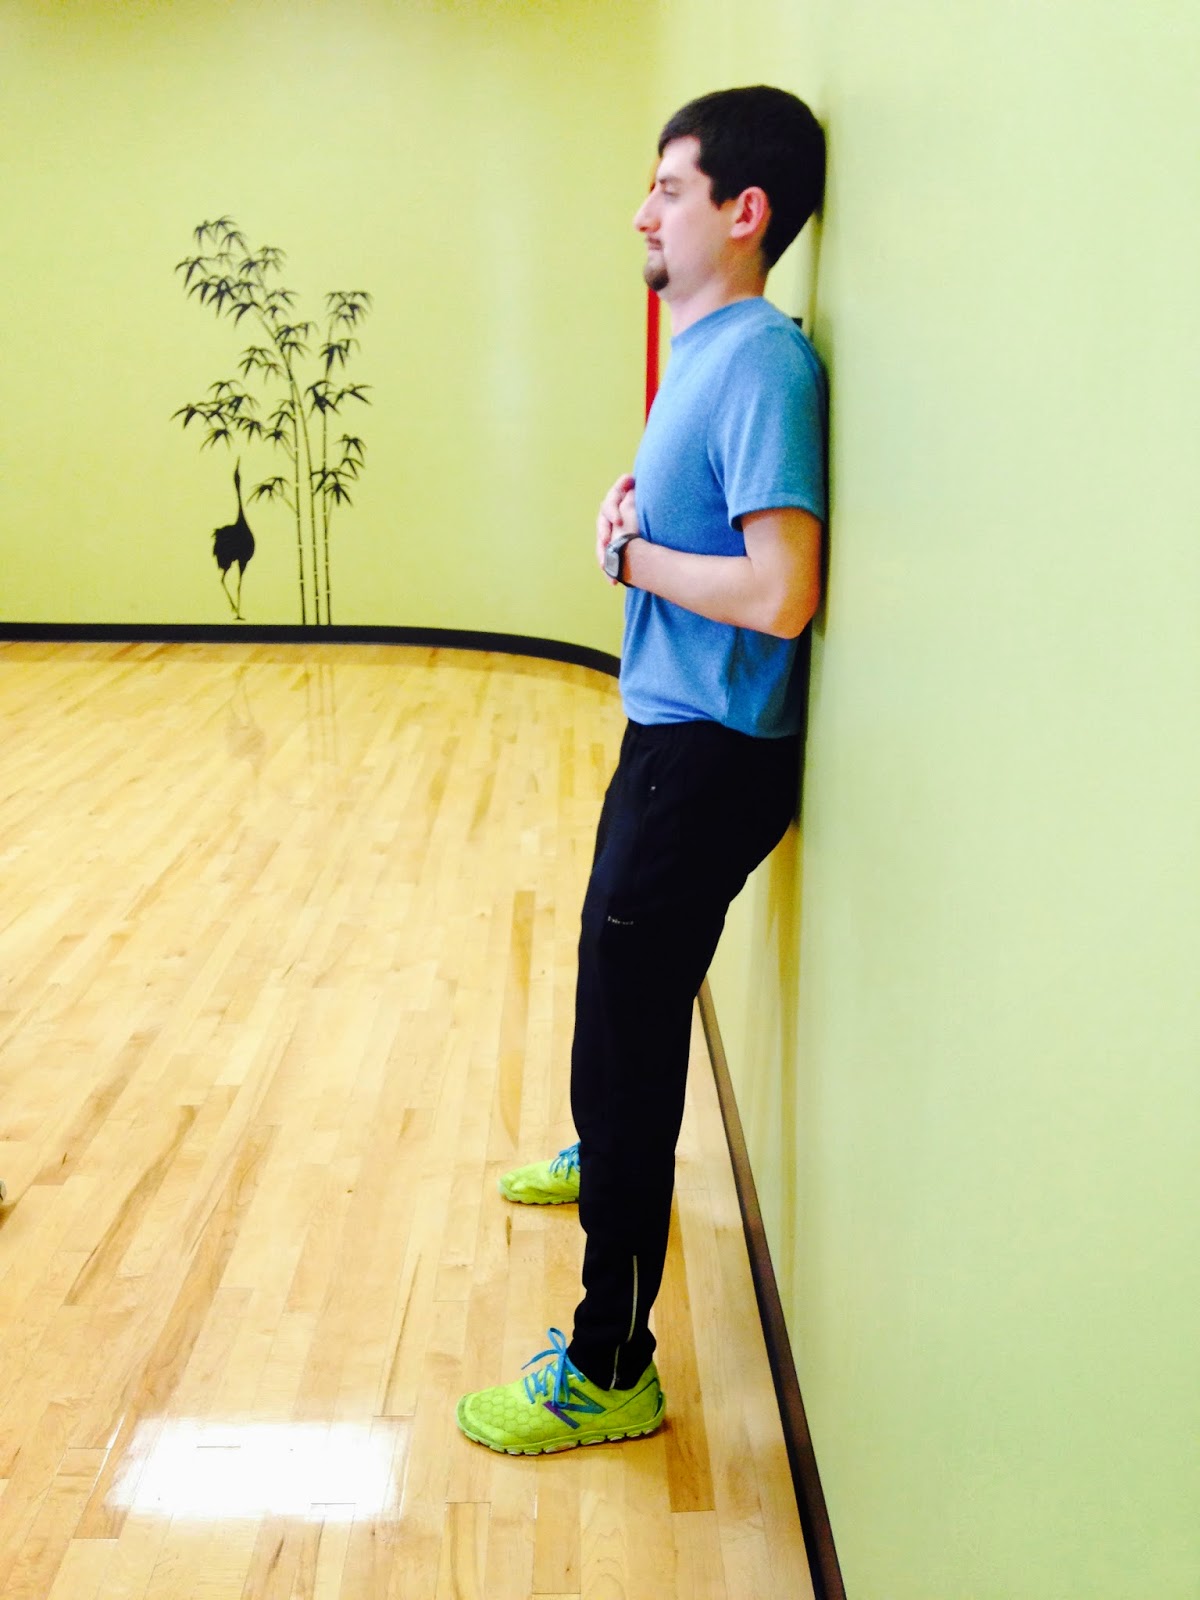
Back to Wall Breathing

Stand 8″ away from
wall. Set your core by doing a pelvic tilt then hinge your butt back to the
wall, flatten back up the wall from pelvis to shoulders one back bone at a
time, take a big breath in through the nose then exhale as if you were blowing
up a balloon in one try. You should feel a good contraction of you core muscle
if you maintain a flat back against the wall. 


Scapular Squeezes

By squeezing your shoulder blades
straight across this will help flatten out the rounder shoulders and help
improve the forward head posture that is caused by it.


Blog post by Craig Moody.
Calories: Why do I need them?

When we talk about how
much energy our bodies need throughout our day, we first need to understand
what energy is. We gain energy from our diets through the consumption of
carbohydrates, fats, proteins, and alcohol (in moderation). When these nutrients
are consumed, our bodies digest, absorb, metabolize and either use the energy
immediately or store it until it is needed for movement or exercise. A more
commonly known word for energy measurement within the body is Calorie (or kilocalorie).
Although Calories often
get a bad reputation for being the cause of weight gain, it is important to
remember that we need Calories to live and function. It is however more
important that we find ways to balance how many Calories that we consume a day
to that in which we need per day in order to control fluctuations in weight and
energy levels. As healthy active individuals we should think of Calories as our
energy needed for our daily living tasks and energy necessary for optimal
performance during exercise.
So you may be wondering,
“How many Calories do I need then?” This is a tough question to answer because
there are many different factors that influence energy balance for each
individual. Some common factors that affect energy balance are:
  • Age
  • Gender
  • Body Composition
  • Metabolic Rate
  • Tissue Growth
  • Intensity and Duration of Activity
Some general
recommendations for Caloric intake have been made and consensus among
researchers show that the amounts needed can be categorized into four separate
groups of individuals and their requirements. Below is a table that shows the
different groups and the recommendations that have been given to each.
Group
Requirements
Example**
Sedentary Men and
Non-Pregnant Women
Approximately 31
Calories / kg* of Body Weight                          
60kg x 31= 1860 kcal
Male and Non-Pregnant
Female Recreational Athletes
Approximately 33-38
Calories / kg* of Body Weight
(Low End) 60kg x 33=
1980 kcal
(High End) 60kg x 38=
2280 kcal
Endurance-Trained
Athletes
Approximately 35-50+
Calories / kg* of Body Weight. Needs vary depending on specific sport and
training regime.
(Low End) 60kg x 35=  2100
(High End) 60kg x 50=
3000 kcal
Strength-Trained
Athletes
Approximately 30-60
Calories / kg* of Body Weight. Needs vary depending on specific sport and
training regime.
(Low End) 60kg x 30=
1800 kcal
(High End) 60kg x 60=
3600 kcal
*  To convert weight from pounds to kilograms, divide
weight by 2.2.
**Example
132lbs / 2.2 = 60kg

Individuals who continually
consume too little Calories often do not consume enough nutrients which in turn
can cause a decrease in performance and overall energy levels. If low-Caloric,
low-nutrient diets put the individual at risk for muscle and bone mass loss,
inability to gain muscle or bone mass, fatigue, illness, menstrual changes, and
injury. For those who need to maintain a restricted Calorie diet should work
closely with a professional dietician to plan nutrient-rich, low Calorie diets
that will enhance their training performance while achieving training goals.


Blog post by Craig Moody.