Running and Knee Health

When it comes to knee health, running often gets a bad reputation
as being a cause for many ailments, the primary one being osteoarthritis.  However, as more research becomes available,
these claims are found to be increasingly baseless, showing that running at
reasonable volumes and intensities leaves the joint no worse for wear.  And according to some studies, possibly better
than before!

What the research tells us:
There are many studies suggesting that running is not detrimental
to the knees.  In one such study, 504
former collegiate cross country runners were surveyed to assess their levels of
hip and knee osteoarthritis.  The follow
up period for individuals was between two and fifty-five years, averaging
twenty-five years.  Of those assessed,
only 2% reported severe pain, and only 0.8% had surgery for their
condition.  They compared these results
to former collegiate swimmers, which had 2.4% reporting severe pain along with
2.1% having surgery (1).  The evidence
from this study suggests that there is no association between moderate
long-distance running and the development of osteoarthritis.  Additionally, it suggests that heavy mileage
and the number of years running are not contributory to the future development
of osteoarthritis.
That is all well and good, but those are former elite
athletes!  How about when compared to
people who do not run regularly? 
In another study, a group of male runners (who averaged 28 miles
per week over 12 years) were compared to male nonrunners to assess a variety of
factors.  The groups were compared in
perceived pain and swelling in the knees as well as the hips, ankles and
feet.  Additionally, radiologic exams
were conducted to assess osteophytes (bony outgrowths in joints), cartilage
thickness, and overall grade of degradation. 
There was no statistically significant difference between either group
for all measures, further suggesting that long-distance running is not
associated with premature join degradation (2, 5).
A more recent systematic review conducted in Australia sought to
analyze the effects of physical activity on the individual structures of the
knee joint.  After analyzing 1,362
studies, the data suggested that there is an association between physical
activity and osteophytes in the knee joint. 
However, this is not necessarily a bad thing, and could possibly be an
adaptation to the stimuli associated with exercise.  Additionally, the review states there is no
strong evidence on physical activity narrowing the joint space from cartilage
degradation.  In fact, there is strong
evidence for an inverse relationship between physical activity and cartilage
defects (3).  In other words, people who
are active have stronger cartilage in the knees than those who do not.  This is further supported by a Swedish study,
in which researchers gave people at risk of osteoarthritis a running program,
and by the end showed improved biochemistry of the associated cartilages (5).
It is also worth noting that factors such as gender, education and
mean exercise time do not appear to increase the chances of developing
osteoarthritis in the knee.  Despite
these findings, running is not an activity that everyone should participate in
without the proper guidance.  Various
factors such as genetic predisposition, higher than average BMI, and previous
damage to the knee can all increase the chances of developing osteoarthritis
(4).

What you can do to prevent damage to your knees?

If you are a runner and have not had knee problems, great!  Keep doing what you are doing.  
If you have had problems, here are some suggestions:

Try maintaining a stable BMI
Since it has been shown that having a high BMI while performing
repetitive exercise can be a risk factor towards osteoarthritis (4), it is
important to try having a consistent, average BMI.  Doing so will reduce the impact that your
feet and knees take.  Did you know?  Depending on the intensity, running can
create an impact of three to ten times a person’s body weight! (6)
Watch your form
Improper biomechanics can place increased strain on the lower
extremities.  Research suggests that
running with a slightly forward-leaning trunk reduces stress on the
patellofemoral joint (7, 8), which is the part of the knee where the thigh bone
and knee cap meet.
Increase volume/intensity gradually
Among runners there is a training philosophy called the “10%
rule”, in which during a training cycle weekly mileage does not increase by more
than 10% from week to week.  The rule has
validity, with one 2014 study showing that runners who followed this rule were
less likely to become injured compared to a group that increased their mileage
by 30% (9).

In conclusion:

If you are an experienced runner or someone who would like to
start and have no underlying knee issues, do not fear that running will damage
your knees.  That being said, always talk
to a healthcare professional before making major lifestyle changes.  Train smart, and above all, enjoy running!


Sources:
1.
Sohn, Roger S., and Lyle J. Micheli. “The Effect of Running on the Pathogenesis
of Osteoarthritis of the Hips and Knees.” Clinical Orthopaedics and Related
Research, no. 198, 1985
2.
Panush, Richard S. “Is Running Associated With Degenerative Joint Disease?”
JAMA: The Journal of the American Medical Association, vol. 255, no. 9, 1986,
p. 1152.
3.
Urquhart, Donna M., et al. “What Is the Effect of Physical Activity on the Knee
Joint? A Systematic Review.” Medicine & Science in Sports & Exercise,
vol. 43, no. 3, 2011, pp. 432–442.
4.
Chakravarty, Eliza F., et al. “Long Distance Running and Knee Osteoarthritis.”
American Journal of Preventive Medicine, vol. 35, no. 2, 2008, pp. 133–138.
5.
Neighmond, Patti. “Put Those Shoes On: Running Won’t Kill Your Knees.” NPR,
NPR, 28 Mar. 2011
6.
Elert, Glenn. “Force on a Runner’s Foot.” E-World, 1999,
hypertextbook.com/facts/1999/SaraBirnbaum.shtml.
7.
Teng, Hsiang-Ling, and Christopher M. Powers. “Sagittal Plane Trunk Posture
Influences Patellofemoral Joint Stress During Running.” Journal of Orthopaedic
& Sports Physical Therapy, vol. 44, no. 10, 2014, pp. 785–792.
8.
Teng, Hsiang-Ling, and Christopher M. Powers. “Influence of Trunk Posture on
Lower Extremity Energetics during Running.” Medicine & Science in Sports
& Exercise, vol. 47, no. 3, 2015, pp. 625–630.
9.
Nielsen, Rasmus Østergaard, et al. “Excessive Progression in Weekly Running
Distance and Risk of Running-Related Injuries: An Association Which Varies
According to Type of Injury.” Journal of Orthopaedic & Sports Physical
Therapy, vol. 44, no. 10, 2014, pp. 739–747.
Blog
post by Robbie Papapietro.

Prevention & Treatment of Shin Splints

Shin splints are a painful condition caused by microtears of
connective tissue at attachment sites in the tibia (lower leg bone) from
overuse or mechanical stress.  Symptoms include
pain and tenderness along the front of the shin (tibia) and when chronic or
severe, may be accompanied by swelling and the presence of ridges or bumps
along the front of the bone. 
Muscle weakness, stiffness, and poor alignment of the lower
extremity joints (such as flat feet) and use of non-supportive shoes may predispose
you to developing shin splints particularly if training or activity is accelerated
too quickly, you walk/run on hard, ramped or uneven terrain, or you play a stop
and go high impact sport such as basketball. 
Shin splints can side line even the most seasoned athlete. 
To prevent and treat the condition try the following
exercises.  Stretches should be held for
a minimum of 30 seconds to allow time for tissue elongation and to avoid reflex
shortening. Repeat 2-3x, 3x/day. Strengthening should be done 10-20 repetitions
for 2-3 sets daily.  Icing, kinesiotaping,
and non-steroidal medications may be helpful in the management of pain.  Consult your physical therapist for
assessment and always speak to your doctor before taking any medication.

Stretching

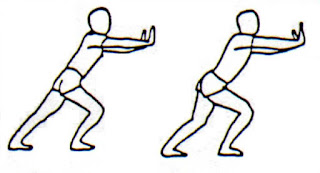
Calf stretch
(gastrocnemius)
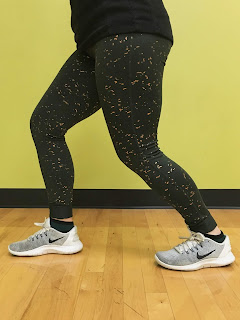
Stand upright holding chair or
hands on wall for support with one leg behind you, foot flat and pointed
straight ahead.  Keeping back heel down
and knee straight, bend front knee. 
Stretch will be felt in calf and Achilles. 

Tip: Tighten abdominals and don’t lean forward
with trunk.


Soleus stretch
Stand upright holding chair or with hands on wall for support with one leg
behind you, foot flat and pointed straight ahead.  Keeping back heel down, bend BACK knee.
Stretch will be felt in lower part of calf deep under Achilles tendon. 

Tip: If you cannot keep your heel down,
shorten your stride.


Toe stretch (toe
flexors and plantar fascia)
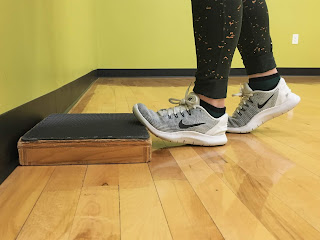
Place 2-3” book or small
platform/step against wall.  Place toes
against edge of step. Keeping knee straight, lean towards wall. Stretch will be
felt in arch of foot.


Dorsiflexor
stretch (tibialis anterior)
Sit on knees on cushioned surface
with ankles pointing down.  Sit back on
heels to stretch front of foot and ankle. 
Leaning back with upper body will intensify the stretch. 

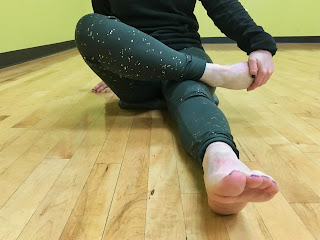
If unable to
kneel, or if ankles are too tight, sit up with foot crossed in front of you and
use your hand to pull ankle and foot downward. 

Strengthening

Ankle
Dorsiflexion (anterior tibialis)
Long sit on
bench or floor. Anchor tubing away from you with loop around foot.  Keeping foot and ankle aligned with toes
facing up, flex ankle up towards you to the count of 2, and return down to the
count of 4.  

Tip: To maintain proper alignment, keep 2nd toe in line with your shin bone.


Wall Toe Raises
(toe extensors and anterior tibialis)
Stand with back
against wall, feet slightly away and facing forward.  Lift toes off ground keeping knees straight.
Hold 5 sec.  

Tip: If unable to raise, toes, bring feet a little
further from wall.


Calf Raises
(gastro-soleus)
Stand with feet
shoulder width apart. Go up on toes to count of 2, lower to count of 4. 
Challenge yourself by doing on one leg.  

Tip: To progress
strengthening through greater range of motion, do off edge of step.


Toe Curls (toe
flexors and plantar fascia)
Sit in chair. Place
towel on tile or wood floor.  Position
bare foot on towel.  Keeping heel down,
curl toes to “scrunch” towel. 


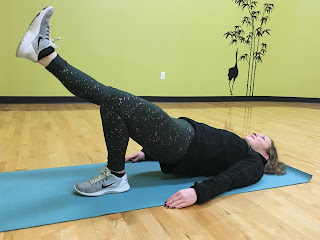
Single Leg Bridge
(gluteal muscles)
Lie on your back with knees bent and feet on floor.  Straighten one leg keeping thighs in line.
Tighten abdominals and lift hips off ground using bent leg. Keep pelvis
level.
  Hold 5 sec.  

Tip: If too difficult, keep both feet on floor while lifting hips.


Heel to toe
walking
Start in standing position. Step out with
right foot flexing ankle toward you as your foot contacts the ground.  Transfer weight to ball of right foot, go up
on toes, then step forward with the left foot contacting heel first with ankle
up.  Repeat cycle.


Blog
post by Jody Coluccini PT DPT.

About Jody Coluccini PT DPT

Dr. Coluccini received her Doctorate with distinction from Arcadia
University and her BS in Physical Therapy from Boston University. She brings 39 years of continuous clinical orthopedic, sports and geriatric physical therapy
experience to patient care. Prior to relocating to Cape Cod, Dr. Coluccini
owned a successful private practice in NY and is currently licensed in both New
York and Massachusetts. Jody believes that successful rehabilitation is a
collaborative effort between the therapist and patient achieved by mutual trust
and respect, constant therapeutic reassessment, mutual goal setting and patient
compliance. She understands that being “fit” as one ages or returns
from injury or illness requires a constant modification of goals and activity.

The Great Debate: When to use heat and when to use ice


Different methods of heat and ice
therapy prove to be an effective and inexpensive way to provide relief. When is
it good to heat and when is it beneficial to use ice? The correct use of heat and ice at the proper time can aide in reducing recovery time.
Let’s first understand what heat and ice
do. Ice constricts blood flow to muscles, thus decreasing swelling, bruising
and discomfort. As the muscle cools, the amount of blood in the muscle
diminishes as the constriction process pushes it out. As the muscle warms and
the blood vessels expand, new blood comes rushing in and cleans the debris left
behind from the injury and stimulates the healing process. As a general rule of
thumb, icing is best for acute injuries.
The application of heat therapy
stimulates blood flow to the area, which brings restorative oxygen and
nutrients. Additionally, heat can inhibit the transmission of pain signals to
your brain and decrease your stiffness. Heat is generally not a good idea for
new injuries because it can make the swelling and inflammation worse. Heat can
work very well for chronic pain, relaxing muscles before exercise.
A common problem area for many people is
the low back. Chronic pain can be debilitating and extremely uncomfortable. So
what might be best for chronic low back pain? There is no straight forward
answer; it may be trial and error until you find a remedy that works best for
you. But when it comes to exercise, many people with chronic back pain find
heat therapy helps to warm up their muscles beforehand, while cold therapy
helps with pain and inflammation afterwards.
The chart below identifies some common
reasons for pain and which treatment is most beneficial. Remember if you have
any serious injuries consult with a doctor before self-diagnosing.

Blog post by Farran Jalbert.

Marathon Training Tip #13: Try Kinesiotaping


What is Kinesiotape and how can it help?

You’ve probably seen it in the Olympics,
the “magic tape”, but what does it really
do?
Kinesiotape is a multi-purpose tape that
physical therapists will sometimes use to aide in rehabilitation following an
injury. This tape can be used to assist muscle movements, inhibit other
muscles, reduce swelling, reduce scar tissue, and improve overall muscle function
and joint kinematics. Kinesiotape actually refers to a specific brand of tape,
but in reality there are several other brands that offer similar benefits-
Rocktape, and Bodytape for example. This type of tape offers much more mobility
than other kinds of more restrictive tape which can be used to stabilize
joints.
There are several different taping
techniques that we use as physical therapists. If you have an area that is
really swollen following an acute injury, we can actually basket weave the tape
to assist with lymphatic flow. For this technique, you can cut the tape as
shown- with strips, or “tentacles”. I recommend cutting 6-8 strips/strands if
you’re using the wider (4 inch) tape, or 4 strips if you’re using the narrow (2
inch) tape. Find the area that is most swollen, and apply the tape with zero
stretch over this area. Avoid applying the tape to sensitive areas (behind the
knees, inner elbow, or face).
Here’s another technique we will
commonly use if you are having knee pain. This technique works to more so
stabilize your knee. You will need 3 strips of 2 inch tape for this technique. Cut
one strip to about 2 inches in length, and the other two to 4 inches in length,
then round the edges. Starting at the body area directly below your knee cap,
anchor one piece of tape with no stretch on the ends, then apply 50% stretch as
you encircle your patella on the inside. Repeat this procedure with your other
4 inch strip of tape, on the outside of your knee. For the final strip, you’re
going to want to apply 50% stretch to the middle portion of the tape, and apply
it directly below your patella.
Another technique that we commonly use
in runners in this technique for plantar fasciitis/arch support. You will need
1 piece of 2 inch tape cut about 4 inches long, and 2-3 pieces cut 2-3 inches
long. With your foot flexed (toes pulled up towards your shin), tape from the
ball of your foot towards your heel. Then apply 2-3 strips at your arch. The
middle of the tape should be stretched to 50%, then no stretch on the ends. You
can also perform this taping technique (or have someone else help you) in a plank
position in order to get your toe involved.

What if you have sensitive skin?
Although skin irritation can happen, it is extremely rare. If you have
sensitive skin, it is possible for you to have some irritation from the tape,
but if this occurs gently take off the tape with soap and warm water.
Generally, we recommend that you take the tape off after 3-5 days of wear. If
you know you are usually sensitive to adhesives, you may want to actually take
the tape off sooner.

Here are some general guidelines that
you should follow if using this tape:

  1. Wear the tape for 3-5 days maximum at a
    time, if you have sensitive skin, you may want to wear for a shorter period of
    time.
  2. When removing the tape, do not just rip
    it off, this may damage the underlying skin. Instead, hold the skin, and roll
    of the tape. Soap and warm water, or baby oil can also be helpful in tape
    removal.
  3. You may wear the tape in the shower or
    in the water- but if it gets wet do NOT blow dry the tape- this will activate
    the tape and you could burn your skin.
  4. If itching or discomfort occurs with the
    tape, do not hesitate to take it off immediately.
  5. It is OK to exercise and perform all
    regular activities while you are wearing the tape.
  6. If the skin surrounding the tape is
    showing redness/irritation remove the tape immediately.
  7. If the skin under the tape starts to
    feel numb/tingly remove immediately.
  8. Do not tape over numb areas or areas
    with poor sensation.
  9. Shoes/socks/other clothing can be worn
    over the tape- never apply the tape over clothing.
  10. Do not use tape over areas where you’ve
    been treated with radiation, or if you have history of cancer without first
    checking with your doctor.
  11. Tape comes in different colors/patterns,
    feel free to choose based on your color preference. The color and/or pattern of
    the tape has no bearing on the strength or effectiveness of the tape.

As always, if you are unfamiliar with
taping, or are unsure if taping could benefit you, make sure you have a
physical therapist show you how to apply the tape properly. If you are taping
yourself, and you’re experiencing pain or itching- take it off!

How to Kinesiotape for Knee Pain


How to Kinesiotape for Foot Pain, Plantar Fasciitis & Arch Support


How to Kinesiotape for Swelling of the Foot


Blog post by Tiffany Sadeck.

About
Tiffany Sadeck PT DPT CSCS

Tiffany is a member of the Cape Cod
Rehab Running Team with a Doctor oh Physical Therapy degree.  She is also a Certified Strength &
Conditioning Specialist with a long history of running which began her freshman
year of high school.  A 3-season athlete,
Tiffany was captain her junior and senior year and went on to run Division 3
Cross Country and Track & Field at Springfield College.  She competed in events ranging from the 800-2
mile and high jump.  Tiffany began
running longer distances up to the marathon two years ago and would like to
help runners to help better times and meet goals while preventing injuries and
maintaining a fun, friendly training environment.

Marathon Training Tip #12: Recover from Shin Splints


Mention the term “shin splints” and almost every runner recalls
experiencing pain in the lower leg associated with running.  The term itself is non-specific and is what
we call a “waste basket” term.  Pain in
the lower leg usually can be identified as Medial Tibial Stress Syndrome
(MTSS), stress fractures and exertional compartment syndrome.
MTSS occurs on the inside edge of the lower leg bone (tibia).  It is usually tender to touch mid-way between
the knee and ankle or in the lower 1/3 of the leg.  This injury usually occurs with runners new
to the sport, running on hard surfaces, training errors—doing too much too soon
or increasing distances too rapidly, muscle imbalances or biomechanical faults
especially excessive pronation.   The
source of the pain is usually either inflammation of the tissue that lines the
bone called the periosteum, or the posterior tibialis tendon that runs along
the inside of the bone to the foot. 
Left untreated or pushing through this injury can lead to a stress
fracture of the tibia, a small crack in the bone.  X-rays are usually not necessary and the
stress fracture doesn’t usually show up for 2-3 weeks and either an MRI or bone
scan is needed to find it.  Women are 2-3
times more likely to experience this problem than men and should be certain
that their vitamin D and calcium intake is sufficient.  If stress fractures are recurrent, a full
medical work up is necessary to rule out other potential causes.
MTSS often develops when the Achilles tendon and Soleus muscle are
tight and or weak.  Performing stretching
and strengthening exercises to correct that problem often eliminates the
problem.  Most runners know how to
stretch the Achilles tendon but often are unfamiliar with stretching the
soleus.
If the lower leg pain is on the top or outside of the bone, the
anterior tibialis muscle may be the culprit. 
If the pain worsens during the run and the foot gets numb and the ankle
gets weak, so weak that it is difficult to lift the toes up with the heel on
the ground, exertional compartment syndrome may be the problem.  The muscles, nerves and blood vessels are
grouped in what is known as a compartment. 
If the pressure builds in the compartment the muscle can swell and the
nerves and blood vessels become compressed to the point the ankle loses
function.  Usually only present during
running and resolves shortly after stopping, but left unchecked may require
surgery to relieve the pressure.

Follow these tips at the first sign of lower leg problems:

  • Ice the area after running.
  • Stretch the Achilles and soleus.
  • Strengthen the lower leg muscles, core and hips.
  • Run on softer surfaces like a trail or track.
  • Correct excessive pronation with an arch support.
  • Replace shoes if worn excessively.
  • Cross train in pool or elliptical until pain lessens.
  • Still a problem after 2 weeks? 
    See a Physical Therapist or Sports MD.

Watch the video for a 3 exercises to
help you recover from shin splints…

Blog post by Joe Carroll.


About
Joe Carroll PT DPT SCS

Joe is a Doctor of Physical Therapy and
co-owns Cape Cod Rehab with his wife, Kathy. One of the first PT’s in the state
to be certified as a Sports Clinical Specialist (SCS), Joe is also a Master
Instructor in the Burdenko Method. He continues to run and support local road
races every year and knows what it takes to help athletes get to the level they
desire. Joe is a 5-time Boston Marathon finisher and ran his 7th marathon on
April 18, 2016 at the Boston Marathon raising money for Boston Children’s
Hospital.

Marathon Training Tip #11: Treat Plantar Fasciitis

What is Plantar Fasciitis?


The plantar fascia is described as a thick fibrous bands of
connective tissue that originates from the medial aspect of the heel through
the sole of the foot and inserts at the base of each toe. It is a shock
absorbing bowstring supporting the arch of the foot.
  For
runners the plantar fascia
 can be a source of major discomfort causing stabbing pain at the
base of the heel and aching throughout the arch of the foot. It affects the
push off mechanism of the foot and produces pain during push off phase while
running.
  It can also cause stabbing pain in the morning during the first
few steps getting out of bed.
Plantar fasciitis was originally thought to be an inflammatory
condition but recent research has found it is non-inflammatory breakdown of
tissue as a result of repetitive microtrauma and the name of the condition may
eventually be renamed to plantar fasciosis.
  There
are also studies discussing the tension on the flexor digitorum brevis and its
resultant forces on the plantar fascia contributing to plantar fasciitis pain.
Diagnosis of plantar fasciitis would be tenderness to touch along
the medial aspect of the calcaneus (heel bone) on the soul of the foot.
Tenderness can also be present along the medial arch when palpating the edge of
the fascia.
 The condition is also accompanied with tightness in the calf or
Achilles causing a decrease in Dorsi flexion. Strength of the flexor digitorum
brevis can also be a factor. In one third of all plantar fasciitis patients,
the condition is bilateral.

While plantar fasciitis is thought to be caused by being flat
footed, and flat footed runners have higher occurrence rates, it is not
clinically proven that fallen arches are predisposing factor. Runners of all
arch height can be affected by this condition.

Treatment

Treatment of plantar fasciitis can come in many forms. There is
strong evidence supporting manual therapy including self-mobilization of the
ankle joint and toes as well as self-soft tissue mobilization of the plantar
fascia itself.
Stretching of the gastroc as well as Soleus components
of the lower extremity also have strong supporting evidence of improving
plantar fashion conditions. Stretching of the sole of the foot
 by
pulling the great toe back is another treatment technique that is supported by
strong evidence.
For those runners with significant morning pain, night splints
have also proven to be successful in reducing plantar fasciitis pain. Foot
orthoses with a supportive arch are also clinically proven and have strong
evidence of improving this condition.
Other external treatment alternatives which have good supporting
evidence
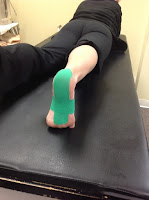
 are anti-pronation taping of the plantar aspect of the foot as
well as kinesiotaping of the arch of the foot. 
RockTape shows an example below:
Strengthening of the flexor digitorum brevis will also help in the
treatment of plantar fasciitis conditions. Different ways to perform
strengthening exercises for the flexor digitorum brevis include a simple
exercise such as picking up rocks or marbles with your toes or trying to
scrunch a towel or pick up a hand towel with your toes.

Prevention

While treatment of plantar fasciitis is a good thing to know,
knowing how to prevent it in runners is probably more important. Changes to
increase mileage to quickly as well as increase in hill training are common
flaws that can lead to plantar fasciitis conditions. Making sure you have good
ankle joint flexibility to perform Dorsi flexion as well as well stretched
lower extremities and a strong flexor digitorum brevis will also help prevent
this annoying condition.

Watch the video for some self-help treatment techniques…


Blog post by T.C. Cleary.

About
T.C. Cleary PT DPT SCS

T.C. is a member of the Cape Cod Rehab
Running Team not because she enjoys running herself, but because she is one of
the select few PTs in Massachusetts to be Bard Certified in Sports Physical
Therapy. An ice hockey player and coach, T.C. particularly enjoys working with
high school and college athletes. She believes in treating everyone the way you
would want your child or mother treated and employs many different
interventions to obtain maximum recovery. T.C. also has special interest in
Anterior Cruciate Ligament (ACL) Injury Prevention & Treatment along with
Concussion Management.

Marathon Training Tip #10: Reduce Knee Injuries


Pain is a language.  Ignore it and you will more often than not
pay the price.  Most running injuries are
not traumatic, but present over time beginning with pain during the activity of
running and progressing to pain during and after a run.  Acting at the first warning sign will shorten
the recovery time and reduce any down time that might be necessary.  If you ignore pain more likely than not
symptoms will worsen and more time will be lost from your training.  If pain worsens to the point that it is
painful with normal daily activities or keeping you awake at night, you should
seek a professional evaluation.
The knee is a complex joint and primary
shock absorber for running.  Approximately
12 times body weight is absorbed with each stride.  Patella-femoral
injuries
, sometimes referred to as Runner’s
Knee
occur if we land with our knees extended or do not have strong
quadriceps and hamstrings along with a flexible Achilles tendon to absorb
shock.  Landing toward the midfoot with a
slightly flexed knee and performing strength training exercises can help
minimize this injury.  Follow this link
to learn a series of strength training exercises for runners using a simple piece
of equipment: 
https://mashpeefitness.blogspot.com/2016/08/cape-cod-rehabs-ccm-training-tip-6.html

Training Errors

Increasing the number of times you run
per week and or number of miles per week is the biggest culprit.  When injury does occur it is best to modify
your schedule and remember the ultimate goal is to be healthy come race
day.  Missing a week of scheduled runs is
preferable to pushing through and worsening the injury.  If you can keep the pain level below a 4 on a
1-10 scale during a run, 10 being terrible pain, it is usually safe to continue
on a reduced frequency and duration schedule. 
Increase non-impact activities to either help recover following runs or
to substitute if pain is greater than 4 or present at rest.  Highly recommended is water running.  If a pool is not available then try the elliptical trainer or
spin bike for low impact cardiovascular conditioning.

Biomechanical Faults

“Stay in your hinges.” The late Dr. Rob Roy McGregor, sports
medicine pioneer coined that phrase and simply means to run with good
alignment.  When alignment is off, the
stress on the knee will be magnified with each stride.  If you have arches that collapse (excessive
pronation) the inside of your lower leg and inside of your knee is susceptible.  If you tend toward valgus (knock knee) or
varus (bow legged) you are susceptible for
Iliotibial band (IT band)
issues.  

Strengthening
the outside of the hip is often overlooked, but is key in preventing and
recovering from many knee injuries.  Here
is a link with an exercise called Scooters used to strengthen the hip abductors: 
https://mashpeefitness.blogspot.com/2014/11/5-burdenko-strength-exercises-for.html

Proper shoes as well as arch
supports are important as well as correcting any muscle imbalances.
Use a common sense progression of 10%
per week in your training, correct and condition the muscles that cross your
knee joint, listen to your bodies signals and your knees will carry you many
miles without a problem.

Watch the video for a few simple self-help
techniques…


Blog post by Joe Carroll.

About
Joe Carroll PT DPT SCS 

Joe is a Doctor of Physical Therapy and
co-owns Cape Cod Rehab with his wife, Kathy. One of the first PT’s in the state
to be certified as a Sports Clinical Specialist (SCS), Joe is also a Master
Instructor in the Burdenko Method. He continues to run and support local road
races every year and knows what it takes to help athletes get to the level they
desire. Joe is a 5-time Boston Marathon finisher and ran his 7th marathon on
April 18, 2016 at the Boston Marathon raising money for Boston Children’s Hospital.

Why do you exercise?

Last month we asked our members, trainers, physical
therapists, and office staff “Why do you exercise?”  We received numerous responses.  Everyone has a different reason and motivation
to work out.  Some of us love it.  Some of us hate it.  We know we have to do it.

Below is an essay Anna
Cavanaugh, a Cape Cod Rehab Physical Therapy Aide, shared with us about regarding the topic…
Transforming society by optimizing movement to improve
the human experience
“Physicist Sir Isaac Newton’s First Law of Motion states: An
object at rest tends to stay at rest and an object in motion tends to stay in
motion, unless acted upon by an external force. When this law of motion was
first introduced in the 1600s, Newton
used it to explain how mass behaves in a system free of external forces such as
friction or gravity. As a recent graduate interested in physical therapy, I
view this law not only applicable to physical objects and systems, but also to
the work of physical therapists in rehabilitating, managing and preventing of
injuries for people in our society.
As an athlete, I fully appreciate the need to stay active,
flexible, and strong for muscle and joint health. I am committed to improving
the human body and how it moves and stays mobile at any age in order to empower
individuals to be able to lead independent and dynamic lives, especially with
the sedentary lifestyle of many today. As a future physical therapist my goal
is to embody this philosophy through education, commitment and innovation.
Education is the foundation to a successful recovery and
enhancing a patient’s wellbeing. I want to help people heal, but first, I want
them to understand how they became injured. Making this a more active process,
I want us to work together to restore their health and prevent future injuries
and complications through proper demonstration and practice of exercise
techniques. To establish this plan of action, I plan to treat the people I work
with as “students” interested in learning about their body and injury
prevention, as opposed to “patients”, where they might think of it as
a one-way experience.  In doing this, I
hope to create a different level of engagement and involvement, which allows
them to continue independently long after their treatment is complete. It is
critical to empower a patient with knowledge and confidence in order to
encourage them to take charge of their own therapy.    
Among many goals that people have in their lives, the
ultimate goal is to live a pain-free life, and I am committed to making that
happen for people as the second step in my vision as a physical therapist. As a
competitive swimmer, I learned the best way to stay pain and injury free is
through self-discipline in developing good technique. I want to help my
“students” live their lives without restrictions or pain. Knowing
effective techniques of any exercise is vital in order to be able to practice
and perform effectively.  My approach to
this is to be positive and encouraging to make therapy and exercise enjoyable
without pain so they do not avoid workouts.
A third component of my philosophy is to incorporate
innovation into my practice. The body is fascinating with its ability to
perform complex and connected moves as one through whatever motions we desire.
When the body is not able to perform the motions that were so effortless in our
youth, problem solving is key to finding the route of the issue and figuring
out ways to strengthen and rehabilitate the individual back good health. An
important consideration for this is that we live in a society where
advancements in science and medicine are constantly changing.  It becomes our responsibility to stay abreast
of this new information and to incorporate it into new treatments, techniques,
and exercises. By incorporating more innovative and individualizing techniques,
I will help my patients move toward better functional lives. 
In Newton’s
third law, he stated: “for every action there is an equal and opposite
reaction.” Concluding with another fundamental physics law, it is important to
help the patients become aware of the fact that the more work that one puts
into his or her own recovery the greater the results he or she will see over a
lifetime. While not everyone is, or aspires to be an athlete, a few minutes of
exercise daily is a step on the road to higher mobility. In today’s lifestyle,
where food is readily available and a high level of activity is not required to
stay alive, many may atrophy into weaker versions of their intended selves,
which is detrimental to their bone mass and musculature. In wanting to
transform the health of society, one patient at a time, I hope to challenge and
motivate individuals to lead more active lives and encourage people to invest
in their own health and future. I wish good health and wellbeing for those I
treat through our work together, and envision that I can make becoming strong
and fit contagious.”
Think about it.  Why
do you exercise?

Blog post by Jen Skiba.

The Barefoot Running Fad

We’ve all heard of
or at least seen Vibram’s FiveFinger minimalist shoes. Maybe you’ve even tried
them. But do you know about the new barefoot running fad? Minimalist running
shoes can be a segway into barefoot running or a protective alternative, but
the theory behind the two is the same: barefoot/minimalist running can
(according to some) help prevent common running injuries while strengthening
your ankles, knees, and legs.
According to some
researchers, running sneakers, while commonly accepted as the norm, may
actually be doing more harm than good. Recent studies have shown that modern
running shoes can cause excessive pronation and put extra stress on joints such
as knees and hips. They can restrict the natural torsion of the foot and
increase the likelihood of heel striking, which is landing directly on the heel
when the foot is planted while running.
Running without
modern running sneakers, on the other hand, allows for the natural movement of
the foot. Barefoot running is, after all, the most natural way for humans to
run isn’t it? Think about it: humans have been running for survival for
thousands of years, the vast majority of those without today’s Nikes. And there
were no podiatrists or physical therapists around centuries ago to help heal
Achilles tendon problems or ITB issues; those occupations arose out of need
when these running injuries became chronic, which happened around the same time
that we as humans began doing everything in sneakers. Without sneakers, the
foot tends to heel strike less and land on the forefoot more. This allows for
better shock absorption through the stride. Running barefoot, especially on
uneven surfaces, also strengthens the feet as well as the legs as a whole.
So, barefoot running
seems like an easy fix for all of your running injuries, right? Not quite.
While there are many scientists and prominent runners who promote barefoot
running, there are still some who are hesitant about it. Depending on what kind
of surface you’re running on, running barefoot can lead to cuts and blisters on
the bottom of your feet (that’s why minimalist shoes like the FiveFinger are
more popular than regular barefoot running).
More importantly, if
you jump right into barefoot running it can lead to worse injuries than the
ones you might be trying to avoid by running barefoot in the first place. If
you’re interested in trying it out, it is important to take baby steps when
beginning barefoot running. Add on a few minutes of barefoot running on grass
to the end of your run and gradually work up to running more and more time
barefoot. Eventually, you’ll be able to do more barefoot running than shod
running!

Blog post by Summer 2014 Intern Kim Bolick.

The Concussion Debate

The prevalence of sports related concussions has steadily been on
the rise with the increased levels of athletic participation. According to ‘BrainLine.org’ “An estimated
1.6-3.8 million sports- and
recreation-related concussions occur in the United States each year. During
2001-2005, children and youth ages 5-18 years accounted for 2.4 million
sports-related emergency department (ED) visits annually, of which 6% (135,000)
involved a concussion.” Immediate side effects include headaches, dizziness,
nausea, vomiting, as well as slurred speech. Some more delayed side effects
include memory complaints, noise and light sensitivity, smell and taste
disorders, post-concussion syndrome and psychological problems (Mayo Clinic,
2014).
While tuning into the World Cup finale of Germany v. Argentina, there were multiple
instances where players faced concussions. This adds to the ongoing debate
within the game of soccer as to whether or not headgear should be necessary for
all ages. Germany’s
Christoph Kramer was involved in a brutal collision with an Argentinian player
in the early minutes of the game. Clearly affected by the blast, Kramer was
assessed by medical staff members who allowed him to remain in the match until
he was unable to physically maintain. In the 56th minute Argentinean Gonzalo Higuain was
involved in a rough challenge with goalkeeper Manuel Neuer. Higuain too was
shaken up in this collision. So this raises the question as to whether or not
headgear should be required in the game of soccer?
Although headgear is not inevitably going to eliminate the risk of
concussions or head injuries sustained, it will lessen the severity of the
injury. Some may argue that it will change the nature of the game or influence
the path of the ball but isn’t the most important aspect of sport to protect
our players – especially the children. A brain is rich in development during
the childhood years and suffering a concussion alters one’s brain function. Any
measure that could potentially protect our brain should be taken and future
research should delve deeper into this headgear intervention.
Not only does headgear have physical injury prevention benefits
but it may also influence mental health. It is believed that this added
protective equipment may improve levels of confidence on the field. When
players feel more comfortable on the pitch they are more likely to go into
challenges with more effort and grit. As covered by NBC News on an interview
focusing on concussion prevention, a woman soccer player stated, “I had extra
confidence, extra confidence that allowed me to play more aggressively.” Sports
psychologists may even relate this enhanced level of confidence to better
performance outcomes.
So there is a decision to be made – purchase the $45 headguard and
reduce the probability of a head injury or play the game and take the chance of
suffering a full-blown injury?

Collision: https://espn.go.com/video/clip?id=11211372 (0:20 mark, 1:25 mark)

Blog post by Evan Healy.

Got Back Pain?

It seems that at some point everyone encounters lower back pain and it can be a result of a number of different issues. Some are more serious than others but some of the
common causes can be corrected with simple stretches and strengthening
exercises.

Common causes of low back pain are:
tight hip flexors, weak abdominal muscles, and weak gluteal & lower back
muscles. This could be a result of excessive sitting, driving, bad training
habits, and overall laziness or “inactivity”.
Although pain can be attributed to a number
of different variables, hip tightness is a quite common reason. This is due to
the hip flexors anterior pull on the pelvis when excessively tight, creating a
more arched lower back. This exaggerated arch causes excessive pressure on the
posterior portion of the lumbar spine. Consequently that hip tightness can
actually inhibit the use of your glute muscles making them small and weak. Not
to mention, it forces your gut forward maybe making your appearance not as
flattering as you’d like.


“So your saying my gut looks bigger and
my butt smaller?!”
Yes I am. If your hip flexors are very
tight, it can actually impede the activation of your large gluteal muscles on a
daily basis and force your hamstrings to do all the work.
So if you’re an individual that doesn’t feel any glute soreness after a workout loaded with a bunch of squats and lunges,
then either your form is incorrect or your flexibility 
isn’t where it needs to
be to properly engage the correct muscles.
Strong gluteal muscles help absorb
impact on the spine, as well as keep it in proper 
stable alignment. If you experience lower back pain or you just can’t seem to strengthening your butt,
have a trainer or physical therapist check your hip flexors’ flexibility by performing the Thompson
Test.


If your thigh and trunk maintain
alignment with the table, your hip flexors are in a good flexible range.
If not, the first step is to stretch
this area. You can stretch the hip flexors by actually doing the Thomas Test
shown above or you can try these two alternatives:


The
next area to strengthen is the core & lower back. A plank or modified plank
is a great way to isolate those muscles while maintaining proper posture. As
you get stronger, progress this exercise by alternating straight leg lifts in
the plank position, this will add some new challenges of balance and glute
strengthening. Make sure when performing a plank that you don’t drop your hips
causing an arch in your lower back. You want to maintain a straight flat back
or a slightly rounded one (butt a little higher) to protect yourself when
beginning this exercise. 


Modified Plank
Plank
Plank with alternating Leg Lifts

Another
exercise that focuses in on these specific areas is quadruped reciprocal extension. Start by positioning yourself on all fours (hands and knees) with
hands underneath the shoulders and knees under the hips. Next engage the
abdominal muscles by tightening your core, then extend and straighten, one leg and arm at the same time (must be opposite; ex. right leg & left arm). Return to the start position and repeat to the other side.


The goal of this exercise is maintain a
flat back and neutral pelvis. Try to imagine a plate of food on your lower back
and you don’t want it to fall off. Keeping the core engaged throughout the
duration of this exercise is extremely important. Focus on using your glute muscles as the main muscular force in lifting and extending the legs.
The addition of resistance tubing and weights will take this exercise to the
next level.

The last exercise in this series is a
bent knee bridge on a physioball. The purpose of this exercise is to target the
hamstrings, quads, glutes, and abdominals. In order to perform properly, you
must focus on keeping your knee angle at 90 degrees at all times while you
contract your core and gluteal muscles to lift your lower back off the ground
and bring it back to the floor slowly.


Good progressions involve using only one
foot on the ball at a time or rolling the ball in and out by
bending and straightening the knees. Just make sure you maintain that pelvic
bridge for the duration.
So quit sitting around! If you have mild
lower back pain, try these stretches and exercises. Take it easy at first
and conqueror the modified versions before progressing. Make sure no pain is
present when doing any of these exercises. If pain is felt, immediately stop and
contact your doctor or physical therapist. Aim for 2-3 sets of 10-15 reps
for the exercises depending on your fitness level. When stretching shoot for
three 20-second holds and for the planks, try to maintain that steady position multiple times for 15-60 seconds. Doing these exercises 3-4
times/week will help increase flexibility, strength, and help to properly
realign the spine.

Blog post by Drew Sifflard CSCS.

Kinesiology Tape at the Olympics

Did anyone see the historic two-man bobsled final race on
Monday night when American bobsledder Steve Holcomb broke a 62 year drought
to capture the Olympic bronze medal?
What Cape Cod Rehab Physical Therapist Briana Lackenby PT DPT saw
at the start of the race was the black tape that Holcomb was donning on his
left calf.
This type of sports tape has many names: Rock Tape, Kinesio
Tape, KT Tape etc.  Unlike the old white
athletic tape that only stabilized, this athletic tape has a stretch gradient
and can be used for a number of injuries. 
“The tape can be applied depending on the direction of pull
to support a weak or injured muscle.  It
can be used to stretch a tight muscle and the tape can even be braided over
swollen regions to help with fluid removal,” says Lackenby who has seen
tremendous personal and professional success over the past year with its use.
“Tape can help you stay lose and reduce pain between your
physical therapy and training sessions,” added Lackenby.  The tape can be worn up to five days and can
even be worn in the pool.
For Holcomb, the calf strain came while pushing off during
the second heat on the first day of competition.
The start is super important in bobsled.  To push off with a weak or injured leg could have
potentially ruined Holcomb’s chances at a medal.  After night one of competition, Holcomb met
with trainers to receive treatments and to keep his strained calf loose.  A combination of massage, electrical
stimulation, acupuncture, and kinesiology tape got him ready for the final two runs.
When asked if he should drop out of the race, Holcomb said,
“It’s four years to get to this point. 
I’m not going to be stopped by a little calf muscle.”
Braided pattern used by Lackenby to reduce swelling
Kinesiology tape can be used to treat a number of injuries and to enhance sports performance.  Interested in learning more?  Talk to your physical therapist or athletic
trainer today!
Blog post by Jen Skiba.