Dynamic Golf Warm Up

Do you warm up before playing golf?  

A good warm up is important for preventing injuries and preparing your body to perform. Next time you head out to the course, try these sport-specific, dynamic stretches. Warm up by walking for 3-5 minutes.
Perform 10 repetitions of each exercise. Gradually move through greater range
of motion. Do not perform any exercise that causes or increases pain.
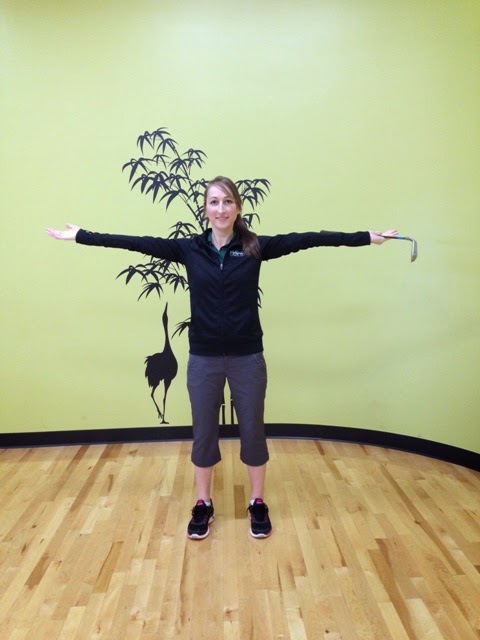
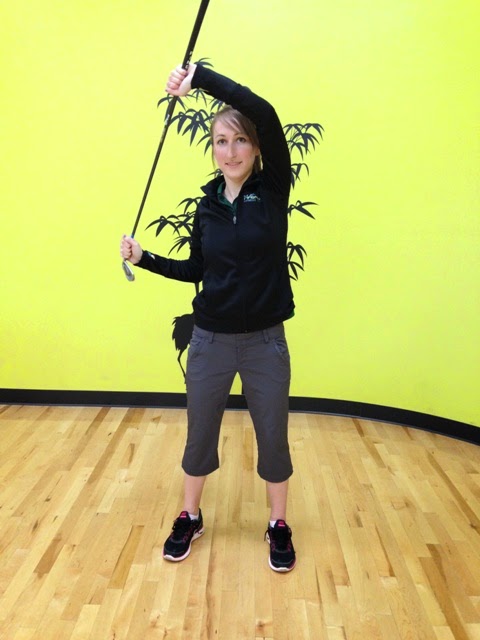
Crossover Pass

Hold your golf club in one
hand and extend your arm to the side. Pass the club over your head to the other
hand. Extend the other arm. Follow the exchange with your head.

Side Bending

Hold your golf club in
both hands over your head.  Bend to one
side. Return to original position. Bend to the other side.

Front Bending

Stand with your golf clubs
behind your back in both hands with your arms shoulder width apart. Bend
forward and lift your arms over your back.

Around the Body

Hold your golf club in
both hands as wide as possible. Rotate the club around your head clockwise. Repeat
counterclockwise.

Hip Rotation

Hold the club upside down
with the grip end planted firmly on the ground. Stabilize your upper body and rotate
your hips. (Remember: We want rotary motion, not lateral!)
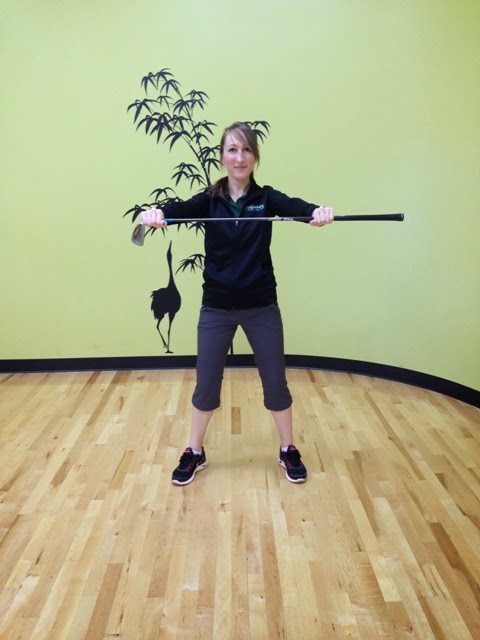
Squat and Twist

Hold your golf club in
both hands and extend your arms straight in front of your body. Squat and turn
your hands so that your right hand is on top and left hand is on bottom. Return
to standing. Repeat with the left hand on top.
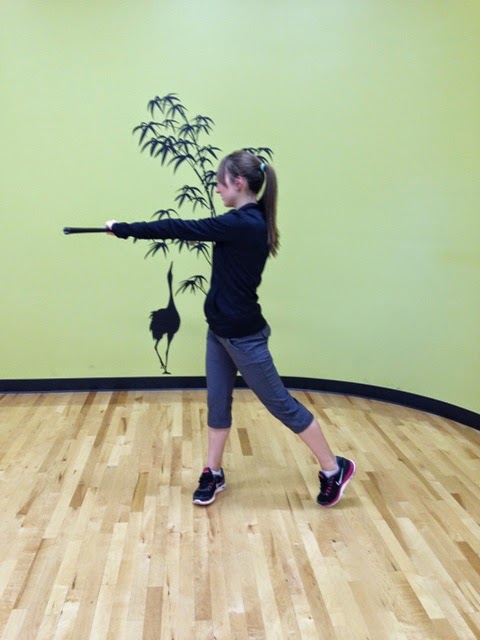
  

Golf Swing Twist

Hold your golf club in
both hands and extend your arms straight in front of your body. Continue to
hold the club in front of you and twist your body side to side as if your lower
body was going through the golf swing.
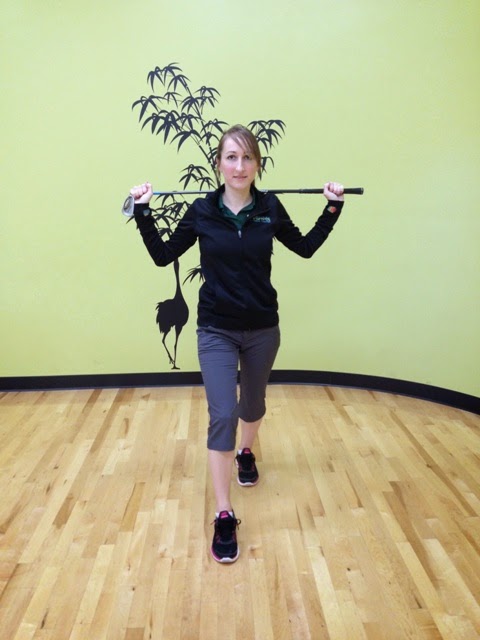
Step
and Turn

Place
your golf club on your shoulders, holding onto it with both hands. Step forward
with your left leg into a lunge and rotate your upper body to the left. Return
to the starting position. Repeat to the other side.

Leg Swings (2 Directions)

Hold the club upside down
with the grip end planted firmly on the ground. Stand on your left leg and
swing your right leg front and back. Repeat on the other leg. Then perform the
same exercise swinging your leg left to right, crossing in front of your
stabilizing leg. Repeat on the other leg.

For a
more personalized warm up routine, schedule your Golf Fitness Assessment with
one of our TPI Certified Professionals:
https://www.capecodrehab.com/golf-fitness-program/

Blog post by Jen Skiba.

Got Back Pain?

It seems that at some point everyone encounters lower back pain and it can be a result of a number of different issues. Some are more serious than others but some of the
common causes can be corrected with simple stretches and strengthening
exercises.

Common causes of low back pain are:
tight hip flexors, weak abdominal muscles, and weak gluteal & lower back
muscles. This could be a result of excessive sitting, driving, bad training
habits, and overall laziness or “inactivity”.
Although pain can be attributed to a number
of different variables, hip tightness is a quite common reason. This is due to
the hip flexors anterior pull on the pelvis when excessively tight, creating a
more arched lower back. This exaggerated arch causes excessive pressure on the
posterior portion of the lumbar spine. Consequently that hip tightness can
actually inhibit the use of your glute muscles making them small and weak. Not
to mention, it forces your gut forward maybe making your appearance not as
flattering as you’d like.


“So your saying my gut looks bigger and
my butt smaller?!”
Yes I am. If your hip flexors are very
tight, it can actually impede the activation of your large gluteal muscles on a
daily basis and force your hamstrings to do all the work.
So if you’re an individual that doesn’t feel any glute soreness after a workout loaded with a bunch of squats and lunges,
then either your form is incorrect or your flexibility 
isn’t where it needs to
be to properly engage the correct muscles.
Strong gluteal muscles help absorb
impact on the spine, as well as keep it in proper 
stable alignment. If you experience lower back pain or you just can’t seem to strengthening your butt,
have a trainer or physical therapist check your hip flexors’ flexibility by performing the Thompson
Test.


If your thigh and trunk maintain
alignment with the table, your hip flexors are in a good flexible range.
If not, the first step is to stretch
this area. You can stretch the hip flexors by actually doing the Thomas Test
shown above or you can try these two alternatives:


The
next area to strengthen is the core & lower back. A plank or modified plank
is a great way to isolate those muscles while maintaining proper posture. As
you get stronger, progress this exercise by alternating straight leg lifts in
the plank position, this will add some new challenges of balance and glute
strengthening. Make sure when performing a plank that you don’t drop your hips
causing an arch in your lower back. You want to maintain a straight flat back
or a slightly rounded one (butt a little higher) to protect yourself when
beginning this exercise. 


Modified Plank
Plank
Plank with alternating Leg Lifts

Another
exercise that focuses in on these specific areas is quadruped reciprocal extension. Start by positioning yourself on all fours (hands and knees) with
hands underneath the shoulders and knees under the hips. Next engage the
abdominal muscles by tightening your core, then extend and straighten, one leg and arm at the same time (must be opposite; ex. right leg & left arm). Return to the start position and repeat to the other side.


The goal of this exercise is maintain a
flat back and neutral pelvis. Try to imagine a plate of food on your lower back
and you don’t want it to fall off. Keeping the core engaged throughout the
duration of this exercise is extremely important. Focus on using your glute muscles as the main muscular force in lifting and extending the legs.
The addition of resistance tubing and weights will take this exercise to the
next level.

The last exercise in this series is a
bent knee bridge on a physioball. The purpose of this exercise is to target the
hamstrings, quads, glutes, and abdominals. In order to perform properly, you
must focus on keeping your knee angle at 90 degrees at all times while you
contract your core and gluteal muscles to lift your lower back off the ground
and bring it back to the floor slowly.


Good progressions involve using only one
foot on the ball at a time or rolling the ball in and out by
bending and straightening the knees. Just make sure you maintain that pelvic
bridge for the duration.
So quit sitting around! If you have mild
lower back pain, try these stretches and exercises. Take it easy at first
and conqueror the modified versions before progressing. Make sure no pain is
present when doing any of these exercises. If pain is felt, immediately stop and
contact your doctor or physical therapist. Aim for 2-3 sets of 10-15 reps
for the exercises depending on your fitness level. When stretching shoot for
three 20-second holds and for the planks, try to maintain that steady position multiple times for 15-60 seconds. Doing these exercises 3-4
times/week will help increase flexibility, strength, and help to properly
realign the spine.

Blog post by Drew Sifflard CSCS.

Stress Fractures in Female Athletes

Stress fractures are very common to female athletes,
especially runners.  They are essentially
an overuse injury that worsens over time. 
Bone structure, running mechanics, and the Female Athlete Triad all make
women more susceptible to stress fractures than men.

What is a stress fracture?

According to the American Academy of Orthopaedic Surgeons, a
stress fracture occurs “when
muscles become fatigued and are unable to absorb added shock. Eventually, the
fatigued muscle transfers the overload of stress to the bone causing a tiny
crack called a stress fracture.”
Typically a stress fracture begins with pain that occurs
toward the end of a physical activity or after the activity is through.  It can progress to a constant pain while
walking or standing.  In most cases, pain
can be pinpointed and there is also some local swelling or tenderness.
Return to play time is typically 12 weeks,
depending on the risk classification.  If
an athlete begins activity before the stress fracture is fully healed, they are
at a higher risk of re-fracturing that bone.
Factors that can contribute to a stress fracture: previous stress fractures, the Female Athlete Triad and the FIIT (frequency, intensity, time, and type of physical activity).

The Female Athlete Triad

The Female Athlete Triad is made up of 3 health problems
common to female athletes:
    • Energy
      Deficiency/Eating Disorders
    • Low
      Bone Mass/Osteoporosis
    • Menstrual
      Irregularity/Amenorrhea
Energy deficiency is another term for “under-fueling.”  We get our energy though our diets and if
your body is not getting enough nutrients, it will not be able to perform and you
will feel tired and weak.  It can lead to
injury, illness, menstrual changes, and changes in energy levels.
Low bone mass can be a result of many risk factors: not enough
calcium and vitamin D, cigarette smoking and alcohol consumption, a sedentary
lifestyle, gender, and genetic predisposition. 
Osteopenia and osteoporosis are advanced cases of bone loss and can be
diagnosed through dual energy x-ray absorptiometry (DXA).
Energy deficiency can also lead to menstrual
irregularity.  A cessation of the
menstrual cycle is termed amenorrhea.  Low
body weight, hormonal imbalances, stress, eating disorders, or over-exercising
can cause amenorrhea.  When periods are
missed, the female body produces less estrogen, a hormone essential to building
strong bones.
The Female Athlete Triad is not something to be taken
lightly.  Stress fractures are just one
of the potential side effects of the Female Athlete Triad.

How can stress fractures be prevented?

There is no way to completely prevent stress fractures but
here are some tips to help keep those bones strong and decrease the probability
of injury:
  • Drink
    your milk!  Calcium and vitamin D
    are essential bone building nutrients. 
    They work together as vitamin D helps the body absorb calcium.  The latest guidelines recommend
    1,000-1,200mg per day of calcium and 600IU per day (800IU for 70+ years
    old) of vitamin D.  Peak bone mass
    is reached in your 20s but consuming enough calcium and vitamin D can help
    slow down bone mass loss as you age.
  • If you
    are just beginning an exercise program or just getting back into it, start
    slow.  Increase your mileage
    gradually to avoid injuries.  Impact
    and weight bearing activities help to preserve bone mass but if you get
    too ambitious too quickly, it can add extra stress to your body.
  • It’s
    important to incorporate a good strength training program into your
    routine.  Functional training, the
    Burdenko Method (on land), free weights, and resistance tubing are all great
    ways to maintain your bone mass and gain muscle strength and
    endurance.  Fatigue and weakness can
    lead to a change in your running form, which can then lead to
    injuries.  Build strong bones and muscles
    to keep from losing your stride.
  • Get
    screened!  The Functional Movement Screen (FMS) is a good tool to discover any physical limitations or
    asymmetries in different patterns of movement.  Finding these areas of weakness and
    working to correct them will help to help to keep you injury free. 

Normal
0

false
false
false

EN-US
JA
X-NONE

  • Change
    your shoes often.  A good pair of
    running will typically last 300-400 miles. 
    Pay attention to the wear patterns on your shoes.  Over-pronators or over-supinators may go
    through shoes quicker than someone with a more neutral stride.  If you start to see the bottoms of your
    soles wear off, its time for new shoes! 
    Running shoes will cost you around $90-110 but new shoes are cheaper
    than Physical Therapy and your feet, knees, and hips will thank you in the
    long run!
Blog post by Jen Skiba.