Long Bars, Short Bars, Mini Bars?


A common
question when working with clients in the pool is “Which is harder the long
bars or the short bars?”  

The answer to the question depends on the exercises that you will be doing and the goals of your exercise
program.  Understanding the equipment and
the differences will help you choose the appropriate tools to make your workout
the most effective.  
Using bars
with more buoyancy will create more resistance when trying to move them through
the water.  This will make these types of
exercises more difficult.  However,
exercise where you are in the hanging position will be easier with more buoyant
bars because they will provide more support and stability.
Using bars
with less buoyancy creates less resistance when trying to move them through the
water.  Less buoyant bars will make these
types of exercises easier.  The less
buoyant bars will make exercises more difficult in the hanging position.  The reduced support and stability will
require your body to work harder to maintain alignment therefore challenging
your core muscles more.
Example of
progression from easy to difficult using equipment for an exercise that
requires you to move the bars in and out of the water vs. a hanging exercise.
Pump and Walk
Mini Bar → Short Bars Level 1 →
Short Bars Level 2 → Long Bars

Splits and Spreads
Long Bars→ Short Bars Level 2 →
Short Bars Level 1 → Mini Bars

Equipment


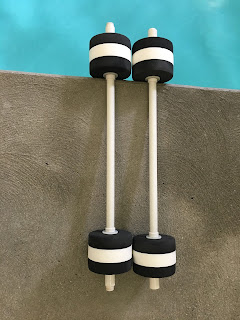
Long Bars
Long bars
provide the most buoyancy, therefore they will give you the most support and
resistance.  

Short Bars
Level 2
These bars
have slightly less buoyancy than the long bars. 
They will be a little easier for exercises that require movement through
the water and slightly harder for hanging exercises than the long bars.

Short Bars
Level 1
The level 1
short bars have less buoyancy than level 2 short bars and long bars.  They will be easier for exercises that
require movement through the water and more difficult for hanging exercises.

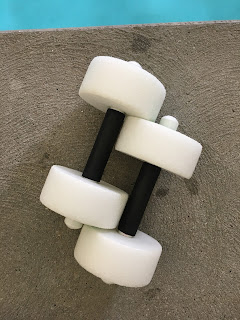
Mini Bars
Mini bars
provide the least amount buoyancy.  These
bars will be the easiest for exercises that require movement through the water
and the most difficult for hanging exercises.  

Blog post by Eric Chandler.

Marathon Training Tip #8: Aquatic Recovery


One of the
most overlooked aspects of training is rest and recovery.  Often
times complete rest for active people is very difficult.  There are many
benefits to including active recovery sessions in your training.  One of
the best places to perform an active recovery workout is in the water. 
The water provides a non-weight bearing environment in that helps reduce stress
on the joints, provide traction to your spine, promote circulation and reduce
swelling to name a few.  The shallow water can provide some of the same
benefits by reducing the amount of impact performing similar activities to
running. At waist level in the water you are about 50% weight bearing. 
Last but not least, exercise in the water is fun! 
Try these
aquatic recovery exercises to improve your performance, reduce your risk of
injury and add some variety to your training program.

Deep End Exercises

Wear a buoyancy belt. Perform waking exercises
for 2-3 laps & hanging exercises 10-15 repetitions.

Forward
Walking
Equipment: none
Action:  Step forward in a normal walking pattern.
Alternate arms with each step while focusing on forward movement with proper
alignment and posture. 
Walk +
Stretch
Equipment: none
Action: Walk 3 steps then kick your leg forward, reaching for your
foot with the opposite arm.  Walk 3 steps
and repeat with the other arm and leg. 
Keep torso straight and keep toes up.
Symmetrical
Walking with Turns
Equipment: none
Action:  While walking forward turn palms out and push
arms out to align with shoulders. Arms make a breast stroke motion. Bring arms
to chest.  Return to start position.  Take 3 strokes forward, then turn 180 degrees
and walk 3 strokes backwards, turn 180 degrees and repeat.
Splits +
Spreads
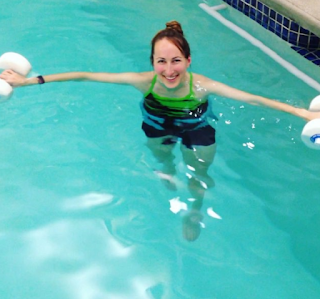
Equipment: 2 long bars
Action:  Separate legs in open scissors kick position:
one leg straight forward, another leg straight back.  Return to start position. Repeat with the
other leg forward.  Return to start
position.  Spread both legs apart to the
sides, keeping toes up and legs straight. 
Return to start position.
Tips:  Keep legs straight and attain full range of
motion with each movement.  Feel the
stretch while keeping toes up to.
Leg Stretch
Series
Equipment: 2 long bars
Action: Bend one knee to a 90° position, keeping toes up. Extend leg
straight in front of the body then back to the 90° position. Return to start
position. Repeat with the other leg. Repeat the sequence changing leg extension
of the knee to an internal position (kicking across the body) then an external
position (kicking out).
Running
Pendulum
Equipment: 2 long bars
Action: 
Run moving to the side lying position using four running steps;
pause.  Return to start position. Repeat
moving to other side.

Shallow End Exercises

Perform
walking exercises for 2-3 laps & stationary exercises 10-15 repetitions.

Weight Shift Catch
Action: 
Shift weight to one leg and simultaneously catch and lift the knee with
both arms and pull the knee to the chest, hold the balance. Return to start
position. Repeat with the other leg.
Tips: 
Maintain straight body alignment while pulling the knee up. Come up on
the toes each time when pulling the knee up.
Catch + Pull
Action: Walk forward 3 steps and catch one foot with the opposite arm
behind body, the other arm reaches straight above the head.  Return to starting position.  Walk forward 3 steps and repeat with the
opposite hand and foot.  For an added
challenge—before you catch the foot, bend the weight bearing knee down into a
squat position and power up to your toes.
Leg Swing
Action: Walk forward 3 steps, stand on one leg while swinging the
other leg forward, back, forward. Swing the arms so opposite hand and foot are
in front.  Was forward 3 steps and repeat
with the opposite side. Make sure to keep your body straight and sing the leg
high back and forth.
Squat Hurdles
Action: Walk forward 3 steps then squat, arms straight forward at
shoulder level. As you stand, mimic hurdle motion: one leg kicks straight out,
touching the foot with your opposite hand. Other arm extends back.  Walk forward 3 steps and repeat with the
opposite hand and foot.  Get the motion
in rhythm, kicking knee is straight, weight bearing leg is on the ball of the
foot.
Carioca
Action: Stand with arms out to side at shoulder level. Step side to
side crossing one foot in front then in back (like the grapevine). Take wide
steps, keeping your pelvis stable.
Blog post by Eric Chandler.
About
Eric Chandler

Eric joins the Cape Cod Rehab Running
Team with a background in Exercise Science. He is a Certified Strength &
Conditioning Specialist (CSCS), certified in Part I & Part II of the
Burdenko Method, a Certified Functional Movement Screen (FMS) Specialist, and
has also been training in the TRX Suspension Training Method. Eric looks for his
clients’ strengths and uses those strengths to help them get the most out of
each session. A recreational runner, Eric has served on many of the CCR Flyers
Cape Cod Marathon relay teams as has a goal of breaking 20 minutes in the 5k.

The Burdenko Method: Land & Water Exercise

The Burdenko Method

Do you know what
Burdenko is?
The Burdenko Method is part of the
Burdenko Water and Sports Therapy Institute. Dr. Igor N. Burdenko founded the
institute in 1984, focusing on the practical application of water and land
exercises. He takes a holistic approach to rehabilitation, conditioning, and
training which allows the method to benefit all ages and conditions. After more
than 30 years of working with rehabilitation clients, training athletes in the
NBA, NFL, NHL, US and Russian Olympic teams, members of the US Handicapped Olympic
Team, and top international dancers and figure skaters, Dr. Burdenko has become
internationally recognized in the rehabilitation and fitness worlds. The
methodology works in a pyramid fashion- you must achieve the skills at the
bottom of the pyramid to effectively master the skills at the top. The Burdenko
Method also uses various equipment and speeds while exercising.
 

Water & Land Exercise

The Burdenko Method utilizes not only exercises
in the gym, but in the water. What makes aquatic exercise so beneficial? Being
in the water eliminates about 90% of your body weight, taking the stress of
your muscles, bones, and joints. This occurs because water helps to stop the
gravitational pull on the body, allowing you to move more freely than you would
on land.
 
Most aquatic exercises used in the Burdenko
Method are done in an upright position. By being vertical, the body’s buoyancy
and posture is challenged. In turn, this helps to strengthen and stabilize the
trunk, spine, and pelvic areas. Progressions to supine (on the back) and prone
(face up) are also used for an added challenge. There are exercises done in
shallow water as well, allowing the body to work against a gentle resistance.
Land exercises are also done progressively.
Typically, one starts in a horizontal position: supine to sidelying to prone.
This allows the freedom of movement from the extremities. Exercises can also be
done sitting, standing, or moving dynamically. Many of the exercises can be
done with or without additional equipment.
 
“Finding one’s center of buoyancy and balance
in deep water is the first step to experience pain free movement (Level 1).
Then, by adding a combination of movements in different planes (vertical,
supine, prone) in deep water and with horizontal mat exercises on land,
coordination develops (Level 2). Level 3 adds challenges with different
equipment and environments to increase the natural force of gravity.” “Your
personal experience with Levels 1, 2, and 3 will allow you to progress to
Levels 4, 5, and 6. You will develop qualities of endurance, speed, and
strength.”
Blog post by Nikki Courtney.
References
Burdenko, I., & Gray, P. (2001). The Burdenko Method Exercise Guide Part 1.
Wayland, MA: The Burdenko Water & Sports Therapy Institute.
Burdenko, I. (2002). Burdenko Exercise Guide Part 2. Wayland, MA: The Burdenko Water
& Sports Therapy Institute.

5 Burdenko Strength Exercises for Runners

All athletes need to strength train but it’s an
element to your training that is often missed. 
Strength training will make you a stronger, faster, and more efficient
runner and most importantly—strength training will help keep you injury
free.  Below you will find 5 Burdenko
exercises that Eric Chandler, a Certified Strength & Conditioning
Specialist and Certified Burdenko Method Instructor, chose to target muscle
groups important for runners. 

Begin with 10 repetitions of each exercise.  After a few sessions, try 2 sets of 10
repetitions and start adding speeds.  Do
not perform any exercise that causes or increases pain.

Earth to Sky

Lunge to the
side and “sweep the floor” with your opposite hand and continue to complete big
circle overhead. Continue for 10 repetitions and repeat to the other side.

1/2 Roll Lunge Step

Stand on one leg with your foot in the middle of the half roll.  Use the other leg to step forward into a
lunge and then step back into a lunge. 
Repeat back and forth for 10 repetitions and repeat on the other
side.  For a challenge, reach opposite
hand to the front foot while lunging.

1/2 Roll Leg Swings

Stand on one
leg while swinging the other leg forward and back. Swing the arms so opposite
hand and foot are in front. Make sure to keep your body straight and swing the
leg high back and forth. Continue for 10 repetitions and repeat on the other
side.

Scooters


Lay on your
side with legs straight together. Support your head with your lower arm and
position your top arm in front with fingers pointing towards the body for
stabilization. Bend top knee towards the top arms. Extend leg straight at elbow
level. Swing leg back to starting position. Continue for 10 repetitions and
repeat on the other side. Progress to full leg extension behind the body, bend
knee and bring forward to elbow again.


Rotate and Kick

Lay on your side with legs
straight together. Support your head with your lower arm and position your top
arm in front with fingers pointing towards the body for stabilization.
Lift top leg straight up and bend your knee down bringing your heel to your
buttocks. Turn knee up and extend your leg straight up. Return to start
position. Continue for 10 repetitions and repeat on the other side.

Blog post by Jen Skiba.

5 Burdenko Warm Up Exercises for Runners

A good warm up is important for preventing injuries
and preparing your body to perform.  Next
time you head out the door for a run, try these 5 Burdenko warm up exercises
that Eric Chandler, a Certified Strength & Conditioning Specialist and
Certified Burdenko Method Instructor, picked out with runners specifically in
mind. 
Warm up by walking for 3-5 minutes.  Perform 10 repetitions of each exercise.  Gradually move through greater range of
motion.  Do not perform any exercise that
causes or increases pain.

Wake Up Call

Take a small
step forward white extending your arms overhead. Clap! Return to start position
and repeat with the other leg. Gradually take bigger steps forward until you
are lunging.

Weight Shift Catch

Shift weight
to one leg and simultaneously catch and lift the knee with both arms and pull
the knee to chest, hold the balance. 
Return to start position and repeat with the other leg.

Squat Hurdles

Squat with
arms straight forward at shoulder level. As you stand, mimic hurdle motion: one
leg kicks out straight, touching the foot with your opposite hand. Other arm
extends back. Squat and repeat with the opposite hand and foot. Get the motion
in rhythm, kicking knee is straight, weight bearing leg is on the ball of the
foot.

High Knees/High Heels

Perform 3 high
knees with alternating arm swings then 3 butt kicks, lifting the heel towards
the buttocks, continuing with the arm swing.

Power Stride

Start with one
foot in front of the other.  Drive up
with the back leg to a high knee with opposite arm in the air.  You can take it one step forward and go all
the way up to your toes on the stable leg. 
Continue for 10 repetitions and repeat to the other side.

Blog post by Jen Skiba.

Just because you’re inflexible, doesn’t mean you have to be

Did you know that
flexibility is an entirely trainable quality? 
Sure, we get a little more
inflexible over the years (a process called fibrosis, where thick connective
tissue takes the place of some of our more pliable fibers that are getting worn
out), but it doesn’t prevent us from staying flexible. In fact, the most common
reason for inflexibility is not age, or genetics, or gender, but DISUSE. It’s
exactly because we DON’T stretch that we become so stiff. 
No, I’m not going to tell
you that to be flexible you absolutely have to start doing yoga, although you
might really enjoy the practice. But it’s been shown in studies that including
a stretching program twice a week for five weeks can improve your flexibility
over time. 
You can elect to do a dynamic stretching program–ask any of us
for some Burdenko moves, for instance–where you move through the stretches.
Dynamic stretches are great for athletes who are getting ready for practice or
competition, as they mimic the exercise movements they’ll perform during their
game and really get the body thinking about what it’s about to
encounter. 

You can also do static stretching, where you slowly make your way
into the stretch and then hold the end position for 30 seconds or so. The key
is to find a point in the stretch that’s just a little uncomfortable, but
doesn’t hurt–and where you definitely aren’t shaking. You trigger your stretch
reflex when you stretch TOO far, which can actually make you TIGHTER (it’s a
defense mechanism for your muscles, to avoid being ripped by being stretched
too far). Also, avoid bouncing into the stretch–while this (known as ballistic
stretching) isn’t technically as bad for you as previously thought when done correctly,
the risk for injury is much higher, and really not worth the “reward”
when static and dynamic stretching offer better options. 

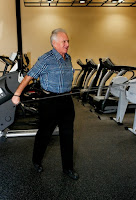
Example of Static Stretching
One of the key things to remember is to warm up before you stretch. Warming up
is important in ANY of your activities, as it gets you ready for your workout
by increasing your body temperature, getting the blood to flow through your
body a little more, and improves viscosity in your joints (in other words, gets
the synovial fluids that keep your joints lubricated to move better so your
joints move better–more like oil than maple syrup), among a number of other
things. A general warm-up for five to ten minutes is perfect–a quick walk on
the treadmill (or around the block, or at the beach), a few minutes on a
bike–just enough to break a sweat.
Then, you can go through
and do a number of stretches as an “active recovery” day, or you can
continue on with your workout and stretch for 5-10 minutes afterward. 

Blog post by Ashley Crosby.

Adult Nationals Weekly Series #6: Paul Wylie’s Presentation

Paul with National Champion Dawn Feest

The U.S. Adult Figure Skating Championship Week was full of amazing skating performances, S.T.A.R.S.
Off-Ice Testing, a Dick Button book signing, and award ceremonies crowning
National Champions.
A highlight of the weekend
was a presentation by American figure skater and 1992 Olympic silver medalist
Paul Wylie.
Paul used to train at the
Tony Kent Arena in South Dennis under Olympic and World Skating coaches Evy and
Mary Scotvold and has also worked with the famous Dr. Igor Burdenko, developer
of the Burdenko Method.  Paul made a
quick visit to the Hyannis Youth and Community Center in Hyannis, MA
for just enough time to speak about functional training, different training
approaches, and fitness as a lifelong journey.
“The Burdenko Method is a
natural part of what I do.  I incorporate
his exercises into my warm up routine backstage before I go on the ice,” said
Paul.  Burdenko exercises are dynamic and
very sport-specific. 
“Working the
whole body in different directions and at different speeds are principles of
the Burdenko Method that translate exceptionally well for figure skaters who
work slowly and gracefully and move into fast dynamic movements while changing
directions,” said Joe Carroll PT DPT, owner of Cape Cod Rehab Physical Therapy
and Master Burdenko Method Instructor.
When Paul first began
skating, training was about trial and error and driven by urgency.  Paul admitted to overtraining and little to
no recovery time. 
His quote of the day was,
“Stress without recovery is the enemy!” 
Training “in the olden
days” was like cramming for a test.  If
there was a competition coming up, skaters went through their routines time
after time, jump after jumps.  They knew
they had to incorporate weight lifting and ballet but no one knew how much or
how often.  He was on rollercoaster
battling body weight and body image.  Too
much weight lifting would bulk up a skater and too much ballet would also harm
skating aesthetics.  It was about trial and
error and seeing what didn’t work.
Now training figure
skaters has taken a more integrated approach driven by goals and personal
plans.  Everything is sport-specific and
individualized.  Skaters work with a team
of professionals working toward a common goal. 
A plan is developed for the season, off-season, career, and a plan for
WHEN they get injured – because it’s going to happen at some point!
Paul credited Dr.
Burdenko’s 6 Essential Qualities of Life and Sport:
  • Balance
  • Coordination
  • Flexibility
  • Endurance
  • Speed/Quickness
  • Strength
“Build on the basics to
become extraordinary from the ground up,” said Paul.
A lot of figure skating
and sport is mental.  Motivation requires
3 things: competence, autonomy (“it’s my choice”), and relatedness.  There are certain questions you need to ask
yourself every time you walk into the gym or ice rink.
“What can I accomplish today?”
“What excuses do I make on a daily basis?”
“Who do I admire? 
What qualities do I admire about them?”
“How can I continuously improve?”
Paul’s talk was very
motivational and encouraging.  If you
ever have a chance to hear him speak, you won’t want to miss it.
Final thoughts from Paul:
Ballet was the Russian Secret Weapon.

Blog post by Jen Skiba.

Adult Nationals Weekly Series #2: Meet Briana

About Briana


You may know Briana
Lackenby PT DPT as a Physical Therapist and Assistant Clinical Director at Cape
Cod Rehab.  You also may know Briana as a
figure skating coach for the Yarmouth Ice Club. 
Or you may even know Briana as a Titleist Performance Institute (TPI)
Golf Fitness Instructor.  She also holds
certifications as a Board Certified Orthopedic Clinical Specialist, Certified
Strength and Conditioning Specialist (CSCS) and a Certified Burdenko Method Instructor
(Levels 1-6).  Briana does it all and she
wouldn’t have it any other way!

Briana began figure
skating when she was 8 years old and worked her way up to earn Senior Gold
Level Status.  She began coaching in 1996
as a freshman in college.  During
Briana’s time as a physical therapy student at Boston University,
she completed one of her clinical rotations at Cape Cod Rehab.  Soon after graduation, Briana was hired by
Joe and Kathy Carroll, owners of Cape Cod Rehab and has been working for them
ever since.  When not in the clinic, you
can find her on the ice at the Tony Kent Ice Arena where she puts in about
12-15 hours per week coaching skaters of all ages and abilities.

Cape Cod Rehab and the Yarmouth Ice Club

The relationship between
Cape Cod Rehab and the Yarmouth Ice Club is very unique.  Briana has a long history of working with
skaters both on and off the ice in injury prevention and rehab.  She became the go-to person when any Yarmouth
Ice Club figure skater was struggling or suffered an injury.  Skaters, coaches, and parents all trust Briana’s judgment and opinions when biomechanically something isn’t
right.  Her knowledge of the jumps and
personal experiences with the physical and mental demands of the sport add that extra element to her already extensive physical therapy training and
education.

The Burdenko Method

Another tie between figure
skating and physical therapy is The Burdenko Method.  The Burdenko Method is a unique, innovative
system for rehabilitation, conditioning and injury prevention developed and
refined by Igor N. Burdenko PhD over a period of 40 years.
Dr. Burdenko has a long
history of working with figure skaters. 
He rehabbed Nancy Kerrigan after the infamous Tonya Harding
incident.  With a combination of land and
water, Dr. Burdenko helped Nancy
to get back on the ice and earn a silver medal at the 1994 Olympics.  His list of figure skaters includes Paul
Wylie, Oksana Baiul, and Yarmouth Ice Club coach and Olympian Konstantin
Kostin. 
Briana’s interest in the
Burdenko Method started as a skater watching Nancy Kerrigan and Paul Wylie
train at the Tony Kent Arena.  They were
both coached by Olympic and World Skating coaches Evy and Mary Scotvold whose
training camp was located at the Tony Kent Arena in South Dennis, MA.  When Briana was hired by Cape Cod Rehab, her
interest in Burdenko was spurred on by Joe who was already using the method in
his clinics.  Joe introduced Briana to
Dr. Burdenko and she became Part I and Part II certified.  Joe continued his training to earn the
credentials as one of the very few Master Burdenko Method Instructors in the
world.
“Working the
whole body in different directions and at different speeds are principles of
the Burdenko Method that translate exceptionally well for figure skaters who
work slowly and gracefully and move into fast dynamic movements while changing
directions,” said Joe.
The
Burdenko Method is very dynamic and sport specific.  It became really big with figure skaters in both rehabbing and conditioning especially after it was proven successful for
so many skaters including Olympic level competitors.  Briana found that it was more fun for the
younger skaters as it was different exercises than everyone was used to and
combined both land and water training.
Joe
added, “Rehab of the injured skater in the pool allows them to simulate
movements they do on the ice without the impact and keeps a level of
conditioning while their training is impacted.  Mentally the athlete is
engaged with the dynamic nature of the workouts and choreographing the
exercises keeps them connected to their training on ice.  The Burdenko Method
allows for a progressive transition from the water to the land and then back
onto the ice.”

Coaching Dawn &
Becky

Yarmouth Ice Club skaters
Dawn Feest and Becky Hamlin will both be competing in Adult Nationals in
April.  Briana coaches all aspects of
Dawn’s skating from technical to choreography and she is also working on
choreographing Becky’s performances.
To Briana, the best part
about coaching is the creativity.  Every
skater has their own style and Briana helps to bring out their strengths on
ice.  She does everything from coming up
with the concept to editing the music, developing the program, and designing
the costumes.

Briana’s Role at
Nationals

Adult Nationals will be a
special event for Briana.  She will play
the role of skating coach to Dawn and Becky, Medical Director for the entire
competition, and if we’re lucky we may even see an appearance on ice during the
opening ceremony.
When asked if she’d ever
compete again, Briana hesitated but said she would consider it.  It’s a huge time commitment and there are not
enough hours in the day!
Stay tuned for next week’s
post featuring Dawn Feest…

Blog post by Jen Skiba.

Stress Fractures in Female Athletes

Stress fractures are very common to female athletes,
especially runners.  They are essentially
an overuse injury that worsens over time. 
Bone structure, running mechanics, and the Female Athlete Triad all make
women more susceptible to stress fractures than men.

What is a stress fracture?

According to the American Academy of Orthopaedic Surgeons, a
stress fracture occurs “when
muscles become fatigued and are unable to absorb added shock. Eventually, the
fatigued muscle transfers the overload of stress to the bone causing a tiny
crack called a stress fracture.”
Typically a stress fracture begins with pain that occurs
toward the end of a physical activity or after the activity is through.  It can progress to a constant pain while
walking or standing.  In most cases, pain
can be pinpointed and there is also some local swelling or tenderness.
Return to play time is typically 12 weeks,
depending on the risk classification.  If
an athlete begins activity before the stress fracture is fully healed, they are
at a higher risk of re-fracturing that bone.
Factors that can contribute to a stress fracture: previous stress fractures, the Female Athlete Triad and the FIIT (frequency, intensity, time, and type of physical activity).

The Female Athlete Triad

The Female Athlete Triad is made up of 3 health problems
common to female athletes:
    • Energy
      Deficiency/Eating Disorders
    • Low
      Bone Mass/Osteoporosis
    • Menstrual
      Irregularity/Amenorrhea
Energy deficiency is another term for “under-fueling.”  We get our energy though our diets and if
your body is not getting enough nutrients, it will not be able to perform and you
will feel tired and weak.  It can lead to
injury, illness, menstrual changes, and changes in energy levels.
Low bone mass can be a result of many risk factors: not enough
calcium and vitamin D, cigarette smoking and alcohol consumption, a sedentary
lifestyle, gender, and genetic predisposition. 
Osteopenia and osteoporosis are advanced cases of bone loss and can be
diagnosed through dual energy x-ray absorptiometry (DXA).
Energy deficiency can also lead to menstrual
irregularity.  A cessation of the
menstrual cycle is termed amenorrhea.  Low
body weight, hormonal imbalances, stress, eating disorders, or over-exercising
can cause amenorrhea.  When periods are
missed, the female body produces less estrogen, a hormone essential to building
strong bones.
The Female Athlete Triad is not something to be taken
lightly.  Stress fractures are just one
of the potential side effects of the Female Athlete Triad.

How can stress fractures be prevented?

There is no way to completely prevent stress fractures but
here are some tips to help keep those bones strong and decrease the probability
of injury:
  • Drink
    your milk!  Calcium and vitamin D
    are essential bone building nutrients. 
    They work together as vitamin D helps the body absorb calcium.  The latest guidelines recommend
    1,000-1,200mg per day of calcium and 600IU per day (800IU for 70+ years
    old) of vitamin D.  Peak bone mass
    is reached in your 20s but consuming enough calcium and vitamin D can help
    slow down bone mass loss as you age.
  • If you
    are just beginning an exercise program or just getting back into it, start
    slow.  Increase your mileage
    gradually to avoid injuries.  Impact
    and weight bearing activities help to preserve bone mass but if you get
    too ambitious too quickly, it can add extra stress to your body.
  • It’s
    important to incorporate a good strength training program into your
    routine.  Functional training, the
    Burdenko Method (on land), free weights, and resistance tubing are all great
    ways to maintain your bone mass and gain muscle strength and
    endurance.  Fatigue and weakness can
    lead to a change in your running form, which can then lead to
    injuries.  Build strong bones and muscles
    to keep from losing your stride.
  • Get
    screened!  The Functional Movement Screen (FMS) is a good tool to discover any physical limitations or
    asymmetries in different patterns of movement.  Finding these areas of weakness and
    working to correct them will help to help to keep you injury free. 

Normal
0

false
false
false

EN-US
JA
X-NONE

  • Change
    your shoes often.  A good pair of
    running will typically last 300-400 miles. 
    Pay attention to the wear patterns on your shoes.  Over-pronators or over-supinators may go
    through shoes quicker than someone with a more neutral stride.  If you start to see the bottoms of your
    soles wear off, its time for new shoes! 
    Running shoes will cost you around $90-110 but new shoes are cheaper
    than Physical Therapy and your feet, knees, and hips will thank you in the
    long run!
Blog post by Jen Skiba.

The Burdenko Method

Normal
0

false
false
false

MicrosoftInternetExplorer4

How
do you secure good health, energy, and the right spirit for many years to come?
Perform exercise not just to exercise, but exercise to improve everyday life
and sport.
The
Burdenko Method is a unique, innovative system for rehabilitation, conditioning
and training. It has been developed and refined by Igor N. Burdenko PhD over a
period of 50 years in both the former Soviet Union and the United States. Many
individuals from Olympic athletes to the general public have benefited from
this original and extraordinarily effective system.
Igor N. Burdenko PhD at Mashpee Fitness
The
Burdenko Method uses a unique combination of water and land exercises to
develop the six essential qualities for everyday life and sport. 
Six
Essential
Qualities:           
  • Balance                      
  • Coordination
  • Flexibility
  • Endurance
  • Speed
  • Strength
To
optimize results it is important to focus on developing the six essential
qualities while practicing the main principles of the Burdenko Method.
Principles:
  • Work
    out in water and on land
  • Vary
    speeds
  • Work
    out in all directions
  • Practice
    what you learn regularly with a solid schedule 
The
greatest feature of the method is the endless exercise possibilities that are
created through the systematic progressions. The Burdenko Method will be a key
factor in helping you attain your goals through out rehabilitation,
conditioning, and training.