The gluteal region of the body is made
up of several muscles that help stabilize and move the pelvis around. A few
standout muscles are the glute medius and the glute minimus. These muscles have
an important role in stabilizing the pelvis during movement as well as during
single leg exercise. If you are standing and raise your leg, the opposite glute
medius and minimus will contract to prevent the pelvis from dropping on that
side. The primary actions of these two muscles is to assist in hip abduction
and medial rotation of the lower limb. During movement, it prevents pelvic drop
of the opposite limb.
Often times we overlook these muscles in
our training programs, and over time, this can lead to pelvic instability and
even low back and knee pain. A 2016 study tested the tensor fascia lata, gluteus
medius and gluteus maximus of over 150 subjects with chronic low back pain. They
found that the gluteus medius was weaker in people that had chronic low back
pain. Another study, which looked at over 800 novice runners, concluded that
runners who lack hip abduction strength were at a higher risk for knee pain. Aside
from low back and knee pain, there are some other signs that the glutes may be
weak or “turned off”. Poor mechanics in squat, hinge and lunges patterns, more
specifically knees caving in, may indicate weak glutes. Some other signs may
include a lack of soreness in the glutes when the aforementioned movements are
trained.
As you can see from the research,
strengthening your glute muscles, particularly your gluteus medius, is very
important as a preventative measure for possible chronic issues down the road.
As an athlete, having weak glutes can be detrimental to stability, mobility,
power and strength.
strengthening your glute muscles, particularly your gluteus medius, is very
important as a preventative measure for possible chronic issues down the road.
As an athlete, having weak glutes can be detrimental to stability, mobility,
power and strength.
Here are a few glute activation and
strengthening exercises you can do on your own.
strengthening exercises you can do on your own.
- Supine Glute Bridge with Band Resistance
- Sidelying Clamshell with Band Resistance
(External Rotation) - Sidelying Clamshell with Band Resistance
(Internal Rotation) - Single Leg RDL with Contralateral Reach
- Pull-Through
*Depending on your fitness level, you
can use this as its own workout. I would work through each exercise performing
2-3 sets of 10 repetitions of each. If you are a little more advanced with your
fitness, I would include these exercises into your warm up prior to any lower
body work days. Perform 1 set of each exercise for 10 repetitions each as an
activation drill prior to your lower body work (specifically squatting or
deadlifting).
1.
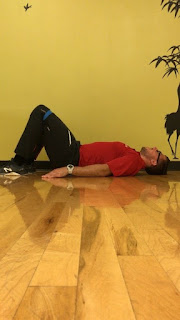
Supine Glute Bridge with Band Resistance
Supine Glute Bridge with Band Resistance
- Begin by placing a band around your legs
(just above the knee) and lay on your back with bent knees and your feet
pressed firmly into the floor. - To begin, start with a deep inhale
through your nose (a deep belly breathe is ideal). - While exhaling slowly yet forcefully,
squeeze your glutes and extend your hips upward. - Hold at the top position for 2-3 seconds
before relaxing and returning to the start position.
Tip: Proper breathing is a key component on this exercise,
especially for those with excessive low back curvature. The forceful exhale
will help to brace the core muscles which in turn will prevent excessive
extension of the lower back.
especially for those with excessive low back curvature. The forceful exhale
will help to brace the core muscles which in turn will prevent excessive
extension of the lower back.
2.
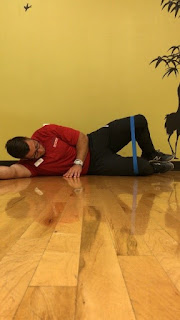
Sidelying Clam Shell with Band Resistance (External
Rotation)
Sidelying Clam Shell with Band Resistance (External
Rotation)
- Begin by placing a band around your legs
(just above the knee) and lying on your side with your legs/feet stacked on top
of each other and your knees and hips slightly flexed (You are looking to
achieve a neutral flat back). - Keeping your
feet together, externally rotate your hip while turning your torso down
slightly. - Squeeze
at the top and return to the start position is a controlled fashion.
Tip:
You really want to focus on isolating
the glute in this exercise. Try only to rotate at your hip and not at your
lower back as well.
You really want to focus on isolating
the glute in this exercise. Try only to rotate at your hip and not at your
lower back as well.
3.
Sidelying Clam Shell with Band Resistance (Internal Rotation)
Sidelying Clam Shell with Band Resistance (Internal Rotation)
- Begin by placing a band around your
ankles and lying on your side with your legs/feet stacked on top of each other
and your knees and hips slightly flexed (You are looking to achieve a neutral
flat back). - Keeping your knees together, internally
rotate your hip by lifting your foot upward. - Squeeze at the top and return to the
start position is a controlled fashion.
Tip:
Work hard to lower back to the
starting position with as much control as possible.
Work hard to lower back to the
starting position with as much control as possible.
4.
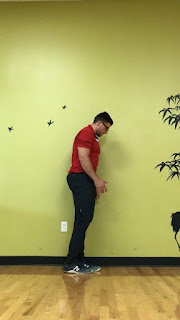
Single Leg RDL with Contralateral Arm Reach
Single Leg RDL with Contralateral Arm Reach
- Begin by standing next to a wall in a
normal upright standing position. - With a soft bend in the knee, slowly
begin to reach your hip back (hip hinge) on the leg closest to the wall while
simultaneously reaching the opposite arm forward and opposite leg straight
back. - Once you have achieved an optimal hinge,
engage your glutes and return to the start position.
Tip:
Do your best to maintain a neutral
spine throughout the movement. Be mindful to push your leg straight back. You
do not want to rotate at the hip during the movement.
Do your best to maintain a neutral
spine throughout the movement. Be mindful to push your leg straight back. You
do not want to rotate at the hip during the movement.
5.
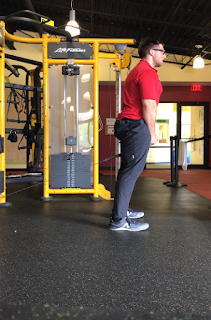
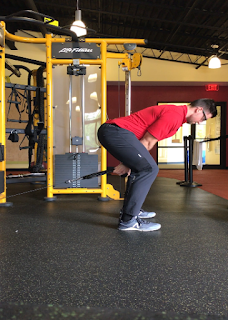
Pull-Through
Pull-Through
- Attach a rope to a cable machine.
- Begin by stepping over the cable (back
to the weight stacks) while grasping the rope with both hands resting on your
groin. Feet should be between hip and shoulder width apart. Soft bend in your
knees. - While inhaling, allow the weight to pull
you into a hip hinge. Maintain a neutral spine. - Once you have reached your optimal hinge
position, squeeze your glutes and extend your hips forward back to the start
while forcefully exhaling.
Tip:
Do your best to hinge and not squat
during this exercise. Your shins should remain as vertical as possible during
the movement. Keep your weight centered through your whole foot rather than
shifting from heel to toe during the movement.
Do your best to hinge and not squat
during this exercise. Your shins should remain as vertical as possible during
the movement. Keep your weight centered through your whole foot rather than
shifting from heel to toe during the movement.
Blog post by Greg Wilson.

