Marathon Training Tip #16: Dominate Race Week


Congratulations!  You made it to race week!
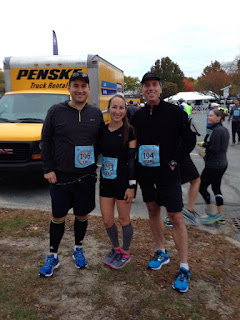
Jon, Jen & Joe in 2015
You did all the hard work and logged all
the miles.  It’s time to trust your
training, let your body rest up and prepare for the big day.
If you missed a few training runs, don’t
try to cram in extra miles or speed workouts before the race.  You are in taper.  Enjoy it. 
Try to stay off your feet and avoid any extra activities that may tire
you out or potentially injury you.  Take
some time to put your feet up if you can.
Get to bed a little bit earlier every
night this week.  Excitement and nerves
often keep us tossing and turning the night before a big race but don’t panic.  It has been said that Ryan Hall broke the
American Record at the Houston Half Marathon off of only a few hours of sleep!
Eat smart and stick to your regular
diet.  Don’t try anything new—especially
race morning and the night before the race. 
Avoid spicy foods, seafood or anything with heavy cream that may upset
your stomach and make sure you are hydrating throughout the week.
Arrive at the start line with a goal and
a race strategy but be ready to adapt. 
We all have good days and bad days. 
What if Mother Nature does not cooperate or something goes wrong?  How will you recoup and finish the race when
giving up is not an option?  I always say
at some point of every race take a look around at all the other runners,
volunteers and race supporters.  Everyone
out there on the course has their own story to tell about their training and
struggles.  Pull some motivation and
inspiration from others around you. 
Appreciate the run and learn from your experiences.
Thank you for following along!  If you missed any of our weekly training
tips—from negative splits to strength training and kinesio taping, you can view
them all by clicking on the Cape Cod Marathon tag: https://mashpeefitness.blogspot.com/search/label/Cape%20Cod%20Marathon

Jen after the 2015 Cape Cod Half with race volunteer & Mashpee Fitness member Beth T.
Good luck out there!  Happy running!
Blog post by Jen Skiba.

About
Coach Jen Skiba

Jen began her running career as a
middle-distance runner for Falmouth High School and has been involved with the
sport for over 12 years as a runner, official, race management, and coach.  A Mashpee Fitness trainer and Certified
Running Coach through the Road Runners Club of America (RRCA), Jen enjoys
working with runners in the gym and on the roads. “Whether you are a beginner
looking to get started running or at the intermediate level hoping to improve
your times or tackle new distances, I can help you reach your goals!”
Marathon Training Tip #15: Get Race Day Ready


Preparing for a big race can be very
stressful. Here are a few things you can do during your training and leading up
to race morning to minimize stress and help you arrive at the start line with confidence
and ease.

Know
the course.

Study the race course and elevation
chart.  If you are local, try to
incorporate parts of the course during your normal training runs.  If you are travelling for the race, try to at
least drive over the course before race day. 
Visualize yourself out there and come up with a plan of how to tackle
the distance.
Check out the video below for Cape Cod
Marathon specific race strategies…

Practice
pre-run meals.

Training is the time to experiment with
your food choices.  Before your long
runs, simulate race morning.  See what
time your race starts and practice running at that time.  (The
Cape Cod Half starts at 7:30am, the Cape Cod Marathon starts at 8:30am!)
  Every runner is different.  How early do you need to eat before your
run?  Can you drink coffee before your
run?  If you are staying in a hotel the
night before your race, see what the hotel has to offer in terms of  breakfast—and how early breakfast opens
up—and plan ahead if you need to bring your own meal.  Learn what works best for you and then
continue to practice the same habits during training and then again on race
morning.

Determine
your race nutrition and fueling strategies.

Almost as important as your pre-run meal
is the fuel you take during your runs. 
If you are training for a 5k and possibly even a 10k, you won’t have to
worry about fueling during your race.  If
you are training for a half marathon or full marathon, this is a very important
concept.
Step 1: Do your research.
Find out what companies are sponsoring
the race.  (The Cape Cod Marathon is sponsored by CLIF with Fuel Stops at mile
9.25 for the half and mile 21 for the full. 
Each water stop offers both water and Gatorade.) 
You have 2 options—either train with what
will be out on the course on race morning or bring your own.  Trying something new could lead to
porta-potty stops mid-race!
Step 2: Read labels.
Check the serving size.  Some packages contain 1-2 servings.  For a half, you will probably want 2
servings.  For the marathon, 4
servings.  Also check the caffeine count
on the labels.  Some have no caffeine,
some have 2x caffeine.  Caffeine can
affect your performance in a positive or negative way.  Again, see what works best for you and stick
with it.
Step 3: Figure out WHEN you need fuel.
I have always stuck with the theory on
the GU packages—15 before every 45.  I
start around mile 3 and fuel every 45 minutes after that.  I personally could never get through 26.2
miles by only taking fuel at the mile 21. 
It takes about 15 minutes for your body to start feeling the effects of
your fuel so don’t wait until it’s too late. 
Plan ahead and keep your body and your muscles happy.

Don’t
rely on the expo for new gear or race nutrition.

Race expos can be fun.  Many big races have a lot of different
vendors giving away free stuff and sampling products but don’t rely on the expo
for your race day essentials.  What if
you were planning to buy your race fuel at the expo and they are sold out?  Minimize the stress and come prepared.  Plus you’ll spend way more time on your feet
walking around trying to find what you need when you should be resting for the
big day!  It’s also never a good idea to
buy new shoes or gear right before a race.
On a similar note, if you are flying to
a destination race, plan to carry on your important items.  You just never know!

Do
a dress rehearsal.

Decide what you plan to wear on race
morning ahead of time and do a dress rehearsal. 
Discover all the little nuisances that may affect your performance on
race day like if your shorts ride up or if your sports bra is rubbing.  Make sure you have a good two to three
weekend of running in new shoes before a race. 
If you race in flats, wear them a few times before your race.  New or unfamiliar shoes on race day could
lead to blisters and/or random aches, pains or strains.

Lay
everything out the night before your race.

Try everything on and lay everything out
the night before your race.  In big on to
do lists so I make a checklist.  Shoes,
socks, shorts, sports bra, shirt, deodorant, Body Glide, GPS watch, Road ID,
hair tie, bobby pins, sunglasses, race number, safety pins, fuel, breakfast,
etc.  Preparation means less stress when
your alarm goes off.

Wear
throwaways to the start.

It’s so important to not only warm up
but also to stay way before your race.  Depending
on the size of the race, you may spend a lot of time waiting around in the
start corrals.  Cold, tense muscles can
cramp up and increase your chances of injury. 
Wear “throwaways” that you don’t mind leaving at the start line and keep
them on as long as you possibly can. 
Don’t have anything you want to part with?  Stop by a thrift shop for some cheap
sweats.  Many of the bigger races will
even collect clothes left at the start and donate to charity.

Take
a deep breath.

You got this.  Good luck out there!  Happy running!
Blog post by Jen Skiba.

About
Coach Jen Skiba

Jen began her running career as a
middle-distance runner for Falmouth High School and has been involved with the sport
for over 12 years as a runner, official, race management, and coach.  A Mashpee Fitness trainer and Certified
Running Coach through the Road Runners Club of America (RRCA), Jen enjoys
working with runners in the gym and on the roads. “Whether you are a beginner
looking to get started running or at the intermediate level hoping to improve
your times or tackle new distances, I can help you reach your goals!”

Marathon Training Tip #14: Prepare for Winter Running


The days are getting shorter and the
mornings are getting cooler, darker and damper. 
You’ve been training hard all summer and now is not the time to lose motivation
and get stuck in a slump.  Even though fall
brings change, it doesn’t mean that your running has to suffer.
Here are some tips to help you transition
into fall and prepare for winter running…

CLOTHING/GEAR

Invest
in a good jacket.
Look for a lightweight breathable jacket
that is windproof and offers some protection against the rain.  This type of jacket will pull moisture away from
your skin to keep you dry.
Dress
in layers.
A good rule of thumb is to dress as if
it were 15-20 degrees warmer.  It’s
important that you don’t overheat because that can lead to excess sweating and
chills.  Layer up so once you warm up you
can start discarding layers.  Gloves and
mittens are great accessories as a high percentage of heat escapes through your
hands and feet and can easily be tucked away in a pocket or in your pants.
Avoid
cotton.
Repeat after me… Cotton is evil.  No, seriously.  There is nothing good about running in
cotton.  Find a good moisture wicking
base layer as cotton will only trap sweat and keep it close to your skin making
you cold and miserable.
Buy
Yaktrax.
If you plan to keep running through the
winter, Yaktrax (or a similar brand/product) is a must.  Great for running in the snow or icy
conditions, you can put them on right over your normal running shoes and head
out the door with confidence.

SAFETY

See
and be seen.
As we keep losing precious daylight
hours, you may find yourself running in the dark.  Make sure you have a headlamp or knuckle
lights along with plenty of reflective gear to stay safe.
Run
on the left side of the road.
It may sound like common sense to most
runners but some still just don’t get it. 
Run against traffic to see cars coming at you.  If a driver doesn’t see you, at least you see
them and can jump out of the way if necessary.
Leave
your headphones at home.
Stay alert and be aware of your
surroundings.  Music is often a major
distractions and some of you can’t run without it but in many situations (dark,
icy, etc.) it’s much safer to save them for the treadmill.
Run
with an ID/ RoadID.
In a very unfortunate event that
something may happen to you while out on a run, make sure you have an ID or
some way to be identified.  I personally
like the company RoadID—they make “Personal Identification Gear”—and I’ve made
sure every runner in my family owns one.

PROTECT
YO’SELF

Adjust
your workout.
Your training plan may say one thing but
Mother Nature is saying another thing. 
It’s ok to take an extra day off or adjust your workout in horrible
conditions.  Trust me when I say it’s not
always worth it.  Find yourself taking a
lot of days off?  Try running on a
treadmill or even pool running!
Hydrate
like it’s the summer.
Replenishing fluids is just as important
in the winter as it is in the summer. 
It’s easy to forget the need to hydrate in cooler and even freezing
temperatures but your body is losing a lot of moisture trying to keep you warm.
Don’t
skip sun protection.
The UV rays reflect off the water and
snow and can cause sun damage to your skin and eyes even in the colder months.
Always wear sunscreen, lip balm with SPF and a good pair of sunglasses.
Eliminate
chaffing.
Cooler weather means increased layers.  This also can mean increased sweating and
increased chaffing.  Find a product you
love and trust like Body Glide or 2Toms to use in those problem areas so there
are no surprises when you hop in the shower after that long run.  Don’t act like you don’t know what I’m
talking about…
Shield
yourself against the wind.
Wind can make cold days feel even
colder.  Heat escapes more rapidly and it
becomes harder to generate heat.  Check
out the video below for some bonus tips for running in the wind…

MOTIVATION

Join
a club or a group.
Running buddies are great for
accountability and support.  Visit your
local specialty running store and ask if they hold weekly group runs.  You can also search the RRCA website to “Find
a Running Club” in your area.
Sign
up for some fun races.
During your marathon or half marathon
training, it’s good to throw in some shorter races to test your fitness.  After your goal race, get a few more fun
races on the schedule to keep you going. 
I love a good themed holiday race like a Turkey Trot or Jingle Jog.
Remind
yourself that it could be worse.
We all know what’s coming.  Take advantage of the good days.  Don’t make excuses now—get out the door and
get after it.
Good luck out there!  Stay safe & happy running!
Blog post by Jen Skiba.

About
Coach Jen Skiba 

Jen began her running career as a
middle-distance runner for Falmouth High School and has been involved with the
sport for over 12 years as a runner, official, race management, and coach.
  A Mashpee Fitness trainer and Certified
Running Coach through the Road Runners Club of America (RRCA), Jen enjoys
working with runners in the gym and on the roads. “Whether you are a beginner
looking to get started running or at the intermediate level hoping to improve
your times or tackle new distances, I can help you reach your goals!”

Marathon Training Tip #13: Try Kinesiotaping


What is Kinesiotape and how can it help?

You’ve probably seen it in the Olympics,
the “magic tape”, but what does it really
do?
Kinesiotape is a multi-purpose tape that
physical therapists will sometimes use to aide in rehabilitation following an
injury. This tape can be used to assist muscle movements, inhibit other
muscles, reduce swelling, reduce scar tissue, and improve overall muscle function
and joint kinematics. Kinesiotape actually refers to a specific brand of tape,
but in reality there are several other brands that offer similar benefits-
Rocktape, and Bodytape for example. This type of tape offers much more mobility
than other kinds of more restrictive tape which can be used to stabilize
joints.
There are several different taping
techniques that we use as physical therapists. If you have an area that is
really swollen following an acute injury, we can actually basket weave the tape
to assist with lymphatic flow. For this technique, you can cut the tape as
shown- with strips, or “tentacles”. I recommend cutting 6-8 strips/strands if
you’re using the wider (4 inch) tape, or 4 strips if you’re using the narrow (2
inch) tape. Find the area that is most swollen, and apply the tape with zero
stretch over this area. Avoid applying the tape to sensitive areas (behind the
knees, inner elbow, or face).
Here’s another technique we will
commonly use if you are having knee pain. This technique works to more so
stabilize your knee. You will need 3 strips of 2 inch tape for this technique. Cut
one strip to about 2 inches in length, and the other two to 4 inches in length,
then round the edges. Starting at the body area directly below your knee cap,
anchor one piece of tape with no stretch on the ends, then apply 50% stretch as
you encircle your patella on the inside. Repeat this procedure with your other
4 inch strip of tape, on the outside of your knee. For the final strip, you’re
going to want to apply 50% stretch to the middle portion of the tape, and apply
it directly below your patella.
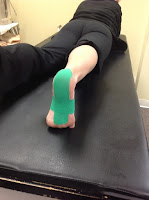
Another technique that we commonly use
in runners in this technique for plantar fasciitis/arch support. You will need
1 piece of 2 inch tape cut about 4 inches long, and 2-3 pieces cut 2-3 inches
long. With your foot flexed (toes pulled up towards your shin), tape from the
ball of your foot towards your heel. Then apply 2-3 strips at your arch. The
middle of the tape should be stretched to 50%, then no stretch on the ends. You
can also perform this taping technique (or have someone else help you) in a plank
position in order to get your toe involved.

What if you have sensitive skin?
Although skin irritation can happen, it is extremely rare. If you have
sensitive skin, it is possible for you to have some irritation from the tape,
but if this occurs gently take off the tape with soap and warm water.
Generally, we recommend that you take the tape off after 3-5 days of wear. If
you know you are usually sensitive to adhesives, you may want to actually take
the tape off sooner.

Here are some general guidelines that
you should follow if using this tape:

  1. Wear the tape for 3-5 days maximum at a
    time, if you have sensitive skin, you may want to wear for a shorter period of
    time.
  2. When removing the tape, do not just rip
    it off, this may damage the underlying skin. Instead, hold the skin, and roll
    of the tape. Soap and warm water, or baby oil can also be helpful in tape
    removal.
  3. You may wear the tape in the shower or
    in the water- but if it gets wet do NOT blow dry the tape- this will activate
    the tape and you could burn your skin.
  4. If itching or discomfort occurs with the
    tape, do not hesitate to take it off immediately.
  5. It is OK to exercise and perform all
    regular activities while you are wearing the tape.
  6. If the skin surrounding the tape is
    showing redness/irritation remove the tape immediately.
  7. If the skin under the tape starts to
    feel numb/tingly remove immediately.
  8. Do not tape over numb areas or areas
    with poor sensation.
  9. Shoes/socks/other clothing can be worn
    over the tape- never apply the tape over clothing.
  10. Do not use tape over areas where you’ve
    been treated with radiation, or if you have history of cancer without first
    checking with your doctor.
  11. Tape comes in different colors/patterns,
    feel free to choose based on your color preference. The color and/or pattern of
    the tape has no bearing on the strength or effectiveness of the tape.

As always, if you are unfamiliar with
taping, or are unsure if taping could benefit you, make sure you have a
physical therapist show you how to apply the tape properly. If you are taping
yourself, and you’re experiencing pain or itching- take it off!

How to Kinesiotape for Knee Pain


How to Kinesiotape for Foot Pain, Plantar Fasciitis & Arch Support


How to Kinesiotape for Swelling of the Foot


Blog post by Tiffany Sadeck.

About
Tiffany Sadeck PT DPT CSCS

Tiffany is a member of the Cape Cod
Rehab Running Team with a Doctor oh Physical Therapy degree.  She is also a Certified Strength &
Conditioning Specialist with a long history of running which began her freshman
year of high school.  A 3-season athlete,
Tiffany was captain her junior and senior year and went on to run Division 3
Cross Country and Track & Field at Springfield College.  She competed in events ranging from the 800-2
mile and high jump.  Tiffany began
running longer distances up to the marathon two years ago and would like to
help runners to help better times and meet goals while preventing injuries and
maintaining a fun, friendly training environment.

Marathon Training Tip #12: Recover from Shin Splints


Mention the term “shin splints” and almost every runner recalls
experiencing pain in the lower leg associated with running.  The term itself is non-specific and is what
we call a “waste basket” term.  Pain in
the lower leg usually can be identified as Medial Tibial Stress Syndrome
(MTSS), stress fractures and exertional compartment syndrome.
MTSS occurs on the inside edge of the lower leg bone (tibia).  It is usually tender to touch mid-way between
the knee and ankle or in the lower 1/3 of the leg.  This injury usually occurs with runners new
to the sport, running on hard surfaces, training errors—doing too much too soon
or increasing distances too rapidly, muscle imbalances or biomechanical faults
especially excessive pronation.   The
source of the pain is usually either inflammation of the tissue that lines the
bone called the periosteum, or the posterior tibialis tendon that runs along
the inside of the bone to the foot. 
Left untreated or pushing through this injury can lead to a stress
fracture of the tibia, a small crack in the bone.  X-rays are usually not necessary and the
stress fracture doesn’t usually show up for 2-3 weeks and either an MRI or bone
scan is needed to find it.  Women are 2-3
times more likely to experience this problem than men and should be certain
that their vitamin D and calcium intake is sufficient.  If stress fractures are recurrent, a full
medical work up is necessary to rule out other potential causes.
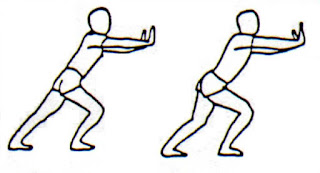
MTSS often develops when the Achilles tendon and Soleus muscle are
tight and or weak.  Performing stretching
and strengthening exercises to correct that problem often eliminates the
problem.  Most runners know how to
stretch the Achilles tendon but often are unfamiliar with stretching the
soleus.
If the lower leg pain is on the top or outside of the bone, the
anterior tibialis muscle may be the culprit. 
If the pain worsens during the run and the foot gets numb and the ankle
gets weak, so weak that it is difficult to lift the toes up with the heel on
the ground, exertional compartment syndrome may be the problem.  The muscles, nerves and blood vessels are
grouped in what is known as a compartment. 
If the pressure builds in the compartment the muscle can swell and the
nerves and blood vessels become compressed to the point the ankle loses
function.  Usually only present during
running and resolves shortly after stopping, but left unchecked may require
surgery to relieve the pressure.

Follow these tips at the first sign of lower leg problems:

  • Ice the area after running.
  • Stretch the Achilles and soleus.
  • Strengthen the lower leg muscles, core and hips.
  • Run on softer surfaces like a trail or track.
  • Correct excessive pronation with an arch support.
  • Replace shoes if worn excessively.
  • Cross train in pool or elliptical until pain lessens.
  • Still a problem after 2 weeks? 
    See a Physical Therapist or Sports MD.

Watch the video for a 3 exercises to
help you recover from shin splints…

Blog post by Joe Carroll.


About
Joe Carroll PT DPT SCS

Joe is a Doctor of Physical Therapy and
co-owns Cape Cod Rehab with his wife, Kathy. One of the first PT’s in the state
to be certified as a Sports Clinical Specialist (SCS), Joe is also a Master
Instructor in the Burdenko Method. He continues to run and support local road
races every year and knows what it takes to help athletes get to the level they
desire. Joe is a 5-time Boston Marathon finisher and ran his 7th marathon on
April 18, 2016 at the Boston Marathon raising money for Boston Children’s
Hospital.

Marathon Training Tip #11: Treat Plantar Fasciitis

What is Plantar Fasciitis?


The plantar fascia is described as a thick fibrous bands of
connective tissue that originates from the medial aspect of the heel through
the sole of the foot and inserts at the base of each toe. It is a shock
absorbing bowstring supporting the arch of the foot.
  For
runners the plantar fascia
 can be a source of major discomfort causing stabbing pain at the
base of the heel and aching throughout the arch of the foot. It affects the
push off mechanism of the foot and produces pain during push off phase while
running.
  It can also cause stabbing pain in the morning during the first
few steps getting out of bed.
Plantar fasciitis was originally thought to be an inflammatory
condition but recent research has found it is non-inflammatory breakdown of
tissue as a result of repetitive microtrauma and the name of the condition may
eventually be renamed to plantar fasciosis.
  There
are also studies discussing the tension on the flexor digitorum brevis and its
resultant forces on the plantar fascia contributing to plantar fasciitis pain.
Diagnosis of plantar fasciitis would be tenderness to touch along
the medial aspect of the calcaneus (heel bone) on the soul of the foot.
Tenderness can also be present along the medial arch when palpating the edge of
the fascia.
 The condition is also accompanied with tightness in the calf or
Achilles causing a decrease in Dorsi flexion. Strength of the flexor digitorum
brevis can also be a factor. In one third of all plantar fasciitis patients,
the condition is bilateral.

While plantar fasciitis is thought to be caused by being flat
footed, and flat footed runners have higher occurrence rates, it is not
clinically proven that fallen arches are predisposing factor. Runners of all
arch height can be affected by this condition.

Treatment

Treatment of plantar fasciitis can come in many forms. There is
strong evidence supporting manual therapy including self-mobilization of the
ankle joint and toes as well as self-soft tissue mobilization of the plantar
fascia itself.
Stretching of the gastroc as well as Soleus components
of the lower extremity also have strong supporting evidence of improving
plantar fashion conditions. Stretching of the sole of the foot
 by
pulling the great toe back is another treatment technique that is supported by
strong evidence.
For those runners with significant morning pain, night splints
have also proven to be successful in reducing plantar fasciitis pain. Foot
orthoses with a supportive arch are also clinically proven and have strong
evidence of improving this condition.
Other external treatment alternatives which have good supporting
evidence
 are anti-pronation taping of the plantar aspect of the foot as
well as kinesiotaping of the arch of the foot. 
RockTape shows an example below:
Strengthening of the flexor digitorum brevis will also help in the
treatment of plantar fasciitis conditions. Different ways to perform
strengthening exercises for the flexor digitorum brevis include a simple
exercise such as picking up rocks or marbles with your toes or trying to
scrunch a towel or pick up a hand towel with your toes.

Prevention

While treatment of plantar fasciitis is a good thing to know,
knowing how to prevent it in runners is probably more important. Changes to
increase mileage to quickly as well as increase in hill training are common
flaws that can lead to plantar fasciitis conditions. Making sure you have good
ankle joint flexibility to perform Dorsi flexion as well as well stretched
lower extremities and a strong flexor digitorum brevis will also help prevent
this annoying condition.

Watch the video for some self-help treatment techniques…


Blog post by T.C. Cleary.

About
T.C. Cleary PT DPT SCS

T.C. is a member of the Cape Cod Rehab
Running Team not because she enjoys running herself, but because she is one of
the select few PTs in Massachusetts to be Bard Certified in Sports Physical
Therapy. An ice hockey player and coach, T.C. particularly enjoys working with
high school and college athletes. She believes in treating everyone the way you
would want your child or mother treated and employs many different
interventions to obtain maximum recovery. T.C. also has special interest in
Anterior Cruciate Ligament (ACL) Injury Prevention & Treatment along with
Concussion Management.

Marathon Training Tip #10: Reduce Knee Injuries


Pain is a language.  Ignore it and you will more often than not
pay the price.  Most running injuries are
not traumatic, but present over time beginning with pain during the activity of
running and progressing to pain during and after a run.  Acting at the first warning sign will shorten
the recovery time and reduce any down time that might be necessary.  If you ignore pain more likely than not
symptoms will worsen and more time will be lost from your training.  If pain worsens to the point that it is
painful with normal daily activities or keeping you awake at night, you should
seek a professional evaluation.
The knee is a complex joint and primary
shock absorber for running.  Approximately
12 times body weight is absorbed with each stride.  Patella-femoral
injuries
, sometimes referred to as Runner’s
Knee
occur if we land with our knees extended or do not have strong
quadriceps and hamstrings along with a flexible Achilles tendon to absorb
shock.  Landing toward the midfoot with a
slightly flexed knee and performing strength training exercises can help
minimize this injury.  Follow this link
to learn a series of strength training exercises for runners using a simple piece
of equipment: 
https://mashpeefitness.blogspot.com/2016/08/cape-cod-rehabs-ccm-training-tip-6.html

Training Errors

Increasing the number of times you run
per week and or number of miles per week is the biggest culprit.  When injury does occur it is best to modify
your schedule and remember the ultimate goal is to be healthy come race
day.  Missing a week of scheduled runs is
preferable to pushing through and worsening the injury.  If you can keep the pain level below a 4 on a
1-10 scale during a run, 10 being terrible pain, it is usually safe to continue
on a reduced frequency and duration schedule. 
Increase non-impact activities to either help recover following runs or
to substitute if pain is greater than 4 or present at rest.  Highly recommended is water running.  If a pool is not available then try the elliptical trainer or
spin bike for low impact cardiovascular conditioning.

Biomechanical Faults

“Stay in your hinges.” The late Dr. Rob Roy McGregor, sports
medicine pioneer coined that phrase and simply means to run with good
alignment.  When alignment is off, the
stress on the knee will be magnified with each stride.  If you have arches that collapse (excessive
pronation) the inside of your lower leg and inside of your knee is susceptible.  If you tend toward valgus (knock knee) or
varus (bow legged) you are susceptible for
Iliotibial band (IT band)
issues.  

Strengthening
the outside of the hip is often overlooked, but is key in preventing and
recovering from many knee injuries.  Here
is a link with an exercise called Scooters used to strengthen the hip abductors: 
https://mashpeefitness.blogspot.com/2014/11/5-burdenko-strength-exercises-for.html

Proper shoes as well as arch
supports are important as well as correcting any muscle imbalances.
Use a common sense progression of 10%
per week in your training, correct and condition the muscles that cross your
knee joint, listen to your bodies signals and your knees will carry you many
miles without a problem.

Watch the video for a few simple self-help
techniques…


Blog post by Joe Carroll.

About
Joe Carroll PT DPT SCS 

Joe is a Doctor of Physical Therapy and
co-owns Cape Cod Rehab with his wife, Kathy. One of the first PT’s in the state
to be certified as a Sports Clinical Specialist (SCS), Joe is also a Master
Instructor in the Burdenko Method. He continues to run and support local road
races every year and knows what it takes to help athletes get to the level they
desire. Joe is a 5-time Boston Marathon finisher and ran his 7th marathon on
April 18, 2016 at the Boston Marathon raising money for Boston Children’s Hospital.

Marathon Training Tip #9: Other Recovery Techniques


Last year I
completed my first 2 half marathons.  I
was cruising through my first half back in June and I remember saying to myself
at mile 10, “Wow, I can’t believe how great I feel!”  Then I got to mile 11 and my left calf
started to cramp, shortly followed by my right calf.  No matter how much stretching I did on the
course, I could not stop the cramping. 
It wasn’t pretty but I finished the race, limping across the finish line.  I remember the pain being severe over the
next few days at work but this didn’t stop me from registering for another
half marathon in the fall. 
Moving forward
with my training, I decided to try wearing compression sleeves over my
calves.  There isn’t much evidence out
there supporting that they’ll improve performance, but there is some evidence
stating that they prevent muscle soreness post longer runs.  I wore these sleeves during my second half
marathon last year and I got through the entire race without cramping and
without excessive soreness afterwards either.  
When faced
with an injury you always want to remember the acronym P.R.I.C.E.
P stands for protection from further injury
R stands for rest
I stands for ice
C stands for compression
E stands for elevation
Paula Radcliffe sporting compression
as she sets the World Record at the
2003 London Marathon!
During
exercise muscles produce lactic acid. 
Too much lactic acid causes muscle soreness and also makes muscles
fatigue quicker leaving them susceptible to injury.   Wearing compression socks helps fight the
effect of gravity and can help return blood to the heart quicker.  This allows the body to eliminate lactic acid
more efficiently allowing our muscles to perform better over the course of a
long run. In theory this sounds great! 
My calves definitely felt the difference in a good way.  But do they actually work?  

There is a great article written by Andrea
Bachand, MSc PT, BSc Kin who does an excellent job summarizing the current
evidence on this topic.  Basically most
studies do not correlate wearing compression socks to improved running
performance or improvements in physiological performance such as HR, blood
lactate levels, or VO2 max profiles. 
However, one study from the International Journal of Sports Medicine by
Bringard et al back in 2006 showed that wearing compression tights decreased
running energy costs but only at very low speeds.[i]  So the compression socks/sleeves may provide
a benefit for those like me who run at 9-10 minutes/mile or slower paces.  You can check out Andrea’s article here: 
https://www.run3d.co.uk/announcements/compression_socks.
Ice is always
beneficial after an injury.  It is a
natural anti-inflammatory.  Sometimes the
body over compensates for an injury and swelling can become excessive.  Ice helps reduce swelling immediately after
an injury.  However, when swelling is
already present, that’s where combining ice with compression can help even
more.
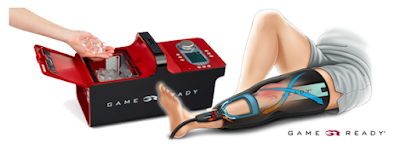
Game Ready is
a company that provides Active Cold Compression Therapy.  A sleeve is wrapped around the injured body
part which circulates ice water and inflates to aid in the healing process.  Cold therapy is effective because it slows
the metabolic demand of cells, which limits the cells need for oxygen,
preventing secondary tissue damage.  The
unit then inflates adding compression to the desired body part.  This produces a pumping action, mimicking
what our muscles do. This muscle pumping-like action helps eliminate swelling
from the area, aiding in lymphatic drainage and improving blood flow. [ii]

Another
company that provides dynamic compression is NormaTec and has become very
popular among professional athletes. 
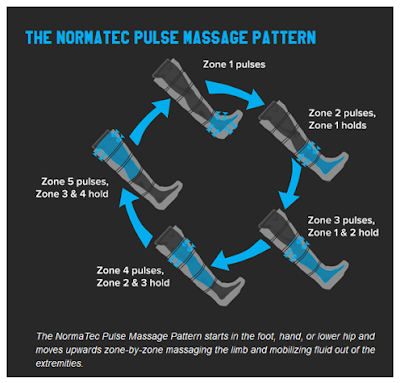
NormaTec makes dynamic compression devices that use a Pulse Massage
Pattern to help improve lymphatic drainage, thus improving blood flow.  There have been several studies published
demonstrating the benefits of dynamic compression.  There are 3 components to NormaTec’s patented
Pulse Massage Pattern. Pulsing is the first component.  This is more effective than static
compression because it mimics the muscle pumping action of our arms and legs,
“greatly enhancing the movement of fluid and metabolites out of the limbs after
an intense workout.”[iii]  NormaTec also utilizes gradients to mimic the
one way valves in our veins and lymph vessels. 
These valves prevent fluid backflow. 
NormaTec uses hold pressures in separate zones to keep fluids from being
forced in the wrong direction, allowing the device to deliver maximum pressure
in each zone.[iv]  NormaTec than utilizes a distal release
pattern, releasing the hold pressures in lower (or distal) zones once they are
no longer needed to prevent backflow.[v]  There are 7 levels of pressure.  I feel most comfortable at level 5.
Check out the
video below to listen to Celtics Head Athletic Trainer, Ed Lacerte, explain the
benefits of NormaTec![vi]  (I love Waltah!)
[vii]
I’ve been
using the NormaTec sleeves as part of my recovery from a recent hamstring/calf
injury.  It feels great after a 15-minute
treatment and really helps accelerate the recovery process.
These are a
just a few things that can help speed your recovery after a long run or help
accelerate the healing process after an injury. 
Let’s face it, us runners hate to take time off from running!
Blog post by Jon Carroll.

About
Jon Carroll PT DPT OCS

Jon joins the Cape Cod Rehab Running
Team with a few personal running accomplishments including finishing his first
2 half marathons in 2015.  A three sport
athlete in high school, Jon took up running after completing his first Falmouth
Road Race back in 2010 and hasn’t looked back. 
A Physical Therapist and Orthopedic Clinical Specialist (OCS), Jon
enjoys working with runners because he knows how good running feels and
understands the frustration when runners have to take a break when
injured.  Jon’s goal is to run a full
marathon in the near future.  His motto:
“Ultimate fitness is a marathon, not a sprint.”

——


[i] www.run3d.co.uk/announcements/compression_socks
[ii] https://www.gameready.com
[iii]
https://www.normatecrecovery.com/how-compression-works/how-and-science/default.aspx#sci
[iv]
https://www.normatecrecovery.com/how-compression-works/how-and-science/default.aspx#sci
[v] https://www.normatecrecovery.com/
[vi] https://www.youtube.com/watch?v=OuQRMkAf7mY
[vii] https://www.normatecrecovery.com/

Marathon Training Tip #8: Aquatic Recovery


One of the
most overlooked aspects of training is rest and recovery.  Often
times complete rest for active people is very difficult.  There are many
benefits to including active recovery sessions in your training.  One of
the best places to perform an active recovery workout is in the water. 
The water provides a non-weight bearing environment in that helps reduce stress
on the joints, provide traction to your spine, promote circulation and reduce
swelling to name a few.  The shallow water can provide some of the same
benefits by reducing the amount of impact performing similar activities to
running. At waist level in the water you are about 50% weight bearing. 
Last but not least, exercise in the water is fun! 
Try these
aquatic recovery exercises to improve your performance, reduce your risk of
injury and add some variety to your training program.

Deep End Exercises

Wear a buoyancy belt. Perform waking exercises
for 2-3 laps & hanging exercises 10-15 repetitions.

Forward
Walking
Equipment: none
Action:  Step forward in a normal walking pattern.
Alternate arms with each step while focusing on forward movement with proper
alignment and posture. 
Walk +
Stretch
Equipment: none
Action: Walk 3 steps then kick your leg forward, reaching for your
foot with the opposite arm.  Walk 3 steps
and repeat with the other arm and leg. 
Keep torso straight and keep toes up.
Symmetrical
Walking with Turns
Equipment: none
Action:  While walking forward turn palms out and push
arms out to align with shoulders. Arms make a breast stroke motion. Bring arms
to chest.  Return to start position.  Take 3 strokes forward, then turn 180 degrees
and walk 3 strokes backwards, turn 180 degrees and repeat.
Splits +
Spreads
Equipment: 2 long bars
Action:  Separate legs in open scissors kick position:
one leg straight forward, another leg straight back.  Return to start position. Repeat with the
other leg forward.  Return to start
position.  Spread both legs apart to the
sides, keeping toes up and legs straight. 
Return to start position.
Tips:  Keep legs straight and attain full range of
motion with each movement.  Feel the
stretch while keeping toes up to.
Leg Stretch
Series
Equipment: 2 long bars
Action: Bend one knee to a 90° position, keeping toes up. Extend leg
straight in front of the body then back to the 90° position. Return to start
position. Repeat with the other leg. Repeat the sequence changing leg extension
of the knee to an internal position (kicking across the body) then an external
position (kicking out).
Running
Pendulum
Equipment: 2 long bars
Action: 
Run moving to the side lying position using four running steps;
pause.  Return to start position. Repeat
moving to other side.

Shallow End Exercises

Perform
walking exercises for 2-3 laps & stationary exercises 10-15 repetitions.

Weight Shift Catch
Action: 
Shift weight to one leg and simultaneously catch and lift the knee with
both arms and pull the knee to the chest, hold the balance. Return to start
position. Repeat with the other leg.
Tips: 
Maintain straight body alignment while pulling the knee up. Come up on
the toes each time when pulling the knee up.
Catch + Pull
Action: Walk forward 3 steps and catch one foot with the opposite arm
behind body, the other arm reaches straight above the head.  Return to starting position.  Walk forward 3 steps and repeat with the
opposite hand and foot.  For an added
challenge—before you catch the foot, bend the weight bearing knee down into a
squat position and power up to your toes.
Leg Swing
Action: Walk forward 3 steps, stand on one leg while swinging the
other leg forward, back, forward. Swing the arms so opposite hand and foot are
in front.  Was forward 3 steps and repeat
with the opposite side. Make sure to keep your body straight and sing the leg
high back and forth.
Squat Hurdles
Action: Walk forward 3 steps then squat, arms straight forward at
shoulder level. As you stand, mimic hurdle motion: one leg kicks straight out,
touching the foot with your opposite hand. Other arm extends back.  Walk forward 3 steps and repeat with the
opposite hand and foot.  Get the motion
in rhythm, kicking knee is straight, weight bearing leg is on the ball of the
foot.
Carioca
Action: Stand with arms out to side at shoulder level. Step side to
side crossing one foot in front then in back (like the grapevine). Take wide
steps, keeping your pelvis stable.
Blog post by Eric Chandler.

About
Eric Chandler

Eric joins the Cape Cod Rehab Running
Team with a background in Exercise Science. He is a Certified Strength &
Conditioning Specialist (CSCS), certified in Part I & Part II of the
Burdenko Method, a Certified Functional Movement Screen (FMS) Specialist, and
has also been training in the TRX Suspension Training Method. Eric looks for his
clients’ strengths and uses those strengths to help them get the most out of
each session. A recreational runner, Eric has served on many of the CCR Flyers
Cape Cod Marathon relay teams as has a goal of breaking 20 minutes in the 5k.

Marathon Training Tip #7: Give It A Rest


I’m sure you’ve been
crushing your long runs, giving big efforts on your tempo runs and speed work,
but maybe you’re starting to feel some tightness and soreness creeping in at
times. What is the first step to preventing this from becoming an injury
situation that keeps you from finishing your training and reaching your goals
on race day? 

REST!
Why
do you want to do this you might ask? Well for one reason, resting is when you
get faster! All of your training is a stress to your body, this makes your
tired, sore and decreases your ability to hold efforts in training. When you
rest, the adaptations take place and you bounce back ready to go harder and
stronger than before. Another benefit is that all that soreness from the great
training you’re doing is going to decrease. You’re going to be more comfortable
and that will translate to more productive workouts.

So,
how do you incorporate rest into your training?

Professional
triathlete Jesse Thomas shared some tips with Competitor Group:
Go
way easier on your easy days.
Not
every workout needs to be a personal best, your hard workouts should be HARD
and your easy ones should be really, really, really easy. You’re training for a
big effort on a single day, not a multi-day event like a cycling stage race.
Change
the plan when your mind or body aren’t up to it.
If
you have a long run or intense track session planned but the kids are sick,
work went late and you skipped lunch, change the workout or push it to another
day when the workout can be more productive for you.
Sleep
More!
The
single biggest difference between professional endurance athletes and amateurs
is sleep. It’s hard to do; between family obligations, work, home maintenance
and watching the Olympics every night, but if your motivation is dropping and
the body is feeling sore, get some extra sleep. Even if it means skipping a
workout here or there, remember the workouts are the stimulus for improvement,
the actual improvement comes when we rest. Just a little bit adds up fast, one
of my cycling friends once pointed out to me that just an extra 15 minutes of
sleep a night is an extra hour and 45 minutes of sleep in a week.


When should you rest and how should you rest?


Blog post by Eric Wheeler.

About
Eric Wheeler MSPT MPE CSCS

Eric joins the Cape Cod Rehab Running
Team with an extensive list of athletic accomplishments including 2x Ironman finisher
with a PR of 10:09:05. He earned a Boston Qualifying time for 2016 with a
marathon PR of 3:06:27. A Physical Therapist and Certified Strength &
Conditioning Specialist (CSCS), Eric enjoys helping injured runners get back on
their feet.
  It’s hard to believe Eric
only started running in 2010 because everyone at Cape Cod Rehab was excited
about the Falmouth Road Race! His motto: “Never judge your life because of one
bad day. Judge it because of the BEST DAY.”

Marathon Training Tip #6: Strength Train


What do most runners do
to train?  Run.
The majority of
distance runners started running because they love to run.  There are many health benefits to running and
it is also convenient to just walk out the door and run.  Often overlooked or ignored by runners is the
importance of strength training. Complimenting your running program with
strength training will improve your performance and also reduce your risk for
injury.  
Here is a TRX series of exercises that
will help strengthen your total body with exercises specifically selected to
address weaknesses typically seen in runners. 
They will help strengthen the core, upper body and lower body and should
be performed 2-3x per week, with a day of rest in between.
Note:
Do not perform any exercise that causes or increases pain.

Warm Up

Squat/Row to Heel Raise
Hold the TRX handles with arms bent and your feet shoulder width apart. Sit back
into a squat keeping your heels on the ground and extend arms. Stand back up
pushing through your heels and pulling with your arms. Once fully standing
raise up on to your toes. 
2×15


The Workout

Power Pull
Hold the TRX handle in single handle position with one hand.  Keep elbow bent at the start and feet shoulder
width apart.  Extend arm holding handle
and drop back into a squat.  Reach back
with your other arm towards the ground. 
Return to the start position by pulling with your arm and driving up
with your legs. 
2×10 each arm

Alternating Side Lunge
Hold the TRX handles and stand with your feet together.  Take a large step out the side keeping toes
pointed straight ahead. Bend the knee that you took a step with pushing hips
back and sitting into a side lunge position. Return to the start position and step
to the other side.
2×10

Balance Lunge with Knee Drive
Hold the TRX handles and stand with your
feet together.  Step back into a reverse lunge.  For a challenge: keep the back foot off the floor in a
balanced position!  Stand up on your
stance leg driving your knee forward into a march position.  Do all repetitions on one side then the
other.
2×10 each

Bridge with Hamstring Curl Series
Lay on the floor with your heels in the TRX cradles (handles should be about 12” off
the ground). Raise your hips into a bridge position.  Keeping hips level draw one knee in towards
your body.  Extend leg out and repeat
with the other leg. Repeat with both legs. Lower body back to the floor.
2×10

Watch Meaghan demonstrate all the TRX Strength Training for Runners exercises…

Bonus! Runner’s TRX Core Circuit

Complete the three exercises in a row
without rest.  Try the circuit 3 times.
Mountain Climbers
Start in a push up position with your feet in the straps. 
Maintain a flat back as you march knees towards your chest in an alternating
pattern.  As the knee comes in towards
your body your hips should rise slightly. 
10x
Three Position Crunch
Start in a push up position with your feet in the straps.  Maintain a flat back as pull both your
knees towards your chest. Return to the start position and pull both knees in
towards your right elbow, return to the start position and pull both knees
towards your left elbow. Repeat the series of 3 movements 5x.
Pike
Start in a push up position with your feet in the straps.  Keep your legs straight and drive your hips
towards the ceiling as you pull your feet towards your hands. 
10x
Blog post by Eric Chandler.

About
Eric Chandler

Eric joins the Cape Cod Rehab Running
Team with a background in Exercise Science. He is a Certified Strength &
Conditioning Specialist (CSCS), certified in Part I & Part II of the
Burdenko Method, a Certified Functional Movement Screen (FMS) Specialist, and
has also been training in the TRX Suspension Training Method. Eric looks for
his clients’ strengths and uses those strengths to help them get the most out
of each session. A recreational runner, Eric has served on many of the CCR
Flyers Cape Cod Marathon relay teams as has a goal of breaking 20 minutes in
the 5k.

Marathon Training Tip #5: Form Running Drills


One way to improve your running speed
and efficiency is by practicing form drills. 
It is very common that your running form can break down with fatigue and
any change in stride will increase your chance of injury.  Form running drills exaggerate different
elements of the running stride to increase range of motion, build strength and
develop muscle memory for important movement patterns. 

When should you perform form running
drills?

Try adding the drills below into your
training 2-3x per week. They should
be done after your warm up/dynamic warm up and before your workout.
Note:
Do not perform any exercise that causes or increases pain.

High Knees


High knees focuses on a powerful leg
drive to develop strength in the quads and hip flexors.

How: Take short steps and alternate
lifting your knees upward until your thigh is at least parallel to the ground.
Foot strikes should be soft and near the balls of your feet.

Butt Kicks


Hello hamstrings! Butt kicks get
the hamstring muscles firing and emphasize the recovery phase—also known as the
follow through. Tight or weak hamstrings can lead to more of a shuffle stride
with a low heel kick and shorter gait.

How: Alternate bringing your heels
towards your glutes as you keep your thighs perpendicular to the ground.

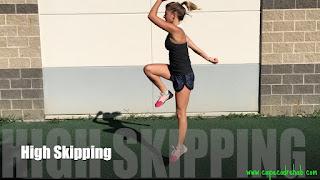
High Skipping


Benefits are similar to the high
knee drill but skipping also incorporates calf and hamstring power along with
increased ankle stability.

How: When was the last time you skipped?
Skip forward focusing on height and soft landings. As you drive up off the
ground, lift your opposite arm overhead.

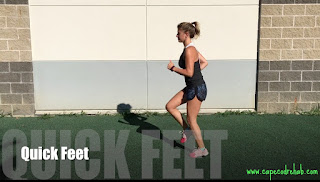
Quick Feet


Quick feet works on your cadence
teaching your muscles to fire and turnover at a faster rate. Bonus! Quick feet
is an excellent drill for over-striders.

How: Work on fast feet and fast arms as
if you are running on hot coals. You should be running more on the balls of
your feet and don’t worry about your high knees and butt kicks—just speed and
quickness!

Backwards Running


Run backwards to recruit different
muscles. It strengthens the quads while promoting good posture.

How: Just as it sounds—run backwards! Focus
on standing up tall and take long strides landing on the balls of your feet.


Carioca


Running is
almost performed exclusively in a straight line moving forward but it is very
important to train laterally. The Carioca exercise (also known as the
grapevine) works on hip mobility and lateral stability.

How: Cross one leg
in front of the other, step out to the side, then cross your leg behind the
other, step out to the side. Swing your arms side to side and your hips should
be rotating as well. Start out slow and increase your speed as you get the hang
of it. Don’t forget to repeat the exercises leading with the other leg!


Good luck out there!  Happy running!
Blog post by Jen Skiba

About
Coach Jen Skiba

Jen began her running career as a
middle-distance runner for Falmouth High School and has been involved with the
sport for over 12 years as a runner, official, race management, and coach.  A Mashpee Fitness trainer and Certified
Running Coach through the Road Runners Club of America (RRCA), Jen enjoys
working with runners in the gym and on the roads. “Whether you are a beginner
looking to get started running or at the intermediate level hoping to improve
your times or tackle new distances, I can help you reach your goals!”

Marathon Training Tip #4: Run Negative Splits


What are negative splits?

It’s pretty simple.  Negative splits are when you complete the
second half of your run faster than your first!

Why should you run negative splits?

Every runner—whether you are a beginner
or an experienced runner—should practice running negative splits on a weekly
basis.  Practicing negative splits in
your normal training runs will translate into racing negative splits.
Why does this matter?  Ok, here’s a common scenario.  You are at a road race.  The gun goes off.  All the excitement and the adrenaline at the
start of the race leads to a super speedy first mile or two.  Even though you know it’s too fast, you feel
good so you try to maintain the pace but totally bonk and have to practically
shuffle your way to the finish line.  Has
this ever happened to you?
In an ideal race situation, you start
out at a comfortable pace.  In fact, you
can use the first few miles of your run as a warm up—just don’t skip the
pre-race dynamic warm up and form running drills!  By starting out slow you are conserving
energy for the end of the race and hopefully avoid hitting that infamous wall
everyone talks about.  After the first
few miles, gradually increase your pace and finish strong, giving it all you
got in the final miles.
You may think that starting out at a
slower pace will effect your ability to run overall fast times but this is not
true at all.  In fact, Runner’s World
wrote at article a few years back about the last five men’s marathon world
record runs.  Going out too fast and
“time in the bank” rarely works out in favor of distance runners.  Spoiler alert!  3 of the last 5 were run at negative splits.  You can view the full article here: https://www.runnersworld.com/newswire/what-world-records-teach-about-marathon-pacing
Patience is a hard trait to teach.  There is such thing as starting out TOO slow
and not being able to make up for the time but that’s why training runs are so
important.  The more you practice running
negative splits, the more comfortable and confident you will become with your
own pacing strategies.  As always, you
need to trust the process and work on your ability to hold back, build on your
speed and cross that finish line with a new PR.

How can you practice running negative
splits during your training?


Good luck out there!  Happy running!
Blog post by Jen Skiba.

About
Coach Jen Skiba

Jen began her running career as a
middle-distance runner for Falmouth High School and has been involved with the
sport for over 12 years as a runner, official, race management, and coach.  A Mashpee Fitness trainer and Certified
Running Coach through the Road Runners Club of America (RRCA), Jen enjoys
working with runners in the gym and on the roads. “Whether you are a beginner
looking to get started running or at the intermediate level hoping to improve
your times or tackle new distances, I can help you reach your goals!”

Marathon Training Tip #3: Tackle the Hills


Whether you are signed up for a hilly
marathon like the Cape Cod Marathon or a super flat race with one epic hill
like the Cape Cod Half, it’s important to incorporate hills into your training.
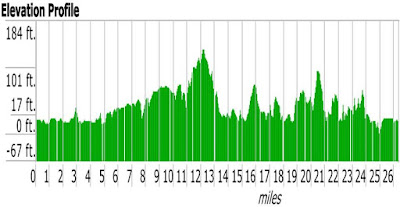
Cape Cod Marathon Elevation Profile

The benefits of hill training is
simple.  Hills will make you
stronger.  More specifically:
  • Improves muscle strength.  Running uphill will strengthen your
    hamstrings, glutes, hip flexors, calves and Achilles.
      Your quads take over most of the workload on
    the downhill.
      You also use a lot more
    upper body muscles running hills than running on flat roads.
  • Improves endurance.
  • Improves power as your muscles need to
    work harder to fight gravity.
  • Improves running form and promotes a
    more efficient stride.
  • Hills can often break up your
    rhythm.
      Train on the hills to master a
    technique so there are no surprises on race day.
      Most new runners will try to surge up a hill
    and then feel totally beat at the top.
     
    The best advice I can give you is to not worry about your pace—focus on
    your effort.
      Maintain your effort level
    on the way up and then allow gravity to carry you downhill.


Running Uphill

When you approach a hill, think about
changing gears.  Your form will change
and your pace may slow down but your effort levels should remain the same.
First, lean into the hill.  I’m talking about a hip hinge, good posture
and no slouching.  With this you will be
running more on your toes—that’s ok, forefoot running on hills is what we want!
Next, think about your arms.  You want to aim for a shorter, faster arm
swing.  Faster arms translates into
faster leg turnover.  Some coaches will
talk about using “higher knees” on the hills but the Road Runners Club of
America stresses that the focus should be on your arms and your legs will
naturally do their job.
So if you are completely out of breath
at the top of the hill, your effort levels are too high.  Try slowing down and finding the right speed
to tackle the hills with ease.

Running Downhill

Downhill running can actually be harder
than uphill running.  It pulls up a lot
of strain on your quads and pressure on your hip and knee joints.
One big thing is that you always want to
be in control on a downhill and accelerate gradually.  Your natural reaction will be to slow down
and “put on the breaks” but that can put your knees at an even greater risk.  Instead, lean forward and allow gravity to
carry you downhill.  Use short strides
and keep your elbows tucked in.

How can you incorporate hills into your
training plan?


Good luck out there!  Happy running!
Blog post by Jen Skiba.

About
Coach Jen Skiba

Jen began her running career as a
middle-distance runner for Falmouth High School and has been involved with the
sport for over 12 years as a runner, official, race management, and coach.  A Mashpee Fitness trainer and Certified
Running Coach through the Road Runners Club of America (RRCA), Jen enjoys
working with runners in the gym and on the roads. “Whether you are a beginner
looking to get started running or at the intermediate level hoping to improve
your times or tackle new distances, I can help you reach your goals!”

Marathon Training Tip #2: Training in the Heat


So you want to keep up with your training but the summer temperatures are rising. No problem. Follow these tips to have a safe run:

Run Early or Run Late

Avoid running in the middle of the day when the sun is directly overhead. The best time to run in the summer heat is first thing in the morning or wait until after the sun starts to set. If that is not an option, take your workout indoors or seek shady routes.

Choose Appropriate Clothing

Less is more when training in the heat. Wear loose fitting and light colored clothing. Chose moisture wicking materials and stay away from cotton.

Acclimatize

It takes about 8-14 days for your body to adjust to hot and humid weather. Just because you can run a 10 miler at an 8 minute pace doesn’t mean you can do the same when the hot and humid days of summer arrive. You may want to cut your intensity by 65% or 70%. Slow down to let your body adjust then over the next few days gradually build back to your previous level.

Check the Heat Index

Before heading out for your run it’s a good idea to check the air quality and the heat index. The heat index tells you what the temperature feels like when combining the air temperature and the relative humidity. For example if the air temperature is 90 degrees and the relative humidity is 70%, then it’s going to feel like it is 106 degrees.

Hydrate, Hydrate, Hydrate

Hydrate before your run. As a rule of thumb drinking 16 ounces of water two hours before running will ensure a good hydration level.  Carry water with you when you run or head to the track where you know every 1/4 mile you have a bottle of water waiting if you want some refreshment. Remember don’t wait until your thirsty before drinking!

Drink Sports Drinks

For runs lasting longer than one hour, you begin to deplete vital electrolytes (i.e., sodium and potassium). Sodium is needed in order for your body to absorb the fluids you’re ingesting. Depleted potassium levels can increase your chances of experiencing muscle cramps. So if you are going to run more than one hour you should switch from water to a sports drink that will replenish these electrolytes.

Blog post by Alan Harrison.

About Alan Harrison

Alan is a Certified Personal Trainer through the American College of Sports Medicine (ACSM). He has a degree in Physical Education and Kinesiology and has held many positions throughout the years as a teacher, coach and Athletic Director.  A former runner, Alan has a passion for sports and is starting to get back into running with the motivation from his Cape Cod Rehab Running Team coworkers and clients.

Marathon Training Tip #1: The Long Run

The long run is the staple to any training program.  In fact it is one of the most important runs
of the week.  The benefits of the long
run are both mental and physical as your prepare for race day.

From a mental standpoint, the long run helps build
confidence.  Confidence in yourself, your
running and your ability to get to that finish line.  You also learn to handle discomfort
and while finding out what you are capable of if you keep going.
Physically the long run forces your body to adapt to the
training.  It’s about the time spent on
your feet and building endurance.  Some
training plans will incorporate tempo work at goal race pace but for the most
part, your long run should be done at the sub-maximal level.  Think about conversation pace—or anywhere
from 30-90 seconds slower than your normal running pace.  When you slow down, you’re training
aerobically and the body relies less on burning carbohydrates and relies more
on burning fat for energy.  Running at
conversation pace, we can train our bodies to stay in that aerobic zone longer
before crossing over to anaerobic where no oxygen is available and we start to
build lactic acid.

5 Tips to Help You Survive the Long Run:

  1. Map out a route ahead of time.
  2. Bring hydration and fuel.
  3. Find a buddy.
  4. If you’re having a bad day, accept that you’re having a bad
    day.
  5. Patience is key.  Pace
    yourself and take it one mile at a time.

Good luck out there! 
Happy running!
Blog post by Jen Skiba.

About Coach Jen Skiba

Jen began her running career as a middle-distance runner for
Falmouth High School and has been involved with the sport for over 12 years as
a runner, official, race management, and coach. 
A Mashpee Fitness trainer and Certified Running Coach through the Road
Runners Club of America (RRCA), Jen enjoys working with runners in the gym and
on the roads. “Whether you are a beginner looking to get started running or at
the intermediate level hoping to improve your times or tackle new distances, I
can help you reach your goals!”

Cape Cod Rehab’s Cape Cod Marathon Training Tip: Introduction


Congratulations!  You did it! 
You signed up to run the 2016 Cape Cod Marathon or Cape Cod Half
Marathon! 
(If you
haven’t registered, there is still time… www.capecodmarathon.com) 
Whether this
will be your 1st or your 30th, you made a big commitment and we want to be a part of your journey to the finish line.
Cape Cod Rehab
has signed on as a Cape Cod Marathon sponsor. 
Not only will you see us around race weekend but our trainers, coaches
and physical therapists will be providing weekly training tips on the Mashpee
Fitness blog leading up to the race beginning next week
the week of July
11th.  Some topics will include: training
in the heat, incorporating hills into your running, recovery
techniques, dealing with injuries, kinesiotaping, etc.  Bookmark mashpeefitness.blogspot.com and follow Cape Cod Marathon & Cape Cod Rehab on Facebook to never miss a
weekly training tip!
Also new for
the 2016 race, Mashpee Fitness trainer & RRCA Certified Running Coach Jen Skiba will be providing training
plans free for runners.  The 16-week
marathon training plans were just released this weekend and training will begin
on July 11th while the 12-week half marathon training plans will be released in
a couple weeks—training begins August 8th. 
You can access these training plans from the homepage on the Cape Cod Marathon website:
www.capecodmarathon.com.
A good rule of
thumb to prevent injury is to find a training plan where Week 1 matches the
mileage you are currently running.  Coach
Jen put together Level 1 and Level 2 training plans.  If these don’t work for you and you’re
looking for a more personalized plan based on your abilities and goals, contact
Coach Jen at running@capecodrehab.com.
Again—we want
to congratulate you and wish you good luck with your training!
~The Cape Cod Rehab Running
Team


About Cape Cod Rehab

Cape Cod Rehab is the premier provider of orthopedic, sports and aquatic physical therapy in the Cape Cod region.  Customers experience elite services that are cutting edge and backed by evidence.  Behind the Cape Cod Rehab Running Program is a team of medical and fitness professionals with a passion for running.  Their mission is to help runners of all ages and abilities improve athletic performance, recover from running-related injuries and provide them with all the tools they need to stay injury free.

About Coach Jen Skiba

Jen began her running career as a middle-distance runner for Falmouth High School and has been involved with the sport for over 12 years as a runner, official, race management, and coach.  A Mashpee Fitness trainer and Certified Running Coach through the Road Runners Club of America (RRCA), Jen enjoys working with runners in the gym and on the roads. “Whether you are a beginner looking to get started running or at the intermediate level hoping to improve your times or tackle new distances, I can help you reach your goals!”