FitPlan Trainer Tip of The Month October 2024

Pumpkin Spice: What’s in It and How to Make Your Own

Pumpkin spice has become synonymous with fall, but do you know what’s actually in it? This warming blend of spices not only brings the essence of the season into our kitchens but also offers a range of health benefits. In this blog, we’ll explore the ingredients of pumpkin spice and show you how to make your own healthier version at home.


Ingredients of Pumpkin Spice and Their Benefits:

  • Cinnamon: Known for its anti-inflammatory properties and ability to regulate blood sugar levels.
  • Nutmeg: Contains antioxidants that help protect against cellular damage.
  • Ginger: A powerful anti-inflammatory agent that aids in digestion.
  • Cloves: High in antioxidants and can help improve liver health.
  • Allspice: Offers a variety of vitamins and minerals, including vitamin A, vitamin B6, and manganese.


Recipe: Homemade Pumpkin Spice Mix Ingredients:

  • 3 tablespoons ground cinnamon
  • 2 teaspoons ground ginger
  • 2 teaspoons ground nutmeg
  • 1 ½ teaspoons ground allspice
  • 1 ½ teaspoons ground cloves


Instructions:

    1. In a small bowl, combine all the spices.
    2. Mix well and store in an airtight container.
    3. Use in your favorite pumpkin spice recipes!


Healthy Pumpkin Spice Chia Pudding Recipe

Chia pudding is a versatile and nutritious dish that’s perfect for breakfast or a snack. By adding pumpkin spice, you can enjoy a seasonal treat that’s both delicious and healthy. Packed with omega-3 fatty acids, fiber, and protein, this pumpkin spice chia pudding is a guilt-free indulgence.


Recipe: Pumpkin Spice Chia Pudding

Ingredients:

  • 1 cup almond milk (or any milk of choice)
  • ¼ cup chia seeds
  • ¼ cup pumpkin puree
  • 1 tablespoon maple syrup (optional)
  • 1 teaspoon homemade pumpkin spice mix
  • ½ teaspoon vanilla extract


Instructions:

    1. In a bowl, whisk together the almond milk, pumpkin puree, maple syrup, pumpkin spice mix, and vanilla extract until smooth.
    2. Stir in the chia seeds.
    3. Cover and refrigerate for at least 4 hours or overnight, allowing the chia seeds to thicken.
    4. Give it a good stir before serving. Enjoy as is or top with nuts, seeds, or fresh fruit.


Pumpkin Spice Smoothie for Post-Workout Recovery

Refueling after a workout is crucial, and what better way to do it than with a delicious and seasonal pumpkin spice smoothie? This smoothie not only satisfies your pumpkin spice cravings but also helps replenish glycogen stores and provides essential nutrients for muscle recovery.


Recipe: Pumpkin Spice Smoothie

Ingredients:

  • 1 cup almond milk (or any milk of choice)
  • ½ cup pumpkin puree
  • 1 frozen banana
  • 1 scoop vanilla protein powder
  • 1 teaspoon homemade pumpkin spice mix
  • 1 tablespoon almond butter
  • Ice cubes (optional, for thickness)


Instructions:

    1. Add all the ingredients to a blender.
    2. Blend until smooth and creamy.
    3. Pour into a glass and enjoy your post-workout treat

Trainer Tip by FitPlan Trainer & Nutrition Coach Andrew White

Trainer Tips: Effective & Safe Exercising for Seniors

As we age, keeping our bodies fit and healthy becomes a vital part of maintaining our quality of life. The human body is incredibly adaptable, but the path to optimal fitness lies in choosing the right exercise program that aligns with our short-term and long-term goals. Whether you’re aiming to maintain muscle mass, enhance joint mobility, improve balance and coordination, or boost cardiovascular health, it’s essential to design a realistic and sustainable fitness plan. Here are some invaluable tips to help seniors exercise safely and effectively, indoors or outdoors.

Warm Up and Cool Down

Always begin your workout with a warm-up to prepare your muscles and joints for activity, and finish with a cool-down to aid recovery. Simple stretches or light movements can help prevent injuries and promote flexibility.

Establish a Workout Plan

Consistency is key! Create a workout plan that adjusts every 3-4 weeks. Monitor your progress by evaluating your safe workload, exercise frequency, number of repetitions, sets, and rest periods. Gradually increasing these metrics will keep your body challenged and engaged.

Train Year-Round

To sustain your fitness journey, commitment is crucial. Training year-round helps maintain progress and avoid stagnation in your abilities. Remember, fitness is a lifelong endeavor!

Eat a Balanced Diet

Nutritional support is just as important as physical activity. Fuel your workouts with a well-balanced diet rich in nutrients to provide energy and aid in recovery.

Listen to Your Body

Your body is your best advisor. Pay attention to signs of fatigue, illness, or injury. Training when you’re not feeling your best can lead to setbacks. Prioritize your health and well-being over pushing through a workout.

Seek Guidance

If you’re unsure about your exercise routine, don’t hesitate to seek the guidance of a personal trainer. A professional can help tailor fitness and nutritional strategies to help you achieve your goals faster and more safely.

Vary Your Exercises

Incorporating a variety of exercises ensures a balanced workout. Alternate between upper-body and lower-body exercises, as well as exercises that target the front and back of your body. This approach can help prevent injuries and promote overall strength.

Focus on the Mind-Body Connection

Training your mind to focus on your movements can enhance the effectiveness of your workout. Stay present and connect with your muscles, minimizing distractions from your surroundings.

Work on Weaknesses

While it’s tempting to stick to what you’re good at, focusing on your weaknesses can lead to well-rounded strength and fitness. Challenge yourself with new exercises and avoid complacency; if an exercise becomes too easy, it’s time to increase the difficulty.

Gradual Progress

Getting in shape doesn’t happen overnight. Aim to progress gradually and set realistic goals that consider your potential, lifestyle, and future plans. Small, achievable milestones will keep you motivated and on track.

Stay Hydrated and Fuel Properly

Before you hit the gym, hydrate by drinking water at least 1-2 hours in advance. Avoid heavy meals prior to your workout—light snacks like juice, fruit, or energy bars work better. If you’ve eaten a healthy meal, allow at least two hours before exercising.

Consult Your Doctor

Always check with your doctor before starting a new exercise program, especially if you have existing health conditions or are on medication. They can provide personalized recommendations catered to your health status.

Enjoy the Journey

Above all, have fun while exercising! Surrounding yourself with a supportive gym or pool community can enhance your experience. Remember, meeting friends and sharing the journey towards fitness is a wonderful way to start your day stronger.

Achieving fitness goals is a gradual process, and prioritizing injury prevention should always be at the forefront of your fitness journey. Embrace each step along the way, and celebrate your progress as you work towards a healthier and happier you!

by FitPlan Trainer Khalil Rizki

Hydration: Your Guide to Staying Refreshed and Healthy

Staying hydrated is essential for overall health, particularly during physical activities. Understanding the best options for hydration and how much water to drink can help you make informed choices.

General Hydration Tips

  • Drink water regularly, even if not thirsty.
  • Include water-rich foods like fruits and vegetables in your diet.
  • Be mindful of hydration needs during exercise and hot weather.
  • Limit caffeine and alcohol, as they can cause dehydration.

Coconut Water vs. Sports Drinks

Coconut Water:

  • Natural electrolytes: potassium, sodium, calcium, magnesium, phosphorus.
  • Low in calories and free from artificial additives.
  • Ideal for moderate exercise.

Sports Drinks:

  • Formulated with added electrolytes, carbohydrates, and sometimes protein.
  • Designed for intense workouts to replenish energy and aid muscle recovery.
  • Can quench thirst better during high-intensity activities.

Dehydration and Medical Conditions

Exercising with conditions like diabetes or heart disease requires careful hydration. Dehydration can worsen these conditions, so drink fluids before, during, and after exercise. Recognize dehydration signs like dry mouth and dizziness.

How Much Water to Drink

Your water intake should be based on your size, activity level, and environmental conditions. A general guideline is:

  • Men: On average about 3.7 liters (125 ounces) per day.
  • Women: On average about 2.7 liters (91 ounces) per day.

During exercise, drink:

  • 17-20 ounces of water 2-3 hours before working out.
  • 8 ounces 20-30 minutes before starting.
  • 7-10 ounces every 10-20 minutes during exercise.
  • 8 ounces within 30 minutes after exercising.
  • 16-24 ounces for every pound of body weight lost during exercise

Blog by FitPlan Trainer Erin Womboldt

FitPlan Trainer Tip of the Month August 2024

Trainer Tip – Stay on Track with Your Fitness Goals: Setting S.M.A.R.T Goals by FitPlan Trainer Andrew White
Embarking on a fitness journey is a commendable step toward a healthier and happier you. Yet, staying on track with your goals can sometimes feel challenging. The secret to sustained success lies in setting clear, manageable goals. Using the S.M.A.R.T framework, you can create a roadmap that guides you every step of the way. S.M.A.R.T stands for Specific, Measurable, Achievable, Relevant, and Time-bound, and it’s a powerful tool to help you stay focused and motivated. Let’s explore how you can set S.M.A.R.T goals and stay on track with compassion and positivity.

Specific

Clarity is crucial when setting your fitness goals. Instead of a vague aim like “get in shape,” define what that looks like for you. Whether it’s running a certain distance, lifting a specific weight, or achieving a particular body composition, be as detailed as possible.

Example: “I want to complete a 5k run in under 30 minutes.”

Measurable

Measuring your progress is essential to keep you motivated and on the right path. Set criteria for tracking your achievements, so you know exactly how far you’ve come and how much further you need to go.

Example: “I will track my running time each week and aim to improve by 1 minute every two weeks.”

Achievable

Your goals should be challenging yet realistic. Setting goals that are too ambitious can lead to frustration. Reflect on your current fitness level and set a goal that is within reach with dedicated effort.

Example: “I will increase my running distance by 0.5 miles every week until I can comfortably run 3.1 miles.”

Relevant

Ensure your goals align with your broader fitness aspirations and personal values. They should be meaningful and matter to you personally, fitting seamlessly into your life and overall wellness vision.

Example: “Running a 5k will improve my cardiovascular health, which is important to me because I want to have more energy to play with my kids.”

Time-bound

Having a deadline creates a sense of urgency and helps you stay focused. Set a clear timeframe for achieving your goal to maintain momentum and drive.

Example: “I will achieve my 5k running goal in 12 weeks.”

Putting It All Together

Here’s how a S.M.A.R.T goal looks when all elements are combined:

Example: “In the next 12 weeks, I will train to run a 5k race in under 30 minutes by increasing my running distance by 0.5 miles each week and improving my time by 1 minute every two weeks.”

Tips for Staying on Track

  1. Write Down Your Goals: Writing down your goals reinforces your commitment. Keep them visible as a daily reminder of what you’re working towards.
  2. Track Your Progress: Use a fitness journal or app to log your workouts and track your improvements. Watching your progress unfold is incredibly motivating.
  3. Celebrate Milestones: Acknowledge and celebrate your achievements along the way. Reward yourself with small treats, new workout gear, or a fun activity.
  4. Stay Flexible: Life happens, and sometimes plans need to change. Be gentle with yourself and adjust your goals as necessary without losing sight of your overall vision.
  5. Seek Support: Share your goals with friends, family, or a supportive fitness community. Encouragement and accountability from others can provide a significant boost.


Setting S.M.A.R.T goals is an effective way to stay on track with your fitness journey. By being specific, measurable, achievable, relevant, and time-bound, you create a clear and motivating path toward success. Remember to stay flexible, track your progress, and celebrate every milestone. With determination and the right plan, you can achieve your fitness goals and enjoy a healthier, happier life. Embrace the journey, and be proud of every step you take toward a better you.

FitPlan Trainer Tip of the Month June 2024

Tips & Benefits of Nordic Walking 

Nordic walking is a perfect outdoor activity to jump-start your summer fitness plan. 

It is a total work-out engaging chest, arms, shoulders, abs & other core muscles. 


1-Nordic walking tips: 

* walk until poles feel natural in your hands 

* step with heels first then roll to ball of the foot 

* begin your step on heel while planting the opposite arm’s pole to the ground 


2-Benefits of Nordic walking: 

* boosts blood circulation: 33% increase in heart rate per minute versus normal walking 

* tones your muscles & helps with bone health 

* allows shredding extra pounds without taxing the joints 

* eases soreness in hip, back & knee joints 

* excellent activity for those who love to explore new places & meet new friends. 

* helps improve breathing, heart rate & body correct posture 

Trainer Tip of the Month by Khalil Rizki, PT Aide & FitPlan Trainer 

Exercise Your Mind: The Link Between Physical Activity and Brain Health

This Blog will provide valuable information and tips on how to maintain a healthy brain through exercise. June being Alzheimer’s & Brain Awareness Month is a perfect opportunity to shed some light on the importance of brain health. One key aspect of maintaining a healthy brain is regular exercise. Research has shown that physical activity not only benefits our bodies but also has a positive effect on cognitive function and brain health. Incorporating regular physical activity into our routines has been shown to improve cognitive function, reduce the risk of cognitive decline, manage risk factors, improve mood and even potentially lower the risk of developing Alzheimer’s disease. 


The Benefits of Exercise on Brain Health: 

  1. Improved Cognitive Function: Regular exercise has been linked to improved memory, attention, and overall cognitive function. Physical activity stimulates the release of chemicals in the brain that support the growth of new brain cells and connections. One of the key chemicals involved in this process is called brain-derived neurotrophic factor (BDNF). BDNF plays a crucial role in promoting the growth, survival, and differentiation of neurons in the brain. 
  2. Reduced Risk of Cognitive Decline: Studies have shown that individuals who engage in regular physical activity have a lower risk of developing cognitive decline as they age. Exercise can help protect against conditions like dementia and Alzheimer’s disease. Regular physical activity increases blood flow to the brain, delivering oxygen and nutrients that are essential for brain function. This helps in maintaining the health of brain cells and supporting cognitive abilities. Regular exercise also helps to reduce inflammation. Chronic inflammation in the brain is associated with cognitive decline and neurodegenerative diseases like Alzheimer’s. Exercise has anti-inflammatory effects, reducing inflammation in the brain and protecting against damage to brain cells.
  3. Enhanced Mood and Mental Well-being: Exercise is not only beneficial for the brain but also for mental health. Physical activity releases endorphins, serotonin, and dopamine, which are neurotransmitters that improve mood and sleep, reduce stress and anxiety, and enhance mental well-being and focus. Maintaining a positive mood and managing stress levels can have a protective effect on brain health.
  4. Manages Risk Factors: Regular physical activity helps in managing various risk factors for cognitive decline and dementia, such as high blood pressure, diabetes, obesity, and cardiovascular disease. By improving overall health and reducing these risk factors, exercise can lower the likelihood of developing cognitive impairments.

Tips for Incorporating Exercise into Your Routine: 

  1. Find an Activity You Enjoy: Whether it is walking, cycling, dancing, or yoga, choose an exercise that you enjoy to make it easier to stick to a routine. 


  1. Set Realistic Goals: Aim for at least 150 minutes of moderate-intensity exercise per week to reap the full benefits for your brain and overall health. Start with small, achievable goals and gradually increase the intensity and duration of your workouts.


  1. Stay Consistent: If you are having trouble staying on track to achieve your goals or lack the motivation it takes to get started and keep it consistent on your own, you may want to consider working with a Trainer. Working with a trainer can provide valuable motivation and accountability, helping you stay consistent with your workouts and reach your fitness goals more effectively. 


By incorporating regular exercise into our lifestyle, we can support brain health, reduce the risk of cognitive decline, and potentially lower the chances of developing conditions like dementia and Alzheimer’s disease as we age. It is important to engage in a combination of aerobic exercise, strength training, and flexibility exercises to reap the full benefits for brain health. 

Blog by Ally Wilson

Ally, the author, has been a certified Fitness Instructor since 1994. She has taught a wide variety of formats including Step, Floor Aerobics, Aqua, Cycle, Muscle Conditioning, Kickboxing, Pilates, Zumba ® Fitness, Yoga, Tai Chi and Burdenko. Ally was a licensed Zumba® Fitness Instructor from 2006 – 2014. During this time, she auditioned and was selected by Zumba® to be one of the original groups of Zumba® Jammers teaching her own original Latin and International dance fitness choreography to other licensed Zumba® Instructors from all over New England. Ally’s hobbies include spending time with her family and friends, riding her horse Lola and any outdoor activities that she can get into.

Back To The Basics #1: Proper Execution of the Squat & Variations


The squat uses most of the major muscle
groups in the legs including the glutes, hip flexors, quadriceps, hamstrings
and even the muscles in the lover leg like the tibialis and muscles in the calf.
It also activates the core, erector spinae and the abdominal muscles, for
stability.
Before getting into your workout always
remember to warm-up with some movements that increase the heartrate slowly and
get blood and oxygen out to the muscles preparing the body before executing the
exercises. After completing your workout, end with stretching the muscles used
in the workout. Warm-up and cool-down may take 5-15 minutes, depending on age
and fitness level. Make sure that you are mindful and present when executing
the movements. Never move into any new pain. Always start small and work into
larger range of motions building up to your full range in the motion to help
prevent injury. Once you are warmed up let’s get started!

Stationary
Squat


Start by standing with feet
parallel and hip to shoulder-width apart. Keep a straight line from the crown
of the head to the tailbone and from shoulder to shoulder. With core engaged move
hips back transferring weight into the heels. Keep knees behind the toes and
lower the hips. Arms may extend forward for balance. Press through the heels to
return to a standing position.

Too
Difficult?… add a chair.


Place a
sturdy chair behind you making sure that it is secure and will not slip. Start by
standing with feet parallel and hip to shoulder-width apart. Keep a straight
line from the crown of the head to the tailbone and from shoulder to shoulder.
With core engaged move hips back transferring weight into the heels. Keep knees
behind the toes and lower the hips to touch down as if going to have a seat in
the chair. Arms may extend forward for balance. Press through the heels and return
to standing a position.

Too
Easy?
… add overloading one leg.


With arms overhead and palms facing
each other, raise one heel off the ground to the ball of the foot or extend one
leg straight with heel on the floor, overloading opposite leg as if a single
leg squat. With core engaged move hips
back transferring weight into the heel of the overloaded leg. Keep the knee
behind the toes and lower hips. Arms may extend forward for balance or remain
overhead. Press through the heel to return to a standing position.

Squat
Down & Reach Up Variation


Start
by standing with feet parallel and hip to shoulder-width apart. Keep a straight
line from the crown of the head to the tailbone and from shoulder to shoulder.
With core engaged move the hips back transferring weight into the heels. Keep
knees behind the toes and lower hips. Reach fingers down toward the ground.
Fingers may touch the ground for a deeper squat. Press through the heels to
return to standing position. After returning to standing position, raise up on
toes lifting heels off the ground and raising arms overhead for additional balance
challenge and range of motion.


Too
Easy? … add plyometrics


Start by
standing with feet parallel and hip to shoulder-width apart. Keep a straight
line from the crown of the head to the tailbone and from shoulder to shoulder.
With core engaged move the hips back transferring weight into the heels. Keep
knees behind the toes and lower hips. Reach fingers down toward the ground.
Fingers may touch the ground for a deeper squat. Press through the heels,
raising arms overhead accelerating up adding power to create a jump off the
ground then decelerate, controlling the
landing and easing back into the squat.

Blog
post by Ally Wilson.

The Benefits of a Superset Workout


What Is a Superset
Workout?


A Superset workout is comprised of two
exercises combined into one full set with no rest in-between.

The
Benefits of a Superset Workout

Supersets may provide a metabolic
benefit. Researchers have found that participants performing supersets had a
higher total energy expenditure compared to the participants who did not
perform supersets. Additionally, post-exercise oxygen consumption and blood
lactate levels were higher post-workout in the superset group, which suggests
these subjects to have longer elevated energy expenditure meaning they will
burn calories longer. Moving more in less time with less rest will often equate
to increased energy expenditure by increasing heartrate and workout intensity.

Supersets can help keep your workouts
shorter. Most of the studies on supersets are “super small” but according to a
study published in The European Journal
Of Applied Physiology
supersets can cut down on training time without
losing effectiveness and doing supersets of the same muscles led to a greater
muscular effort and strength gain than working different muscle groups, per a
Journal Of Strength And Conditioning
Research
study.
Supersets can create an increased
hypertrophy by providing an additional stimulus for muscle growth that single
sets may not do.

Different
Types of Superset Workouts


Things to consider when putting
exercises together for supersets are the amount of weight and repetitions used
as well as the exercises selected depending on goals.
Antagonist /Opposite Muscle Group
Sets
Possibly the most common form of
supersetting is agonist antagonist style training. This is the combination of
two exercises that utilize opposing muscle groups. For example, you will pair a
push with a pull exercise to work your anterior/posterior muscles in opposition.
Another example would be a bicep curl followed by a tricep extension. An
advantage to adding these to your workouts is that your muscles will recover
faster in between sets. When one muscle group is being contracted (shortened)
the opposite muscle relaxes (lengthens), reducing the need for a break or rest
time between exercises.
Agonist/Same or Simular Muscle Group
Sets
This is where both exercises work the
same muscle groups. For example a push-up uses pectorals and triceps followed
by a tricep extension or chest fly. This is great for adding intensity and
volume to a workout as well as focusing on particular muscle groups. It is the
most demanding type of superset. This type of superset may also be called
compound sets.
Unrelated Muscle Group Sets
This is where the two exercises use totally
different muscle groups.  Exercises may
alternate a lower body exercise followed by an upper body exercise. An example
of this would be Squats followed by Lat Pulldowns. The primary advantage of
this type of superset is that there is no loss of strength in going from one
exercise to the other. The muscle group rests while to are doing a completely
different muscle group.
Blog
post by Ally Wilson.

Planks!

While data on
exercise changes as new studies are done, one thing that remains constant is that planks
are great… but only when you do them properly!


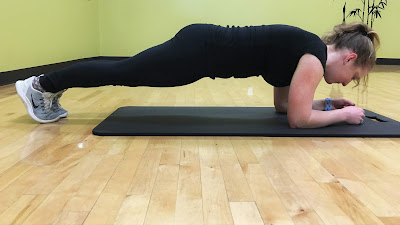
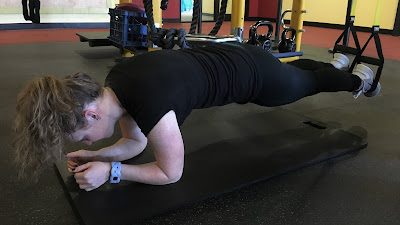
The traditional plank (shown above) targets more than just your
abdominals. It requires contraction of the quads, glutes, shoulders, biceps and
triceps. It is a stabilizing exercise that can lead to improvements in other
exercise moves.


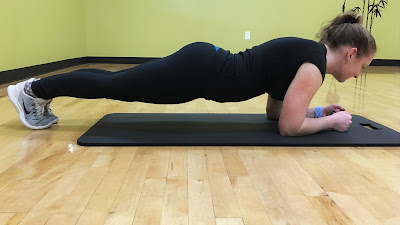
3 Common Plank Form Mistakes


Arched Back

Note: In this position your abs will be inactive. This also put a lot of strain on your lower back!

Hips Too High

Uneven Hips


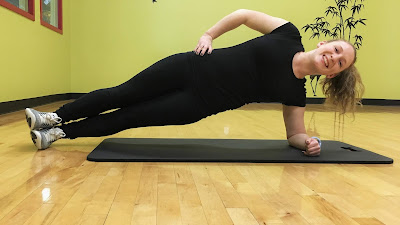
Other Plank Variations


On Hands


Side Plank


Taking Your Plank to the Next Level

Alternating Leg Lifts
Up, Up, Down, Down

Side Plank with Rotation

Side Plank with Hip Dips


Physioball Planks


TRX Plank


Planks can assist in many other areas!


Balance
The core
stability provides and increases in your overall stability and balance.  Example: i
f you are
bumped into while walking, having a stronger core can assist you in regaining
your balance faster.

Maintain Proper Running Form
A stable core helps a runner’s body stay in proper alignment, rather than twisting mid stride.
Maintain Form in Many Other Lifts
One of the first steps in many lifting exercises is to
engage your core. Having a stronger core can make it easier to keep proper form
in many activities and can prevent injury to the back. 


Happy Planking!

Blog
post by Erin Womboldt.

Exercises & Stretches for Arthritic Hands

Daily tasks can be painful and difficult
when arthritis and other types of joint issues affect the hand and wrist. There
are numerous medications and treatment solutions that can help ease the pain
but exercise is one of the best and noninvasive solution that can provide many
benefits.
Hand exercises can help strengthen the
muscles that support the hand joints. Movement with exercises and stretches
will help to keep ligaments and tendons flexible resulting in better range of
motion and function.
What is happening to cause the pain you
might ask? The lack or cartilage or cushioning in the joint causes inflammation
and irritation. Pain can increase with repetitive tasks such as typing or
gripping. The production of synovial fluid which lubricates the joints can be
increased when the hand and wrist are exercised and stretched regularly- this
will improve joint function.
Take a look at the exercises below and
give them a try!
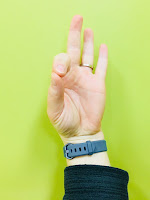
Thump
Opposition
Begin sitting with your hand in a
comfortable position. Touch the tip of your thumb with one finger, then
separate and repeat with each of your other fingers. Make sure to keep the rest
of your arm relaxed during the movement.


Finger
O
Begin sitting upright in a chair with
your elbow resting on a table, palm facing forward, and fingers straight. Make
a circle with your thumb and index finger. Straighten them back out and repeat.
Make sure to keep your wrist straight during the exercise.


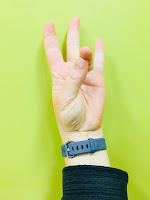
Finger
Spreading
Begin sitting upright in a chair with
your hand resting flat on a table. Spread your fingers apart as far as is
comfortable then bring them back together and repeat. Make sure to keep your
fingers on the table during the exercise.

Seated
Claw Fist AROM
Begin with your wrist and fingers
straight. Curl your fingers toward your palm, bending at the middle knuckles. Return
to starting position then repeat. Make sure to keep your wrist straight during
the exercise.


Seated
Full Fist AROM
Begin with your wrist and fingers
straight. Curl all of your fingers toward your palm into a fist—light squeeze
or no squeeze.  Return to the starting position
then repeat. Make sure to keep your wrist straight during the exercise.

Wrist
Circumduction AROM
Begin sitting with your arm resting on a
table and your hand in a fist, hanging off the edge. Slowly rotate your wrist
in a circle, first clockwise then counterclockwise. Make sure to keep your wrist
relaxed during the exercise.

Standing
Wrist Flexion Stretch
Begin in a standing upright position
with one arm in front of your body, palm facing the floor. With your other
hand, bend your wrist downward until you feel a stretch. Make sure to keep your
elbow straight.
Standing
Wrist Extension Stretch
Begin in a standing position with one
arm in front of your body, palm facing the ceiling. With your other hand, apply
a gentle downward pressure on your fingers, bending your wrist and keeping your
elbow straight.
Blog post by Farran Jalbert.

Get The Most Out Of Your Personal Training Sessions

Personal
training is an option for members who need the extra motivation or guidance to
get through a workout.  It’s also a great
way to learn new exercises and progress your fitness routine.
Working with a
trainer is great but are you getting the most out of your sessions?

Set Clear Goals

It’s important
that you and your trainer are on the same page.  It’s also important that you set clear goals so
your trainer can build the appropriate program for you.  Think SMART
goals: Specific, Measurable, Achievable, Realistic, Timely.
 Goal setting should be worked into your first
appointment and revisited during each session.

Arrive Early

I say this
over and over again to my clients… warm up before your session!  Showing up late not only cuts into your
training time but now the trainer has to incorporate a warm up into the routine
leaving not much time for actual exercise. 
Show up early to get in a little cardio, dynamic stretches and/or foam
roll so you’re ready to go when the session begins.

Speak Up

Communication
should go both ways.  Ask questions.  Let your trainer know how you’re feeling and exactly
what you’re feeling.  If something isn’t
right, don’t be afraid to speak up.  We
appreciate your feedback and honestly!

Do Your Homework

You can’t just
show up to your once a week training appointment and expect to see progress.  Your trainer can work with you to build a weekly
plan but it’s ultimately up to you to commit by exercising on your own, eating
right and recovering well. 

Bring A Buddy

Still struggling
with motivation?  Find a friend with similar
fitness levels and goals to team up with. 
They can help get you out the door on days you may consider cancelling
and help push you harder during the workout. 
One-on-one personal training can get expensive so ask about most
cost-effective group personal training rates.

Attitude Is Everything

Everyone has
their own reason for working out but if you’re not invested in your own health
and fitness, you’re never going to get results. 
A positive attitude is key along with patience, commitment, consistency,
and hard work.

Blog post by Jen Skiba.

Perform a Better Prone Plank

Do you remember your first plank you
were asked to hold? Did it feel like the seconds were minutes and that someone
had lit a fire under muscles in your stomach that you never knew you had? Well
if you dread the plank or are having a difficult time maintaining good form
here are a couple methods to use to improve your experience.

Do you ever get pain in your lower back?
Set up is key!

When preparing to plank it is important
to remember the focus of the exercise is preventing hyperextension of the lower
back.  That being said, engaging the
muscles of the lower abdomen and pelvis properly before even lifting off of the
table is crucial in preventing any excessive motion in the lower spine. One
strategy is utilizing the Posterior Pelvic Tilt. This exercise will teach you
how to build tension in your lower abdomen and create a “flat back” to help aid
in any drooping or arching of the lower back when in the prone position.
Supine
Posterior Pelvic Tilt with Ball Squeeze
Begin by lying on your back with your knees bent and
feet flat on the floor. Place a ball between your knees and squeeze. Slowly
bend your low back and tilt your pelvis towards the floor. Return to start
position.


Do you feel more pressure in your
shoulders than your stomach?

Improper alignment of the shoulders over
the elbows can cause abnormal strain on the individual’s tendons and ligaments
of the shoulder joint leading to possible injury. It is just as important to
ensure to keep the weight of your torso from sinking to the ground as well as
shifting forward during the plank. This can again place a shearing force across
the joint line of the shoulder and needs to be avoided. One exercise that can
help is the Scapular Push Up on a Table.
Plank on
Table with Scapular Protraction Retraction
Place both hands on the edge of a table and step your
feet back into a plank position. Slowly round your upper back, pulling your
shoulder blades apart. Next, lower your back down, squeezing your shoulder blades
apart.


Remember to breathe!

How often do we tend to hold our breath
when performing strenuous exercise? This sometimes can hurt you more than help
you. In our case with the plank, a deep exhale through pressed lips can help
tighten your core just before you lift up and continue to hold the ribs down to
prevent hyperextension at the back during the hold. Quadruped Diaphragmatic
Breathing drills can help you establish a good spinal position as well as core
contraction just from breathing!
Quadruped
Diaphragmatic Breathing
Begin on all fours. Breathe in, pushing your abdomen
down, then exhale and repeat. Make sure there is no movement in your chest or
shoulders as you breathe.

 Plank Progressions: 


Plank with Elbows on Table –> Plank on Knees –> Standard Plank

Plank with Elbows on Table


 Plank on Knees


Standard Plank

Blog post by Craig Moody.

Osteoporosis: Lazy Isn’t for Bones

Osteoporosis
and Screening

Osteoporosis is a disease that reduces
the strength and mass of bones, making them fragile and susceptible to fractures.
Although it is most common in middle-aged and older women, osteoporosis can affect
both men and women of any age. According to the National Osteoporosis
Foundation, about nine million Americans have osteoporosis and an estimated 48
million have low bone density. This means that nearly 60 percent of adults age
50 and older are at risk. One in two women and up to one in four men age 50 and
older will break a bone due to osteoporosis. One measure of the health of bones
is “bone mineral density” or BMD for short. A bone scan to assess BMD is a
relatively simple procedure that is offered by medical practitioners. The U.S.
Preventive Services Task Force (USPSTF), an independent panel of experts
commissioned by the government to study the evidence behind routine health
screens, has issued guidelines for osteoporosis screening. They recommend that
women younger than 60 get bone density scans if they have risk factors that
increase the likelihood that they could experience a fracture within the next
10 years. That means women with parents who fractured bones, a broken bone
after age 50, post-menopausal, a history of smoking, alcohol abuse, or a
slender frame. The panel maintained its recommendation that women age 65 and
over and men 70 and over should get bone density testing, even if they have no
other risk factors. Plan for the future – Talk with your health care provider
to find out what is recommended for you.

Pressure
your bones into growing stronger

For bones to increase and maintain their
density, they require the application of weight-bearing force.

In fact, studies
suggest that the best exercise may not only be weight-bearing but also impact
exercise. This means imparting a jolt to muscle and bone such as you would when
placing a foot forcefully on the ground while running, or lifting or pushing a
weight suddenly. Naturally, you have to ensure you do such exercise safely.  Weight-bearing exercise, when preformed
correctly, causes the muscles and tendons to pull on the bones. This stimulates
them to produce new cells to replace old ones and absorb calcium, making them
harder. The load on the bones can be created by your own body weight or by
external weights like dumbbells or gym machines in a weight training program. 

Appropriate exercise as we age, not only help keep bones healthy, it protects
against falls and fractures as well improving balance and strength.

Suggested
Exercises to Help Build Bone Density

While all exercise benefits your general
fitness. Weight-bearing exercise is best for strengthening bones.

Some good examples are:

  • Running and jogging
  • Gymnastics
  • Aerobics class — step, dance, and floor
    aerobics
  • Weight lifting — dumbbells, barbells,
    machines, body weight exercises
  • Team sports involving running and
    throwing — basketball, football, baseball, softball, volleyball
  • Individual sports involving running —
    racket sports
  • Walking (but less effective than running
    or jogging)

Examples of least effective exercises:

  • Swimming
  • Water aerobics
  • Cycling

These exercises are not useful for building
bone density but are still effective in building cardiovascular fitness. Bear
in mind that running or leg-based exercise acts mainly on the lower body.

And
although much of the disabling effect of bone loss is felt in the hips and
spine, exercising the upper body with weight-bearing exercise is of equal
importance. Broken wrists and arms from falls, as we age, are not uncommon.

Without proper diet and exercise, bone
density deteriorates over time, leading to symptoms such as back pain, poor
posture and fractures. A well-rounded fitness plan, including cardiovascular
exercise, weight training and flexibility exercises, combined with a healthy
food plan, will help to prevent bone loss as we age.

Blog post by Ally Wilson.

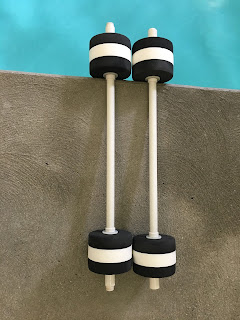
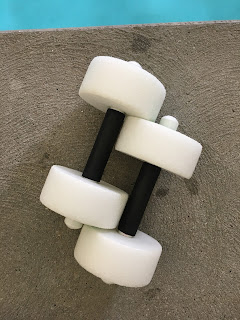
Long Bars, Short Bars, Mini Bars?


A common
question when working with clients in the pool is “Which is harder the long
bars or the short bars?”  

The answer to the question depends on the exercises that you will be doing and the goals of your exercise
program.  Understanding the equipment and
the differences will help you choose the appropriate tools to make your workout
the most effective.  
Using bars
with more buoyancy will create more resistance when trying to move them through
the water.  This will make these types of
exercises more difficult.  However,
exercise where you are in the hanging position will be easier with more buoyant
bars because they will provide more support and stability.
Using bars
with less buoyancy creates less resistance when trying to move them through the
water.  Less buoyant bars will make these
types of exercises easier.  The less
buoyant bars will make exercises more difficult in the hanging position.  The reduced support and stability will
require your body to work harder to maintain alignment therefore challenging
your core muscles more.
Example of
progression from easy to difficult using equipment for an exercise that
requires you to move the bars in and out of the water vs. a hanging exercise.
Pump and Walk
Mini Bar → Short Bars Level 1 →
Short Bars Level 2 → Long Bars

Splits and Spreads
Long Bars→ Short Bars Level 2 →
Short Bars Level 1 → Mini Bars

Equipment


Long Bars
Long bars
provide the most buoyancy, therefore they will give you the most support and
resistance.  

Short Bars
Level 2
These bars
have slightly less buoyancy than the long bars. 
They will be a little easier for exercises that require movement through
the water and slightly harder for hanging exercises than the long bars.

Short Bars
Level 1
The level 1
short bars have less buoyancy than level 2 short bars and long bars.  They will be easier for exercises that
require movement through the water and more difficult for hanging exercises.

Mini Bars
Mini bars
provide the least amount buoyancy.  These
bars will be the easiest for exercises that require movement through the water
and the most difficult for hanging exercises.  

Blog post by Eric Chandler.

Kettlebell Swing into Summer

I can’t think of better piece of
equipment in the gym than a kettlebell. There are over a dozen exercises that
can be done with a kettlebell but today I want to highlight one of my all-time
favorite exercises; The Kettlebell Swing.
The kettlebell swing (if done correctly)
can be an amazing exercise to incorporate into your program. Whether you are
looking to develop lower body explosive power, or just looking to tone up those
glutes for the summer, the kettlebell swing is sure not to disappoint.

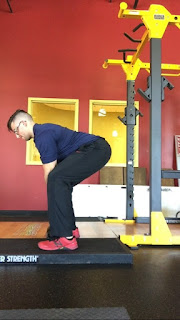
It’s a Hinge NOT a Squat!

First and foremost, the kettlebell swing
is a hinge movement pattern, not a squat. A hinge is essentially maximal hip
bend with minimal knee bend (think deadlift). As the hips come back in your
hinge, the torso will begin to come down as well. On the other hand, a squat is
maximal hip and knee bend simultaneously. During a squat, the torso will remain
mostly vertical. This is a common error that I see most often with the
exercise.

                                           Hip Hinge                                    Squat


Set Up and Execution

The set up for a kettlebell swing is
fairly simple. Begin with kettlebell on the ground in front of you. It should
be about arm’s length away. To begin, hip hinge back and place your hand firmly
wrapped around the handle of the kettlebell. At this point, you can shift your
weight back a bit and the bell should tilt on its side slightly.
While maintaining your hinged position,
you will ‘hike’ the kettlebell back towards your glutes.

1                                                      2
Once the kettlebell has been hiked,
proceed by driving the bell forward using your hips, glutes and hamstrings.  As the bell reaches shoulder height, engage
your lats, pecs, shoulders and core to decelerate the bell.  

3

Tips

  • Sometimes the arms will start to do all
    the work in the movement if the weight is too light. If you feel like you are
    not engaging your posterior chain during the movement, try using a heavier kettlebell.
    I find this sometimes will clear up that problem.
  • Breathe! Breathing during the swing is
    very important. You should be exhaling forcefully as you drive the weight
    forward and inhaling at the top of the movement just as the bell begins to make
    its downward phase. Proper breathing during the swing will help brace the core
    and prevent injury.
  • Be Patient! A lot of times I notice
    there to be a disconnect between the upper and lower body during the swing. The
    most common error I see is, during the downward phase, the client will break
    their hips back into a hinge before the kettlebell has reached the hips.
    Breaking the hips back early can cause the kettlebell to travel below the knee
    and in turn create excessive tension in the lower back.

Blog post by Greg Wilson.

Begin a Fitness Routine

Happy 2017!  Did you know that 66% of New Year’s
Resolutions involve fitness?
If you’ve been consistently working out
and running in 2016—then great!  Keep it
up!
But if you decided that today is the day
that you will get off the couch and begin a fitness routine then read below for
some tips to help you get going…


Set goals.

A lot of New Year’s Resolutions are very
vague: lose weight, eat healthy, start running, etc.  If your goal is to lose weight, as yourself
how much you want to lose, how long it will take me to get there and what do I need
to do to accomplish that goal?  Set SMART
goals.
  • Specific.
  • Measurable.
  • Achievable.
  • Realistic.
  • Timely.

Have a plan.

You know what they say, “A goal without
a plan is just a dream.”  Whether it’s a
running specific goal or you’re starting to strength train and eat better,
develop your plan.  Map our a few weeks
and refer back.  This will help you stay
on track.

Ease into it.

The worst thing you can do the first
week of January is go hard on your resolutions every single day.  Being too ambitious and diving right into a
new routine or high mileage running will only set you up for burnout and
injuries.  Your body needs to adapt to
the new stresses and recover.

Hire a coach.

Not sure what to do or how to get
started?  Hire a personal trainer or
certified coach for some guidance and expert knowledge.

Be patient.

Fitness doesn’t happen overnight.  Diet and exercise takes a lot of discipline
and self-motivation.  All you can do is
stay consistent and keep working towards your goals.

Have fun!

Enjoy the process.  Hard work is easy work.

Blog post by Jen Skiba.

Autumn: A Transitional Time of Year


When the sun is setting earlier and the
temps are cooling down it can be a challenge to continue with your gym routine.
Don’t let the leaves changing throw you off your game, instead take advantage
of this beautiful time of year and let it be a positive transition into the
winter!

What Can You Do?

Sign up for community events
This is the perfect time of year to sign
up for that turkey trot or reindeer romp! There are plenty of local walk/run
road races that support great causes, so get your name on the list and begin
the training today. You can do it!
Hit the Trails
Enjoy the changing leaves and crisp air
outside by taking a trail run or walk on a nature path.
Turn Fall Chores into a Workout
According to Health Status,
a 150-lb. person can burn 135 calories by raking leaves for 30 minutes. Turn
outdoor chores into a game by setting small, achievable goals to help pass time
and burn away fat
Exercise Early
With the time changing and
the sun setting earlier it can feel like a real drag to get to the gym later in
the day.  It feels later than it is and
people feel more tired than usual. Get that workout in early and relax in the
afternoon.
Vary Activities
With the cooler weather
setting in, it might be time to try something new at the gym. Get into a spin
class, try yoga or get a new set of exercises from a personal trainer. Set
yourself up right for the winter!

Seasonal Advice

Dress for the weather
Invest in some comfortable cool weather
workout gear. Dress in layers that can easily be shed so you can keep
exercising in the outdoors a little longer.
Drink water, Drink Tea!
Don’t ignore the bodies’ need for water
just because it’s cooler outside. Staying on top of your fluid intake can help
with both exercise recovery and appetite control. Green tea and black tea
contain antioxidants that help ward off diseases during flu season so you can
remain healthy and active as the season shifts.
Avoid Holiday Candy & Treats
According to the National Institutes of
Health, on average, non-obese adults gain about a pound a year around the
holidays. Be sure to pack lots of healthy snacks to munch on throughout the day
to help deter you from grazing on sweets that pop up in the office, at home or
at holiday parties.
Everyone dreads those holiday pounds so
think of Fall as a time to prep yourself for a healthy winter. Setting goals
and getting involved now will start your progression towards a happier,
healthier you.

Normal
0

false
false
false

EN-US
JA
X-NONE

Blog post by Farran Jalbert.  

Marathon Training Tip #6: Strength Train


What do most runners do
to train?  Run.
The majority of
distance runners started running because they love to run.  There are many health benefits to running and
it is also convenient to just walk out the door and run.  Often overlooked or ignored by runners is the
importance of strength training. Complimenting your running program with
strength training will improve your performance and also reduce your risk for
injury.  
Here is a TRX series of exercises that
will help strengthen your total body with exercises specifically selected to
address weaknesses typically seen in runners. 
They will help strengthen the core, upper body and lower body and should
be performed 2-3x per week, with a day of rest in between.
Note:
Do not perform any exercise that causes or increases pain.

Warm Up

Squat/Row to Heel Raise
Hold the TRX handles with arms bent and your feet shoulder width apart. Sit back
into a squat keeping your heels on the ground and extend arms. Stand back up
pushing through your heels and pulling with your arms. Once fully standing
raise up on to your toes. 
2×15


The Workout

Power Pull
Hold the TRX handle in single handle position with one hand.  Keep elbow bent at the start and feet shoulder
width apart.  Extend arm holding handle
and drop back into a squat.  Reach back
with your other arm towards the ground. 
Return to the start position by pulling with your arm and driving up
with your legs. 
2×10 each arm

Alternating Side Lunge
Hold the TRX handles and stand with your feet together.  Take a large step out the side keeping toes
pointed straight ahead. Bend the knee that you took a step with pushing hips
back and sitting into a side lunge position. Return to the start position and step
to the other side.
2×10

Balance Lunge with Knee Drive
Hold the TRX handles and stand with your
feet together.  Step back into a reverse lunge.  For a challenge: keep the back foot off the floor in a
balanced position!  Stand up on your
stance leg driving your knee forward into a march position.  Do all repetitions on one side then the
other.
2×10 each

Bridge with Hamstring Curl Series
Lay on the floor with your heels in the TRX cradles (handles should be about 12” off
the ground). Raise your hips into a bridge position.  Keeping hips level draw one knee in towards
your body.  Extend leg out and repeat
with the other leg. Repeat with both legs. Lower body back to the floor.
2×10

Watch Meaghan demonstrate all the TRX Strength Training for Runners exercises…

Bonus! Runner’s TRX Core Circuit

Complete the three exercises in a row
without rest.  Try the circuit 3 times.
Mountain Climbers
Start in a push up position with your feet in the straps. 
Maintain a flat back as you march knees towards your chest in an alternating
pattern.  As the knee comes in towards
your body your hips should rise slightly. 
10x
Three Position Crunch
Start in a push up position with your feet in the straps.  Maintain a flat back as pull both your
knees towards your chest. Return to the start position and pull both knees in
towards your right elbow, return to the start position and pull both knees
towards your left elbow. Repeat the series of 3 movements 5x.
Pike
Start in a push up position with your feet in the straps.  Keep your legs straight and drive your hips
towards the ceiling as you pull your feet towards your hands. 
10x
Blog post by Eric Chandler.

About
Eric Chandler

Eric joins the Cape Cod Rehab Running
Team with a background in Exercise Science. He is a Certified Strength &
Conditioning Specialist (CSCS), certified in Part I & Part II of the
Burdenko Method, a Certified Functional Movement Screen (FMS) Specialist, and
has also been training in the TRX Suspension Training Method. Eric looks for
his clients’ strengths and uses those strengths to help them get the most out
of each session. A recreational runner, Eric has served on many of the CCR
Flyers Cape Cod Marathon relay teams as has a goal of breaking 20 minutes in
the 5k.

Use It or Lose It!


It is important
to always keep up with the exercise that we do daily because taking a break
from it for too long can have consequences. Our bodies need to move around and
exercise whether it is a program that you are apart of or just a simple walk in
the morning. It is certainly okay to have a day of rest or modify the exercise
based on how you are feeling that particular day. However, stopping the
exercise that your body is used to for more than two weeks can start to show
changes in the muscles endurance that are being used. This is a term known as
detraining and along with muscle atrophy can also show decreases in the 6 essential qualities of life and sport: balance, coordination, flexibility, endurance, speed and strength. 
Sometimes it is
difficult to keep up with the exercise programs that we are in because we
become busy, but even just getting out and moving makes a huge difference.
There will still be a loss in the muscular endurance if the exercise intensity
is decreased, but it will be substantially less endurance lost than just
sitting around all day. Studies have shown that if the exercise intensity is
decreased by 2/3 of the original training load then there will be losses in
endurance. Even if a few weeks go by and you start to see your endurance being
lost don’t get discouraged but rather get back into whatever exercise you were
doing before. The endurance that you worked so hard for will come back quickly
so it’s always better to not hesitate and get right back to it. 
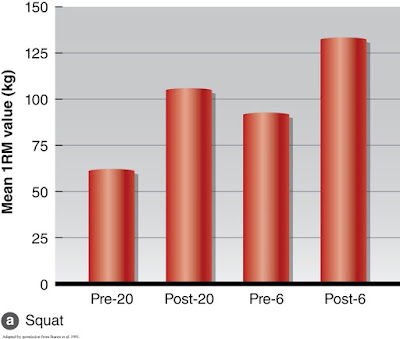
This graph below
shows a one repetition maximum in kilograms taken before 20 weeks of training
and one taken after 20 weeks of training. It then shows a 6 week period of no
training after which another measurement was taken and finally after another 6
weeks of training another value was taken. This graph shows how even after
losing the strength in the muscle after 6 weeks of not training it only took
another few weeks to not only get back what was lost but improve on it. These
measurements were taken by RS Staron in 1991 when he was doing a case study on
the detraining and retraining of women.


So the point to
take home here is to never give up on exercise even if a long break has been
taken from it, there is always time to improve and create a healthy lifestyle.

Blog Post by Summer 2016
Intern Matt Leduc.