Post-Round Stretches for Golfers

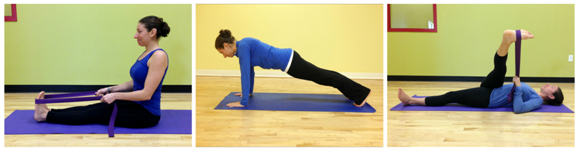
Do you stretch after playing golf?
Post-round stretching is just as
important as your dynamic warm up.  The
goals of these static stretches are to decrease stiffness, prevent soreness and
increase golf flexibility.  The muscle is
taken to a point of mild stretch and held for 20-30 seconds.  Perform 2-3 repetitions of each
exercise.  Do not perform any exercise
that causes or increases pain.

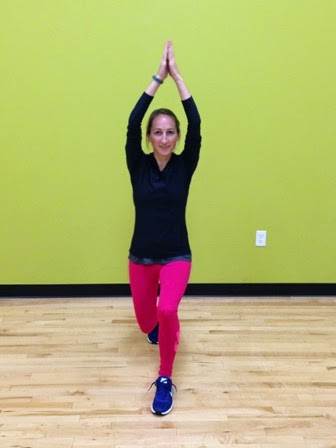
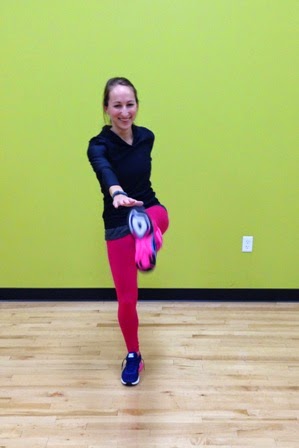
Standing Quad Stretch

In your left hand, hold
the club upside down with the grip end planted firmly on the ground.  Stand on your left leg and grab your right
foot/ankle with your right hand.  Try to
keep your right knee directly underneath you. 
Hold 20-30 seconds.  Repeat on the
other leg.

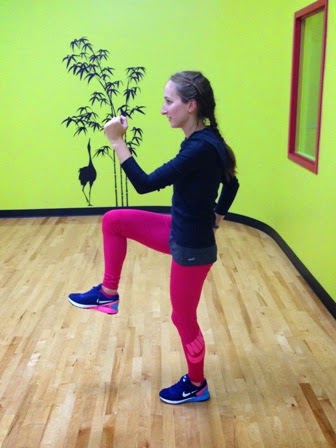
Standing Hamstring Stretch

Hold the club upside down
with the grip end planted firmly on the ground. 
Stand on your left leg and place your right foot onto your golf cart or
another elevated stable surface.  Hinge
forward into the stretch until you feel a stretch in your hamstrings.  Hold 20-30 seconds.  Repeat on the other leg.

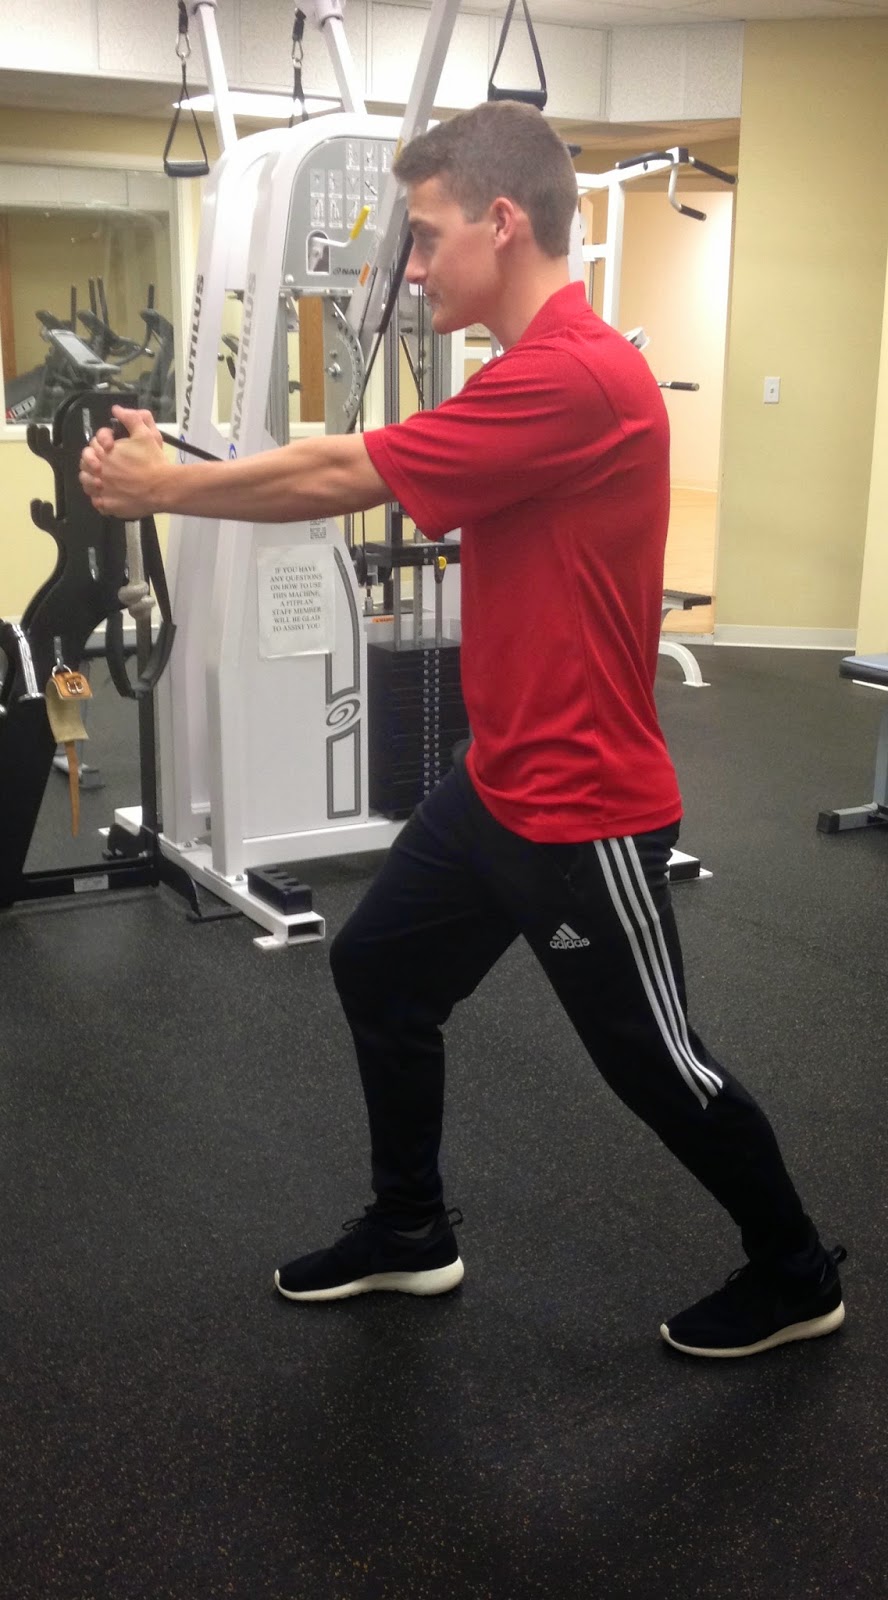
Bent Leg Calf Stretch

Hold the club upside down
with the grip end planted firmly on the ground. 
Step back with your right foot. 
Keep your right heel planted firmly on the ground and slowly bend your
back knee.  Hold 20-30 seconds.  Repeat with the other leg.

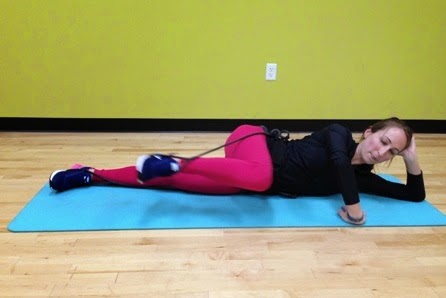
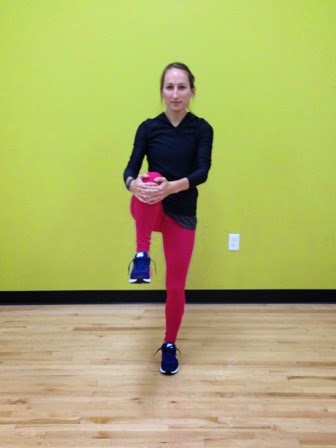
Standing Figure 4 Stretch

Hold the club upside down
with the grip end planted firmly on the ground. 
Cross your right leg, resting your right ankle just above the left
knee.  Slowly sit back into your
imaginary chair until your feel a stretch in your piriformis
Important: Keep your back straight, do not hunch forward.
  Hold 20-30 seconds.  Repeat with the other leg.  (Can
also be done seated.)

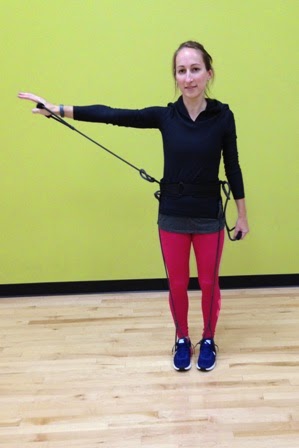
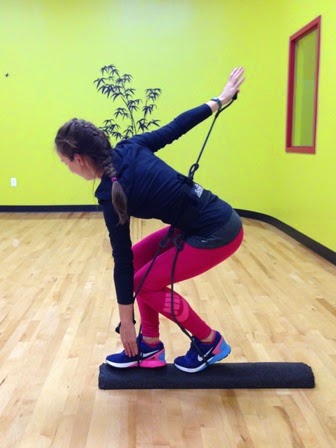
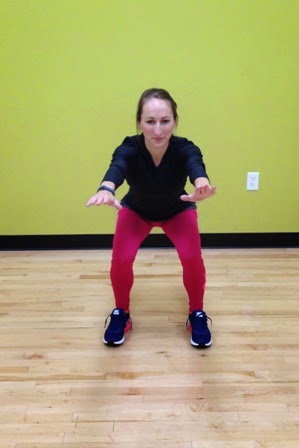
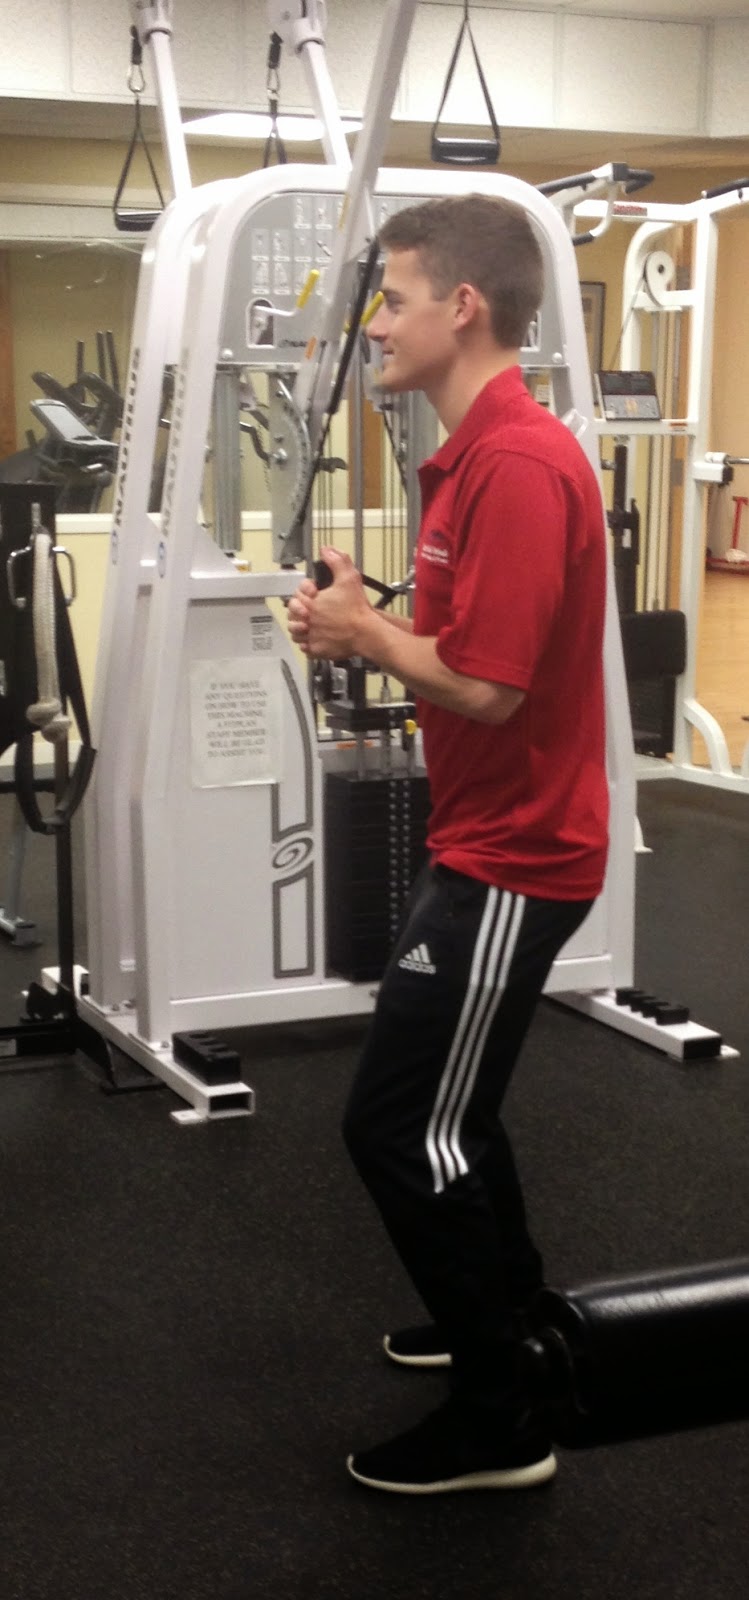
Standing Prayer Stretch

Hold the club upside down
with the grip end planted firmly on the ground. 
You can also use your golf cart or higher stable surface.  Sit back into your heels, hinging at the hips
until you feel a stretch in your shoulders and lat muscles.  Hold 20-30 seconds.

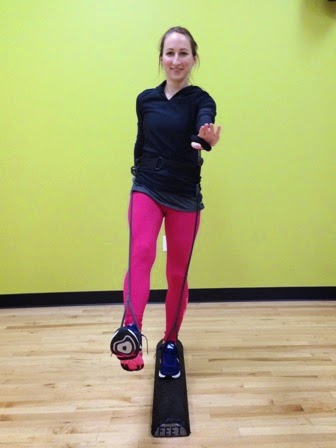
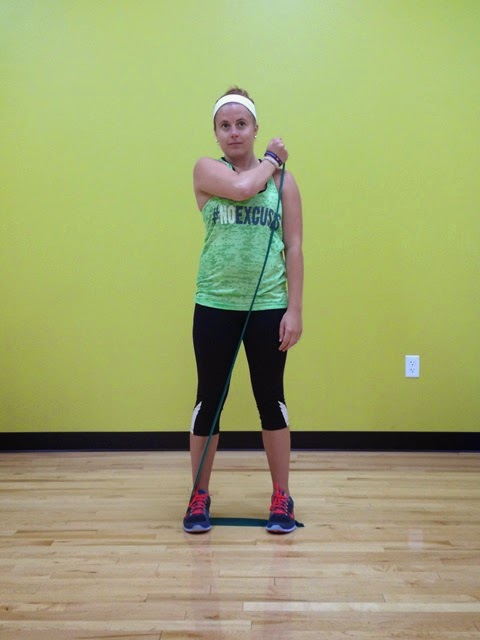
Wrist Extension Stretch

Grab your right hand with
your left hand.  Extend your wrist
bringing your finger nails toward your forearm until you feel a mild stretch.  Slowly extend your elbow.  Hold 20-30 seconds.  Repeat on the other arm.

Wrist Flexion Stretch

Grab your right hand with
your left hand.
  Flex your wrist bringing
your finger pads towards your forearm until you feel a mild stretch.
  Slowly extend your elbow.  Hold 20-30 seconds.  Repeat on the other arm.

Blog post by Jen Skiba.

Your Desk Job could be Affecting your Golf Game

There have been numerous
studies in the past few years about the detrimental effects of sitting all
day.  Some media sites have even claimed
that “Sitting is the New Smoking” because of the increased risk of disease and
even death.  We know how important it is
to get in 30-60 minutes of physical activity (on most if not all days of the
week) but what you are doing the other 23 hours of your day could be offsetting
the work that you are putting in at the gym or out on the course.
In addition to an increased
risk of cardiovascular disease, sitting can cause a change in your
posture.  Think about how you sit when
you are at the computer.  Most of us
don’t sit up straight and tall like we should. 
Spinal alignment is off as your shoulders start slouching forward
causing your chest muscles to tighten. 
Soon you notice a forward head position. 
Long term sitting can cause your muscles and spine to stay in these
forward bending positions even when we are standing.
In Titleist Performance
Institute (TPI) language, we call this the “C posture,” also known as Upper
Cross Syndrome or kyphosis.  TPI reported that 33.1% of all amateur players have C postures which is
characterized by excessive roundness in the upper back.  More specifically it is tight upper trap and
weak lower trap, tight levator scapulae, tight sternocleidomastoid, weak
serratus anterior, weak deep neck flexors, and tight pec major and pec minor.  An unstable core could also lead to these C
posture characteristics.
A golfer’s thoracic spine
needs to be mobile.  Any arching of the
upper back or lack of thoracic extension can result in a loss of rotation,
specifically in the backswing.  If you’re not
getting the club to the proper position in the backswing, you could be limiting
both your power and consistency.  

The
goal in the setup position is a neutral spine but it’s not a simple fix and
these muscular imbalances need to be addressed off the course and in the gym.  
Find a Certified TPI
Professional in your area and schedule a golf fitness assessment.
  They will be your greatest resource to help
you improve your golf game.
What can you do if you
have a desk job?  Get up and move!  Take small breaks throughout the day and get
up and stretch, go for a drink of water or take a lap around the office.  Set a timer so every 30 minutes you are
reminded it’s time to stand up.

Remember: A neutral spine and good posture will lead to more rotation.  Mobility is important for proper mechanics
and injury prevention.  If you don’t take
care of your body, your longevity in the game you love may be cut short!
[Related Posts: Desk Yoga
& Desk Yoga – Part 2]

Blog post by Jen Skiba.

Yoga for Athletes


Most
athletes know and understand the benefits of cross training, but have you ever
considered incorporating yoga as part of your cross training?
Yoga not
only has physical benefits like flexibility, balance, coordination and
strength, but also offers the mental benefits of breath awareness and
concentration – all things athletes can benefit from!
Many
athletes don’t take the time to slow down and really focus on listening to and
taking care of their bodies, which can lead to overuse and injury – spending
time on your yoga mat can help avoid that!
While you
don’t need to be flexible to do yoga (a common misconception!), you can
definitely expect some stretching in a yoga class.  Tight muscles are more prone to injury, so
taking the time to loosen up tight spots can help increase range of motion and
avoid painful injuries in the future. 
Yoga also
focuses on mindfulness and linking breath with movement, both of which can be
taken off the yoga mat to benefit you in your everyday living and your
sport.  And if you’re looking for a great
way to relax and recovery after an intense training session, a restorative yoga
class can help you physically and mentally recover quicker.
I could
go on and on about the benefits of yoga for athletes, but the best way for you
to understand is to experience them yourself! 
Starting this week you can join me
on the mat for Yoga for Athletes on Thursday’s at 7am at Mashpee Fitness – hope
to see you there!
Namaste
Danielle

Blog post by
Danielle Nardi.

#WalkingDay

Did you know that April 1st is National Walking
Day?  The American Heart Association
encourages everyone to “Get Up & Move” today.  There are so many reasons to walk.  Why do you walk?


Benefits of Walking (provided by the American Heart Association)

  • Walking can reduce the risk of coronary heart disease
  • Improve cholesterol
  • Improve blood pressure and blood sugar levels
  • Improve blood lipid profile
  • Promote weight loss, maintain body weight and lower risk of obesity
  • Enhance mental well being 
  • Increase energy

Tips for Better Walking

  • Push off your toes and hip. This will provide for proper kinetic propulsion and alignment.
  • Use long strides to involve more muscles and provide for tissue lengthening.
  • Keep legs close together. This keeps the legs under the hips for improved balance and stability.
  • Move your shoulders as you stride for proper gait and body rotation.
  • Focus on your surroundings and avoid looking at the ground when walking to keep you in proper posture alignment.

Blog post by Alan Harrison.

Reasons to Hire a Personal Trainer in 2015

Happy 2015!

  1. Consistency and Motivation  

Having trouble just getting to the gym?  Hire a personal
trainer.  Having scheduled appointments
will help you get there regularly and you will have someone to keep you
motivated to finish your workouts.

  1. Safety

Unsure how to use the equipment at the gym or how to perform
exercises without hurting yourself?  A
personal trainer will show you how to exercise safely and instruct on proper
use of equipment.

  1. Individualized Workouts  

What works for one person may not work for another. A personal
trainer will develop an effective program for you based on the results of your
fitness assessment and your personal goals.

  1. Effective Workouts

A personal trainer can help maximize your time by
providing workouts designed to meet your goals efficiently in the time you
have available.

  1. Injury Rehabilitation

Are injuries and/or accidents preventing you from participating
in your favorite activities?  An
experienced personal trainer can make the road to recovery easier by
recommending exercises that emphasize overall muscular balance to prevent
future injuries.

  1. Sports Specific Training  

Many amateur and professional athletes work with personal trainers
during the off season to prepare for inseason competition.  Your trainer can personalize your
program to the sport of your choice.  Time to think about improving that
golf game, tennis, soccer, running a marathon.

  1. Focus on your unique health concerns  

People with health challenges such as diabetes, asthma, osteoporosis,
heart disease, and arthritis can benefit greatly from regular physical
activity, however exercising with these conditions can be a safety challenge.
Have your trainer design a program that addresses your special needs.

  1. Education

Your trainer is there to teach you the hows and whys of exercise
and help you find out what will work best for you!!
Not seeing
results from that same old workout?  It’s
time for an update!

Blog post by Colleen Britton.

Exercise & Pregnancy: Why it’s beneficial and what you can do


Exercising
during pregnancy can be beneficial in many ways, not only by keeping certain
pregnancy conditions at bay but also by making you feel better about yourself.
Here are some reasons why you shouldn’t put away the gym sneakers just yet.


  • Energy
    Booster- Pregnancy can wipe you out, consuming most of your daily energy to
    complete tasks. Even small bouts of exercise can make you feel energized. With muscles that are
    strong and toned, you need less effort to engage in any activity, whether that
    means grocery shopping or sitting through meetings at the office.  According to the American
    College of Obstetricians and Gynecologists (ACOG), you can safely take part in
    30 minutes or more of moderate exercise every day, as long as you don’t have a
    medical condition or complication that your doctor or midwife has told you
    rules out exercise or limits your activity level.

  • Better Sleep- When you’re carrying an extra 15
    pounds (or more!) in front of you, finding a comfortable sleeping position can
    be a real challenge. But exercise will help you work off any excess energy and
    tire you enough to lull you into a more restful sleep.

  • Reduce Discomfort- Stretching and strengthening can
    better help the body adjust to the normal aches and pains of pregnancy. For
    example: Stretches ease back pain, walking improves your circulation,
    and swimming can strengthen your
    abdominal muscles.

  • Preparation for childbirth- The better shape you’re
    in, the better off you’ll be when you go in to labor. The birthing process
    takes strength, stamina and determination. 
    Exercising while pregnant can ease and shorten the length of delivery.

  • Reduces stress- Having a child is a life changing
    event that brings about so many emotions, experiencing highs and lows. It’s been
    found that exercise boosts levels of serotonin, a brain chemical linked to
    mood, putting you in better spirits.

  • Improving self-image- Staying active helps you feel
    better about yourself and improves your odds of gaining a healthy
    amount of weight
    .

  • Your body after childbirth-When you’ve maintained
    your strength and muscle tone all through your pregnancy, your body will have
    an easier time bouncing back after you give birth. You’ll also gain less
    surplus weight if you exercise during your pregnancy.

Some of the
best exercises to start or stick with are walking, low impact aerobics,
swimming, prenatal yoga and stretching, whether you’re a beginner to the
exercise world or have been active all along.
If you
exercised regularly before getting pregnant and your pregnancy is
uncomplicated, you can most likely continue working out as before. In some
cases it’s not
okay to exercise during pregnancy
, though, so talk to your doctor or midwife about
your fitness routine to make sure your activities don’t put you or your baby at
risk.

Blog post by Farran Jalbert.

Fighting Falls

Falls are a huge public health problem.  1 out of 3 older adults (age 65 or older) fall
every year.
  Over 95% of hip fractures
are caused by falls.
  The good news is most
falls can be prevented.
  Follow these
guidelines.
Exercise:
  • Activities such as walking, water workouts and
    yoga can improve strength, balance, coordination and flexibility.
  • Wear
    proper footwear: properly fitted shoes with non skid soles.
  • Know your
    surroundings:
      Wet leaves, black ice and
    uneven surfaces such as cobblestone walkways can be a fall hazard.
      (BE AWARE!)

What can you do at home to prevent falls?
  • Remove
    electrical cords and phone cords from walk ways.
  • Secure
    loose rugs with double sided tape.
  • Install
    non slip mats in the shower.
  • Turn on
    lights before going up or down stairways.
  • Install a
    grab bar at the bathtub entrance.
  • Do not go
    up or down stairs in stocking feet.

BASIC EXERCISES: For improved balance
and posture the following exercises can be done using a folding chair. Stand
behind the chair holding on with both hands.  Start with a goal of performing 10 repetitions.  Stop the exercise and see a physician if you feel any pain or discomfort.

Squats

Stand with legs shoulder width apart.  Bend knees as if you are sitting in a chair until knees line up with toes and return to start position.

Knee Raises

Stand up straight and alternately bring one knee up to a 90 degree angle.  Return to start position and repeat
with opposite leg.

Heel Raises

Stand flat footed and raise up on toes.  Return to start position.

Hip
Abduction

Begin standing on both legs and slowly raise one leg out to side.

Leg Swings

Stand on one leg.  Swing other leg forward and backward.  Repeat with other leg.

In addition light weight training using
dumbbells can help improve overall body strength which can help you maintain a
correct posture. Overhead press, chest fly, bicep curls, triceps extensions are
some of the effective exercises.
In the recent Fighting Falls class
offered by Mashpee Fitness all four of the participants that took the Berg Balance
test before and after the program showed improvement in basic balance in
the areas of: stand from a sitting position, leaning forward on toes, picking
items up from the floor, standing with feet together, standing on one leg and
stepping up a simulated flight of stairs. 
Balance can be improved.  Are you
ready to start fighting falls?
Blog post
by Alan Harrison.

Why do you exercise?

Last month we asked our members, trainers, physical
therapists, and office staff “Why do you exercise?”  We received numerous responses.  Everyone has a different reason and motivation
to work out.  Some of us love it.  Some of us hate it.  We know we have to do it.

Below is an essay Anna
Cavanaugh, a Cape Cod Rehab Physical Therapy Aide, shared with us about regarding the topic…
Transforming society by optimizing movement to improve
the human experience
“Physicist Sir Isaac Newton’s First Law of Motion states: An
object at rest tends to stay at rest and an object in motion tends to stay in
motion, unless acted upon by an external force. When this law of motion was
first introduced in the 1600s, Newton
used it to explain how mass behaves in a system free of external forces such as
friction or gravity. As a recent graduate interested in physical therapy, I
view this law not only applicable to physical objects and systems, but also to
the work of physical therapists in rehabilitating, managing and preventing of
injuries for people in our society.
As an athlete, I fully appreciate the need to stay active,
flexible, and strong for muscle and joint health. I am committed to improving
the human body and how it moves and stays mobile at any age in order to empower
individuals to be able to lead independent and dynamic lives, especially with
the sedentary lifestyle of many today. As a future physical therapist my goal
is to embody this philosophy through education, commitment and innovation.
Education is the foundation to a successful recovery and
enhancing a patient’s wellbeing. I want to help people heal, but first, I want
them to understand how they became injured. Making this a more active process,
I want us to work together to restore their health and prevent future injuries
and complications through proper demonstration and practice of exercise
techniques. To establish this plan of action, I plan to treat the people I work
with as “students” interested in learning about their body and injury
prevention, as opposed to “patients”, where they might think of it as
a one-way experience.  In doing this, I
hope to create a different level of engagement and involvement, which allows
them to continue independently long after their treatment is complete. It is
critical to empower a patient with knowledge and confidence in order to
encourage them to take charge of their own therapy.    
Among many goals that people have in their lives, the
ultimate goal is to live a pain-free life, and I am committed to making that
happen for people as the second step in my vision as a physical therapist. As a
competitive swimmer, I learned the best way to stay pain and injury free is
through self-discipline in developing good technique. I want to help my
“students” live their lives without restrictions or pain. Knowing
effective techniques of any exercise is vital in order to be able to practice
and perform effectively.  My approach to
this is to be positive and encouraging to make therapy and exercise enjoyable
without pain so they do not avoid workouts.
A third component of my philosophy is to incorporate
innovation into my practice. The body is fascinating with its ability to
perform complex and connected moves as one through whatever motions we desire.
When the body is not able to perform the motions that were so effortless in our
youth, problem solving is key to finding the route of the issue and figuring
out ways to strengthen and rehabilitate the individual back good health. An
important consideration for this is that we live in a society where
advancements in science and medicine are constantly changing.  It becomes our responsibility to stay abreast
of this new information and to incorporate it into new treatments, techniques,
and exercises. By incorporating more innovative and individualizing techniques,
I will help my patients move toward better functional lives. 
In Newton’s
third law, he stated: “for every action there is an equal and opposite
reaction.” Concluding with another fundamental physics law, it is important to
help the patients become aware of the fact that the more work that one puts
into his or her own recovery the greater the results he or she will see over a
lifetime. While not everyone is, or aspires to be an athlete, a few minutes of
exercise daily is a step on the road to higher mobility. In today’s lifestyle,
where food is readily available and a high level of activity is not required to
stay alive, many may atrophy into weaker versions of their intended selves,
which is detrimental to their bone mass and musculature. In wanting to
transform the health of society, one patient at a time, I hope to challenge and
motivate individuals to lead more active lives and encourage people to invest
in their own health and future. I wish good health and wellbeing for those I
treat through our work together, and envision that I can make becoming strong
and fit contagious.”
Think about it.  Why
do you exercise?

Blog post by Jen Skiba.

5 Burdenko Strength Exercises for Runners

All athletes need to strength train but it’s an
element to your training that is often missed. 
Strength training will make you a stronger, faster, and more efficient
runner and most importantly—strength training will help keep you injury
free.  Below you will find 5 Burdenko
exercises that Eric Chandler, a Certified Strength & Conditioning
Specialist and Certified Burdenko Method Instructor, chose to target muscle
groups important for runners. 

Begin with 10 repetitions of each exercise.  After a few sessions, try 2 sets of 10
repetitions and start adding speeds.  Do
not perform any exercise that causes or increases pain.

Earth to Sky

Lunge to the
side and “sweep the floor” with your opposite hand and continue to complete big
circle overhead. Continue for 10 repetitions and repeat to the other side.

1/2 Roll Lunge Step

Stand on one leg with your foot in the middle of the half roll.  Use the other leg to step forward into a
lunge and then step back into a lunge. 
Repeat back and forth for 10 repetitions and repeat on the other
side.  For a challenge, reach opposite
hand to the front foot while lunging.

1/2 Roll Leg Swings

Stand on one
leg while swinging the other leg forward and back. Swing the arms so opposite
hand and foot are in front. Make sure to keep your body straight and swing the
leg high back and forth. Continue for 10 repetitions and repeat on the other
side.

Scooters


Lay on your
side with legs straight together. Support your head with your lower arm and
position your top arm in front with fingers pointing towards the body for
stabilization. Bend top knee towards the top arms. Extend leg straight at elbow
level. Swing leg back to starting position. Continue for 10 repetitions and
repeat on the other side. Progress to full leg extension behind the body, bend
knee and bring forward to elbow again.


Rotate and Kick

Lay on your side with legs
straight together. Support your head with your lower arm and position your top
arm in front with fingers pointing towards the body for stabilization.
Lift top leg straight up and bend your knee down bringing your heel to your
buttocks. Turn knee up and extend your leg straight up. Return to start
position. Continue for 10 repetitions and repeat on the other side.

Blog post by Jen Skiba.

5 Burdenko Warm Up Exercises for Runners

A good warm up is important for preventing injuries
and preparing your body to perform.  Next
time you head out the door for a run, try these 5 Burdenko warm up exercises
that Eric Chandler, a Certified Strength & Conditioning Specialist and
Certified Burdenko Method Instructor, picked out with runners specifically in
mind. 
Warm up by walking for 3-5 minutes.  Perform 10 repetitions of each exercise.  Gradually move through greater range of
motion.  Do not perform any exercise that
causes or increases pain.

Wake Up Call

Take a small
step forward white extending your arms overhead. Clap! Return to start position
and repeat with the other leg. Gradually take bigger steps forward until you
are lunging.

Weight Shift Catch

Shift weight
to one leg and simultaneously catch and lift the knee with both arms and pull
the knee to chest, hold the balance. 
Return to start position and repeat with the other leg.

Squat Hurdles

Squat with
arms straight forward at shoulder level. As you stand, mimic hurdle motion: one
leg kicks out straight, touching the foot with your opposite hand. Other arm
extends back. Squat and repeat with the opposite hand and foot. Get the motion
in rhythm, kicking knee is straight, weight bearing leg is on the ball of the
foot.

High Knees/High Heels

Perform 3 high
knees with alternating arm swings then 3 butt kicks, lifting the heel towards
the buttocks, continuing with the arm swing.

Power Stride

Start with one
foot in front of the other.  Drive up
with the back leg to a high knee with opposite arm in the air.  You can take it one step forward and go all
the way up to your toes on the stable leg. 
Continue for 10 repetitions and repeat to the other side.

Blog post by Jen Skiba.

Row, Row, Row Your Boat

Looking for a full body, cardiovascular
workout?  Try indoor rowing.
Rowing has become more and more popular
over the past few years.  It’s a fairly
simple cardiovascular activity using the entire body.  It’s easy to learn and entirely up to you to control the time, distance, and intensity.  Rowing is great for burning calories,
increasing your stamina (through heart rate training!), and strengthening your
muscles.  It’s also a low impact activity
with much less pressure on the joints than walking, running or jumping.  Joints move through a wide range of motion
and when I say the entire body is working, I mean the entire entire body.  With every stroke you are using your calves,
quads, hamstrings, glutes, core, pecs, biceps, triceps, deltoids, lats, and so
on.

Technique is important.

Before you hop on a rowing machine and
start rowing, make sure you learn proper form.  Technique is important to keep you injury
free and more efficient so you can row better and faster.  Some of my clients are worried about straining the
lower back during rowing exercises but if done correctly, power comes from
the legs putting minimal stress on the lower back.

The Rowing Sequence

There are two phases in the rowing
stroke: the recovery phase and the drive phase. 
These two phases can be broken up into 4 positions: Recovery, Catch,
Drive, and Finish.
During the recovery phase, your triceps
work to extend your arms out in front of you and your upper body (abdominals
flexed with back muscles relaxed) is leaning forward at about a 30 degree angle.  Start to bend your knees allowing the seat to
slide forward.  The catch position is
when your shins are vertical and the balls of the feet are in full contact with
the footplate.  To protect your knees,
you never want to compress your legs past that. 
Your arms are still straight with shoulders level.


The drive phase begins with arms
straight and upper body still leaning forward at 30 degrees while beginning to push off the
footplates with your legs.  During
rowing, power is generated in the drive phase with the muscles of your
legs.  Your shoulder muscles are also
contracting during this time.  As you
straighten your legs, lean your upper body back at 30 degrees,
using your core to support your lower back. 
Use your biceps to bring your hands back in a straight line toward your
lower ribs.  Your glutes and hamstrings
are also contracting to extend the hips. 
This brings us to the finish position with legs extended, arms at the
lower ribs, flat wrists, upper body engaged and still at 30 degrees, head
neutral with neck and shoulders relaxed.

Adjust the damper setting

The most common misconception about the
Concept 2 Rower is the damper setting. 
I’ll admit that I even had this all wrong.  On the Concept 2 Rower, the lever is 1-10 on the flywheel.  The damper setting does not
control the level or resistance.  Let me
repeat.  The damper setting does not control
the level or resistance.
The damper setting controls how much air
flows into the flywheel cage.  High
settings will allow more air in which takes more work to spin the
flywheel.  This doesn’t necessarily mean
you will go faster or farther, it just means you will work harder and your
muscles will fatigue quicker.  Lower
settings allow less air flow making it easier to row.
How do you change the resistance?  You pull harder!  It depends on the leg strength and power
behind your push off and how hard you pull using your arms and back muscles.
Start with a setting or 3-5 and
experiment with different settings. 
Typically 3-5 is ideal for aerobic exercise and building endurance.  Higher settings turn your aerobic exercise
into more of a strength workout.

Warm up & start out slow

Before you begin a rowing workout, warm
up for 3-5 minutes.  Start out slow and
gradually increase your time, distance, and intensity.  Getting too ambitious your first few sessions
on the rowing machine will set you up for injury!

Focus on your breathing

Breathing is often overlooked when
exercising.  With each inhale, you are
filling your lungs with fresh oxygen and supplying muscles with nutrient rich
blood whereas each exhale you are flushing out the bad carbon dioxide and
waste.  Holding your breath, breathing too fast or too shallow will have an effect on
your workout.  Our goal during rowing is
deep and relaxed breathing and creating a breathing rhythm related to the
rhythm of each stroke.
Most rowers either take one breaths per
stroke: inhale during recover, exhale during the drive.  Rowers rowing at high intensities may sneak
in a quick second breath per stroke.
See what works best for you and continue
the same breathing pattern throughout your workout.  This will keep your muscles happy with
continuous and regular oxygen supply.

Last but not least—have fun!

Blog post by Jen Skiba.

Race Week Taper Mode

Whether you’re running the beautiful and
prestigious 7-mile Falmouth Road Race course in Falmouth, Massachusetts next
Sunday or preparing for your goal race of the year, race week is a very
important week.

Let me start out by saying – nothing you
do in the week (actually two weeks) before the race will benefit you in terms
of aerobic fitness levels, speed, or strength. 
Your last long run should be 2 weeks out.  One of the hardest things about taper can
be learning to trust your training.  However, cramming in an extra long run or logging
mega miles will only lead to tired and heavy legs or even worse… over training
and injuries!  You have done all the hard
work (hopefully!), now is the time to let your body rest up and prepare for the
big day.
I am a big believer in training
plans.  There are a million to choose
from but the right training plan, if followed, can set you up for a great
race.  Sure there are things that we
cannot control—like the weather—but doing all the little things that we CAN
control make all the difference in the world.
If the race is on Sunday, run like your normally would Monday-Thursday with a day or two off. 
Nothing crazy fast or out of the ordinary.  Try 4-6 strides at the end of your run to
work on turnover.  Take Friday completely
off as a rest day and use Saturday as a “shake out run” or an easy, easy 20-30 minutes
max before you tear it up on Sunday.
If the race is early, practice running
early.  Set your alarm to get out the
door before work.  Your body’s energy
levels fluctuate throughout the day depending on your sleep, stress, and
nutrition.  If you always run in the
morning and you’ve signed up for a night race, make sure to get in a few night
runs to see how your body reacts and give it time to adjust.
Eat smart and stick to your regular
diet.  Don’t try anything new—especially
race morning and the night before the race. 
Avoid spicy foods, seafood or anything with heavy cream that may upset your
stomach.  During your training, you
should have been practicing race nutrition. 
The week of the race isn’t the time to experiment with new gels or different
pre-run meals.  If you’re running a
destination race, call the hotel ahead of time to see what they offer for
breakfast.  If not, bring your own meals
or stop by the local grocery store when you get to your destination.
Get some sleep!!  And I’m not just talking about the night
before.  Try to get to bed a little
earlier every night the week of the race. 
Your body will thank you.
Drive the course.  Some runners like to drive the course
beforehand, others do not.  Knowing the
route can be beneficial if you are in new running territory and are nervous
about the event.  You can scope out the finish line and all
the hills to mentally prepare yourself for what’s to come.
Develop your race day strategy.  Have a plan for how you will tackle the
run.  Do you have a goal time in
mind?  Do you usually go out too
fast?  Are you too conservative so you
always feel like you could have done better? 
Almost as important as having a strategy is being able to adapt.  What if something goes wrong?  How will you recoup and finish the race?  Maybe you’re having a bad day but never give
up.  Take a look around at all the
runners, volunteers, and race supporters. 
Everyone out there on the course has their own story to tell about their
training and struggles.  Appreciate the
run and learn from your experiences. 
There is always another race to redeem yourself.
Lay everything out the night
before.  Pick out (and try on) your race
day outfit.  Even better–wear your race
day outfit for a run.  Don’t wear new
sneakers the day of the race.  Make a
checklist of everything you will need: bib number, pins, socks, sneakers, watch,
Gu, Body Glide, etc.  Plan your
breakfast.  Set your alarm early enough
that you aren’t rushed.  Expect traffic.  Add in extra time because you know you will
want to wait in a porta potty line and a dynamic warm up before the start.
Try all these race week taper tips and
you’ll be arriving at the start line with fresh legs ready to rock a personal best!  Good luck!
Blog post by Jen Skiba.

4 Ways to Ease Sore Hamstrings

1
Massage your hamstrings.
Use
a foam roll or massage stick to loosen knots in your muscles.

2
Mix up your routine.
Try
cross training in the pool. A little variation gives your body a break from
always doing the same thing and putting stress on the same areas.

3
Adjust your training volume
every third week. 
If you’re a runner, cut your mileage by a third to a half to
give your body time to recover. You can still train just as hard.

4
Strengthen your
glutes!
 
If your glutes are weak, your hamstrings
will have to work overtime to pick up the slack. One idea: Include mini band
walks in your workout to strengthen your glutes. Just make sure you’re feeling
it in your glutes and not your hamstrings.

Blog post by Farran Jalbert.

Improper Training of the Abdominals

The majority of individuals that
participate in exercise programs usually train their abdominal muscles.
Different people have different reasons as to why they like to train
abdominals. Some want that defined 6-pack, others may want to lose weight
around the torso, and athletes train the core to improve their game. 


The core
is a big part of every movement we make.

Most individuals think that the core
refers to only abdominal muscles. In all actuality the core is a functional
unit composed of the abdominal and lower back muscles. These two groups are
connected by the transverse abdominals and internal obliques. The muscle groups
help keep the torso stable during all body motions. Failure to train these
muscles properly can change the way the body functions.
There are two parts of the abdominals;
the inner unit and the outer unit. The inner unit deals more with keeping the
trunk stable, while the outer unit is involved in movement patterns. In my next blog post I will go more in depth about these two units. Abdominals are broken
down into three sections; upper, lower, and obliques. All three should be
trained equally so no imbalances occur within the body. This is where the
majority of individuals go wrong with their training. People are always in the
gym doing sit-up after sit-up. Sit-ups / crunches are great exercises, but too
much of them changes the body. Normal posture alignment is an imaginary line
that travels through the cheek bone, sternum, and pubic symphysics. When an
individual performs many sessions of sit-up / crunch exercises they actually
begin to create a forward head posture. Over a long period of time this type of
training will pull the chest downward. This downward pull causes an increased
first rib angle. The reason this happens is because those exercises shorten the
rectus abdominis which causes the pull. Not only does this chronic training
pull the chest forward, but it can also be associated with shoulder dysfunction
and impingement of the nerves that feed the arms from the cervical spine. If
that wasn’t enough, a lot of people who chronically perform sit-up / crunch
exercises usually complain of back problems. If you experience lower back pain
when performing sit-ups / crunches, stop those exercise completely and switch
to lower abdominals and transverse abdominal exercises (leg lifts, flutter
kicks, reverse crunch, and 4 point stance). It has been proven that individuals
with lower back pain performing lower and transverse abdominal exercises had a
decrease in their pain levels.
This post is not about bashing sit-up /
crunch exercises and saying they are bad for you. It is more about bringing
awareness that abdominals need to be trained properly so the body can function
properly. When working the abdominal muscles, the order in which they should be
trained is lower, obliques, then upper (lower= leg lifts, obliques= russian
twists, upper= sit-ups). All three groups should not be trained every day.
Training all groups everyday can lead to strains, poor posture, and increased
workload on accessory respiratory muscles. If you are going to train abdominals
everyday then make sure you only train one region per day! 


Also, abdominals
should ALWAYS be trained last! Failure to wait till the end of the workout will
fatigue the abdominals when they are needed for more complex exercises. This
can lead to injury.
Stay tuned for my next blog post where I will go
more in depth about the inner and outer units. I will also give exercise
examples of how to train each unit properly.
Blog post by Cam Bergeron CSCS.

The Barefoot Running Fad

We’ve all heard of
or at least seen Vibram’s FiveFinger minimalist shoes. Maybe you’ve even tried
them. But do you know about the new barefoot running fad? Minimalist running
shoes can be a segway into barefoot running or a protective alternative, but
the theory behind the two is the same: barefoot/minimalist running can
(according to some) help prevent common running injuries while strengthening
your ankles, knees, and legs.
According to some
researchers, running sneakers, while commonly accepted as the norm, may
actually be doing more harm than good. Recent studies have shown that modern
running shoes can cause excessive pronation and put extra stress on joints such
as knees and hips. They can restrict the natural torsion of the foot and
increase the likelihood of heel striking, which is landing directly on the heel
when the foot is planted while running.
Running without
modern running sneakers, on the other hand, allows for the natural movement of
the foot. Barefoot running is, after all, the most natural way for humans to
run isn’t it? Think about it: humans have been running for survival for
thousands of years, the vast majority of those without today’s Nikes. And there
were no podiatrists or physical therapists around centuries ago to help heal
Achilles tendon problems or ITB issues; those occupations arose out of need
when these running injuries became chronic, which happened around the same time
that we as humans began doing everything in sneakers. Without sneakers, the
foot tends to heel strike less and land on the forefoot more. This allows for
better shock absorption through the stride. Running barefoot, especially on
uneven surfaces, also strengthens the feet as well as the legs as a whole.
So, barefoot running
seems like an easy fix for all of your running injuries, right? Not quite.
While there are many scientists and prominent runners who promote barefoot
running, there are still some who are hesitant about it. Depending on what kind
of surface you’re running on, running barefoot can lead to cuts and blisters on
the bottom of your feet (that’s why minimalist shoes like the FiveFinger are
more popular than regular barefoot running).
More importantly, if
you jump right into barefoot running it can lead to worse injuries than the
ones you might be trying to avoid by running barefoot in the first place. If
you’re interested in trying it out, it is important to take baby steps when
beginning barefoot running. Add on a few minutes of barefoot running on grass
to the end of your run and gradually work up to running more and more time
barefoot. Eventually, you’ll be able to do more barefoot running than shod
running!

Blog post by Summer 2014 Intern Kim Bolick.

The Concussion Debate

The prevalence of sports related concussions has steadily been on
the rise with the increased levels of athletic participation. According to ‘BrainLine.org’ “An estimated
1.6-3.8 million sports- and
recreation-related concussions occur in the United States each year. During
2001-2005, children and youth ages 5-18 years accounted for 2.4 million
sports-related emergency department (ED) visits annually, of which 6% (135,000)
involved a concussion.” Immediate side effects include headaches, dizziness,
nausea, vomiting, as well as slurred speech. Some more delayed side effects
include memory complaints, noise and light sensitivity, smell and taste
disorders, post-concussion syndrome and psychological problems (Mayo Clinic,
2014).
While tuning into the World Cup finale of Germany v. Argentina, there were multiple
instances where players faced concussions. This adds to the ongoing debate
within the game of soccer as to whether or not headgear should be necessary for
all ages. Germany’s
Christoph Kramer was involved in a brutal collision with an Argentinian player
in the early minutes of the game. Clearly affected by the blast, Kramer was
assessed by medical staff members who allowed him to remain in the match until
he was unable to physically maintain. In the 56th minute Argentinean Gonzalo Higuain was
involved in a rough challenge with goalkeeper Manuel Neuer. Higuain too was
shaken up in this collision. So this raises the question as to whether or not
headgear should be required in the game of soccer?
Although headgear is not inevitably going to eliminate the risk of
concussions or head injuries sustained, it will lessen the severity of the
injury. Some may argue that it will change the nature of the game or influence
the path of the ball but isn’t the most important aspect of sport to protect
our players – especially the children. A brain is rich in development during
the childhood years and suffering a concussion alters one’s brain function. Any
measure that could potentially protect our brain should be taken and future
research should delve deeper into this headgear intervention.
Not only does headgear have physical injury prevention benefits
but it may also influence mental health. It is believed that this added
protective equipment may improve levels of confidence on the field. When
players feel more comfortable on the pitch they are more likely to go into
challenges with more effort and grit. As covered by NBC News on an interview
focusing on concussion prevention, a woman soccer player stated, “I had extra
confidence, extra confidence that allowed me to play more aggressively.” Sports
psychologists may even relate this enhanced level of confidence to better
performance outcomes.
So there is a decision to be made – purchase the $45 headguard and
reduce the probability of a head injury or play the game and take the chance of
suffering a full-blown injury?

Collision: https://espn.go.com/video/clip?id=11211372 (0:20 mark, 1:25 mark)

Blog post by Evan Healy.

Functional Training

The importance of maintaining a degree of functional fitness
is a main determinant in reducing and preventing injury. Integrating functional
training into a client’s exercise prescription will improve aspects of
coordination and synergism of multiple muscle groups. By intentionally
recruiting muscles simultaneously through various planes the client should
experience an enhanced sense of proprioception, balance, and overall strength.
Smooth, integrated movements are the basis to all activity,
ranging from every day tasks to athletic competition. Implementing functional
training will make the performance of everyday activities easier, safer, and
more efficient.
Seeing as the body is considered a ‘kinetic-chain’ we can
assume that the significance of the core is of massive importance. The core
connects and coordinates movements between the upper and lower body. A great
exercise for improving core stability are the variants of the cable pallof
press as shown below. This movement again, requires core and anti-rotational
strength while recruiting lower body muscles to maintain solid form. The beauty
of an exercise like this is that it is easily modifiable and can be performed
utilizing a variety of modes including but not limited to resistance bands and
cables as well as many positions including a standing, kneeling, squat or split
stance lunge position.

The following pictures show examples of the standing
press, split stance press, and sustained squat press.

The starting position for each exercise is with hands
interlocked and close to the chest, and knees bent in an athletic position. By
pressing straight forward you will reach the end position with the arms fully
extended. Return back to the chest to complete the repetition.

Standing Pallof Press

Split Stance Pallof Press

Sustained Squat Pallof Press

As with all exercise begin with appropriate repetition and
weight ranges while progressing in a proper manner. Start with 2 sets of 10
repetitions on each side. Enjoy the different variations and have fun!
Blog post by Evan Healy.

Combating your Desk Job Slouch

There’s
no question that the human body is designed to move, but with the rise in desk
jobs, we spend more time sitting than moving. And with that, we come across a
number of problems: lower metabolisms, low back pain, tight hip flexors,
slouching posture, and weak cores among them.
Combat
some of the work-related issues in the gym with these moves:

Hunching over your desk/keyboard

This is a huge
cause for much of the stress we hold in our shoulders and the poor posture we
experience. 

IYTWs over a ball:
You can do these with low weight or no weight, with or without a hold, and with
your palms in a number of positions to challenge your muscles. The key is to
pinch your shoulder blades and draw them down your back as you lift your arms
through the patterns.  This activates the rhomboids rather than the trapezius
(which is already well developed in tense shoulders!). Try one to two sets of
ten to start and notice how much straighter you stand up after! 

D1/D2 with a band:
These are diagonal patterns that work the shoulders and back complex and can
be done in a number of different directions. Stand with the band in your right
hand and under your right foot. Bring your hand across your body in a diagonal
pattern up towards your left shoulder and return it back to your right side.
This is a D1 pattern. You can also do it in reverse, with the band attached up
high by your left shoulder and in your right hand, and drawing
it down across your body. Sometimes we call these “Wolverines”
because it’s just like how Hugh Jackman whipped his claws out.


For
D2 patterns, stand with the band under your left foot and in your right hand,
with your hand by your left pocket. Draw it up across your body diagonally as
though you’re unsheathing a sword and then return it across your body to your
pocket. Again, you can do this move in reverse, attaching the band up high and
drawing it low. 


Rowing with a band:
For this, hold two ends of a band
that is wrapped around a pole in each hand, pinch your shoulder blades down and
back, and draw your elbows towards the wall behind you while keeping your
forearms parallel with the floor. 


Stretch it out:
Try a prayer stretch (also called child’s pose in yoga) to stretch out your
shoulders and back. Start in a table-top position (on hands and knees, with
your hands directly under your shoulders and knees directly under your hips)
and sit back on your heels. If needed, you can walk your hands out a bit more
in front of you once you’re seated back. You can also try this with a rotation,
where you start with your hands off to one side, and then sit back. You’ll feel
it more along one side. 


You can also try an upper trap stretch. While standing up straight and looking
straight ahead, bring one ear towards your shoulder, then to the other side. To
increase the stretch, push the heel of your hand down towards the ground on the
side opposite the ear (so if you’re dropping your left ear to your left
shoulder, push your right hand towards the ground).

A good stretch to loosen up your chest and shoulders is the doorway stretch.
Stand in a doorway with your arms bent and step into it. You can change the
angle on this one, depending on which fibers are tightest.  

Tight Hip Flexors/Low Back Pain

A little while back, Drew
wrote a great article on stretching out hip flexors that become tight from
being in a shortened position (as they are when we’re sitting). Check it out here.

Core


I’m sure you’ll love me for saying this, but planks are some of the best
exercises to strengthen the entire core. There are a TON of ways to do them to
keep them interesting and fun (go ahead, ask me sometime!) but the best way to
start? Try modified planks. These are just like regular planks, but your knees
are on the ground instead of your feet, shortening the work load and allowing
you to really focus on your form. When you get comfortable with those, you can
progress to regular planks and side planks and increase your time! Just make
sure you keep that form perfect.


Blog post by Ashley Crosby.

Just because you’re inflexible, doesn’t mean you have to be

Did you know that
flexibility is an entirely trainable quality? 
Sure, we get a little more
inflexible over the years (a process called fibrosis, where thick connective
tissue takes the place of some of our more pliable fibers that are getting worn
out), but it doesn’t prevent us from staying flexible. In fact, the most common
reason for inflexibility is not age, or genetics, or gender, but DISUSE. It’s
exactly because we DON’T stretch that we become so stiff. 
No, I’m not going to tell
you that to be flexible you absolutely have to start doing yoga, although you
might really enjoy the practice. But it’s been shown in studies that including
a stretching program twice a week for five weeks can improve your flexibility
over time. 
You can elect to do a dynamic stretching program–ask any of us
for some Burdenko moves, for instance–where you move through the stretches.
Dynamic stretches are great for athletes who are getting ready for practice or
competition, as they mimic the exercise movements they’ll perform during their
game and really get the body thinking about what it’s about to
encounter. 

You can also do static stretching, where you slowly make your way
into the stretch and then hold the end position for 30 seconds or so. The key
is to find a point in the stretch that’s just a little uncomfortable, but
doesn’t hurt–and where you definitely aren’t shaking. You trigger your stretch
reflex when you stretch TOO far, which can actually make you TIGHTER (it’s a
defense mechanism for your muscles, to avoid being ripped by being stretched
too far). Also, avoid bouncing into the stretch–while this (known as ballistic
stretching) isn’t technically as bad for you as previously thought when done correctly,
the risk for injury is much higher, and really not worth the “reward”
when static and dynamic stretching offer better options. 

Example of Static Stretching
One of the key things to remember is to warm up before you stretch. Warming up
is important in ANY of your activities, as it gets you ready for your workout
by increasing your body temperature, getting the blood to flow through your
body a little more, and improves viscosity in your joints (in other words, gets
the synovial fluids that keep your joints lubricated to move better so your
joints move better–more like oil than maple syrup), among a number of other
things. A general warm-up for five to ten minutes is perfect–a quick walk on
the treadmill (or around the block, or at the beach), a few minutes on a
bike–just enough to break a sweat.
Then, you can go through
and do a number of stretches as an “active recovery” day, or you can
continue on with your workout and stretch for 5-10 minutes afterward. 

Blog post by Ashley Crosby.

The Importance of an Active Rest Day

Just because you are taking a day off from the gym, doesn’t
mean you should take a day off from being active!


Giving your body a break between intense workouts is
essential to help your muscles recover, avoid overtraining and reduce the risk
of injury but don’t make the mistake of thinking your days off can be spent
sitting on the couch all day watching trashy TV—which can be a very tempting
option.
Your rest day should be spent doing some sort of light physical
activity that will stimulate recovery without placing any undue stress on your
body. Summer is just around the corner and as the weather is starting to
warm up, make the most of your days off. Go outside, get moving, and have fun.
Take a bike ride along the canal, a walk on the beach, or
explore one of the many nature trails the Cape
has to offer. Organize a pick up game of softball going with friends and
family, just as long as the intensity stays relatively low and you don’t get
too competitive! Paddle boarding, kayaking, yoga, golf, hiking, swimming, doing
a light body weight workout or easy jog…the list is endless.

As long as you stay active, you will feel better and
maximize the progress you are making in the gym!

Blog post by Catie Furbush CSCS.