Yoga Etiquette

Happy Yoga Monday!
Today I thought we’d address some Yoga
Etiquette.  Whether you’re thinking about
going to your first class or you’re a veteran yogi hopefully you’ll find some
useful information in today’s post.
Turn off your cell phone
Or better yet, don’t even bring it into the yoga
room!  One of the goals of a yoga
practice is to clear your mind and be fully present on your mat  -nothing will jar you back to reality like
the ringing of a cell phone!  
That being said, teachers will certainly understand
if there is an extenuating circumstance that requires you to have your phone
nearby (a sick child, etc.), just be sure to let the teacher know you are going
to have your phone on your mat on vibrate just in case you’re needed.
If you arrive late enter
quietly!
Everyone understands life gets
in the way and you may be running a few minutes late – hey, we’re glad you made
it! – but please be considerate and enter the room quietly as to not distract
others from their practice.
Also, if you’re more than a few
minutes late be sure to take the time to do a few warm up poses before you jump
in with the rest of the class – running late is no reason to risk injury
because your body wasn’t warmed up properly!
When the teachers asks if you
have any injuries tell them!  
I promise you we’re not being
nosey!  We learn a lot about anatomy in our training and we’re
knowledgeable as to what poses you should avoid if you are dealing with an
injury – we just want to help you have a healthy and safe yoga practice!
A good yoga teacher will tell
you if there is a pose you should skip, if there is a way to modify it so it
will put less stress on a certain body part, or if there is an alternate pose
you can do instead!
Listen to your body
If your body is telling you that
it needs a break, then by all means, take a break!  I promise no one is
going to think you aren’t good at yoga or can’t keep up.  And here’s a secret…if you’re just not
feeling a certain pose one day – don’t do it!  Really! Feel free to make
your practice your own and skip a pose that may not be working for you for
whatever reason.
Props and assists aren’t just
for beginners
Yoga props and assists from a
teacher aren’t because you can’t do a pose and need “help”.
 Props and assists are to help you get the most out of the pose.
 Please don’t feel like you’re doing something “wrong” or are
“not good enough” if you use a prop or a teacher comes over and gives
you a gentle hands on assist- in fact I bet most teachers would tell you they
LOVE getting assists during a class, it usually helps you access the pose a
little deeper than you could on your own!
Don’t give up!
If you go to a yoga class and absolutely
hate it, please don’t give up!  There are many different styles of yoga
and many different yoga teachers and you may just not have found the right fit
– I can’t tell you how important it is to find a teacher you connect with!
See you on the mat!
Danielle
Don’t forget, you can practice with Danielle at
Mashpee Fitness on Monday mornings at 8:30am and Thursday mornings at 7am &
8:30am.

Blog post by Danielle Nardi.

Yoga Pose of the Week: Child’s Pose

Child’s pose, or Balasana
as it is called in Sanskrit, is a resting and restorative pose in the practice
of yoga.  In addition to offering a gentle
stretch for the hips, thighs and back, Child’s pose also slows the mind by
calming the central nervous system and offers an opportunity for inner
reflection by allowing the body to fold into itself. 
Child’s pose should be a
safe, relaxing place to come to at any point in your yoga practice when you
need a break or at any point in your day when you need a calming place to
focus.

 
TO DO:
  • Kneeling on the ground bring big toes to touch
    sitting back on the heels
  • Knees can stay together or come about hips distance
    apart
  • On an exhale fold the upper body over or between
    the legs until the forehead touches the mat, lengthening from the tailbone all
    the way to the crown of the head
  • Lay your arms alongside your body palms facing up
    and release the shoulders towards the floor
  • For a more active version extend the arms out long
    in front of the body
  • Hold for a minimum of 5 breaths, but you can stay
    for up to a few minutes for full relaxation and stress relieving benefits!

VARIATIONS:

For knee issues either
keep your hips lifted or place a folded towel or blanket under your seat to
create more space and put less pressure on the knees.


If you prefer not to get
on the floor you can do a modified Child’s pose while seated in a chair.  Place a pillow or folded blanket on your lap
and fold the upper half of the body forward over the pillow.
If you’re ever feeling overwhelmed or stress or
your body needs a break in a yoga class know that Child’s pose is always there
for you!
Namaste,
Danielle

Don’t forget you can join Danielle for yoga at
Mashpee Fitness on Monday and Thursday mornings at 8:30am and for Yoga for
Athletes on Thursdays at 7am!

Blog post by Danielle Nardi.

Yoga Pose of the Week: Pigeon Pose

In celebration of the Boston Marathon
today I wanted to share the yoga pose that I feel has really helped me the most
as a runner!
When I first began running a few years
ago I had a lot of trouble with my piriformis, a small muscle located in the
gluteal region – also known as runner’s “pain in the butt”!
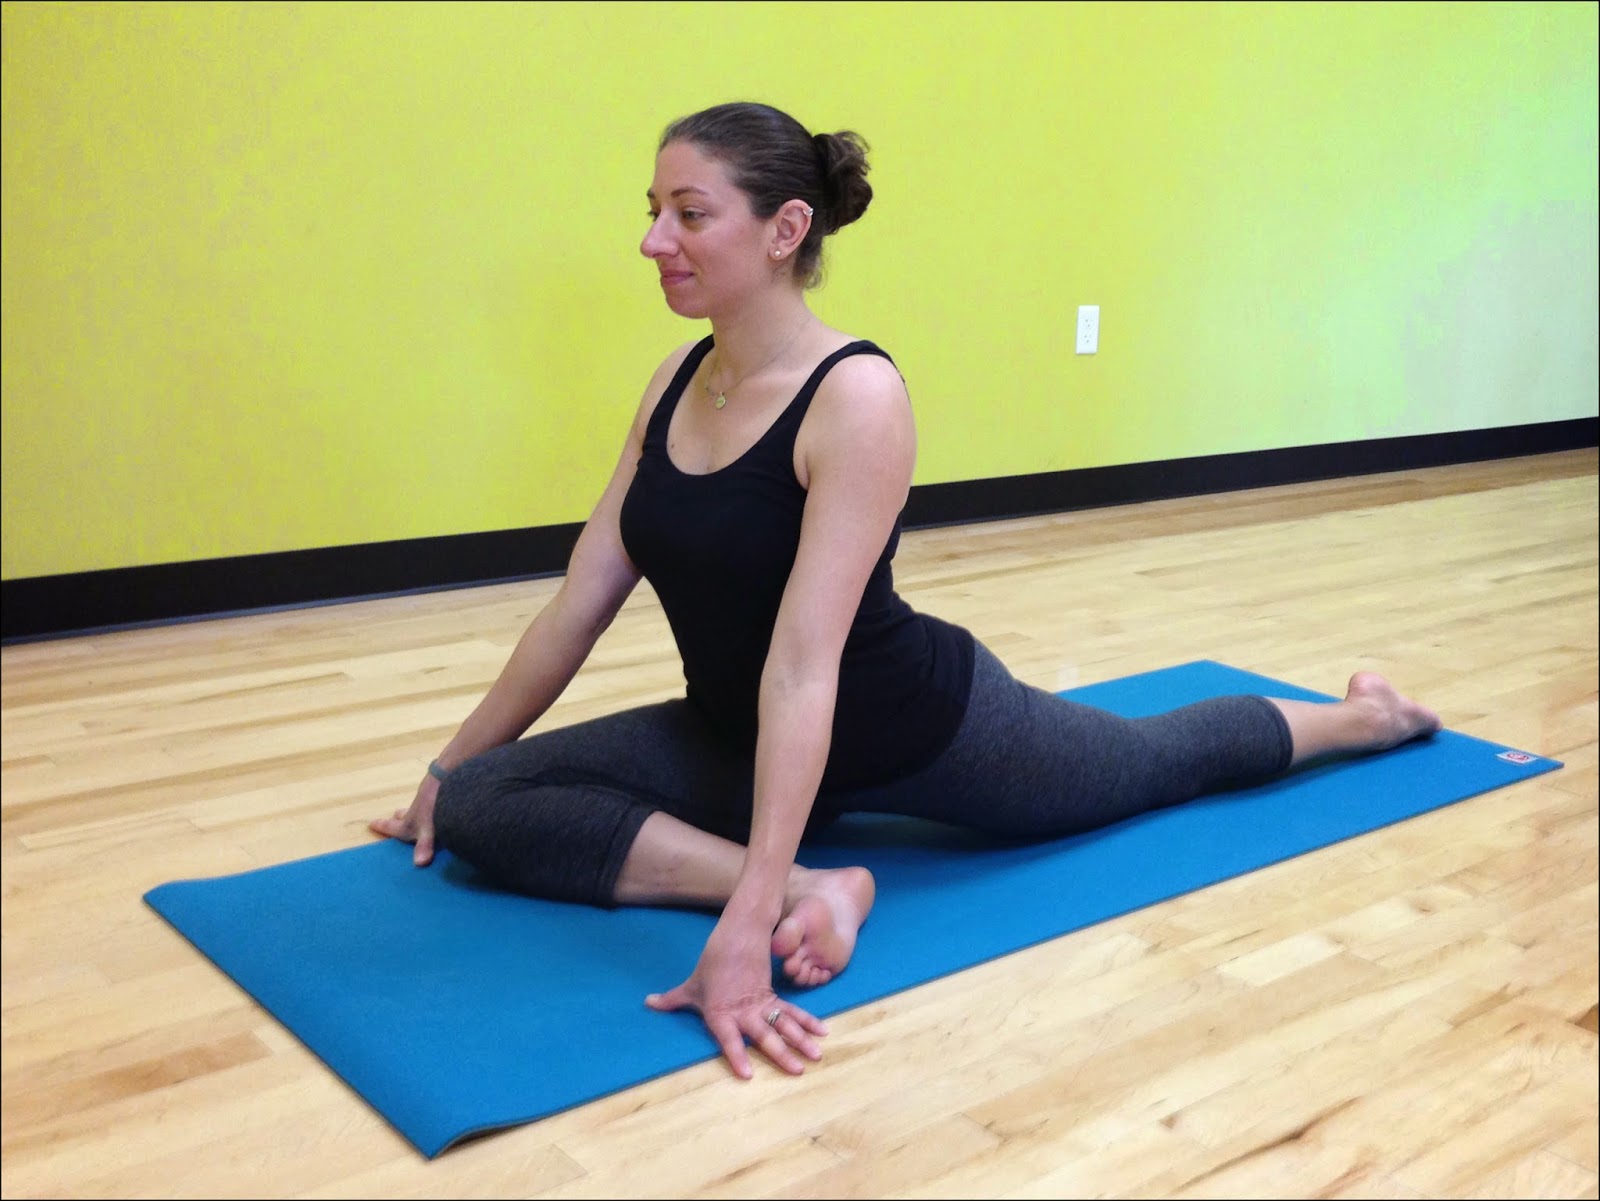
Eka Pada Rajakapotasana or one-legged
pigeon pose is a great way to target the piriformis muscle and done regularly
this pose can help alleviate the tightness and pain that runners sometimes
experience.
Since this pose is such a deep hip
opener it should only be done AFTER you’ve already done some basic yoga poses
that warm up and stretch the muscles in this area to be ready for this pose.
TO DO:
  • Begin in a low lunge position (I suggest
    staying here for a few breaths to begin to open up the hips and hamstrings
    before moving into the deeper stretch)
  • From the lunge, move your front foot
    towards the opposite wrist and then lower your hip until you feel a gentle
    stretch in your hamstrings, glutes and piriformis

**Be sure to move slowly and only go to the point that you feel a gentle
stretch!**
Your hips should stay as squared as
possible and your hip, knee and ankle of your back leg should stay in line with
each other.  If your hip does not come to the ground you can put a yoga
block, a folded towel or blanket or even a pillow under it so that it’s
grounded and you can stay comfortably in the pose without over doing the
stretch.   
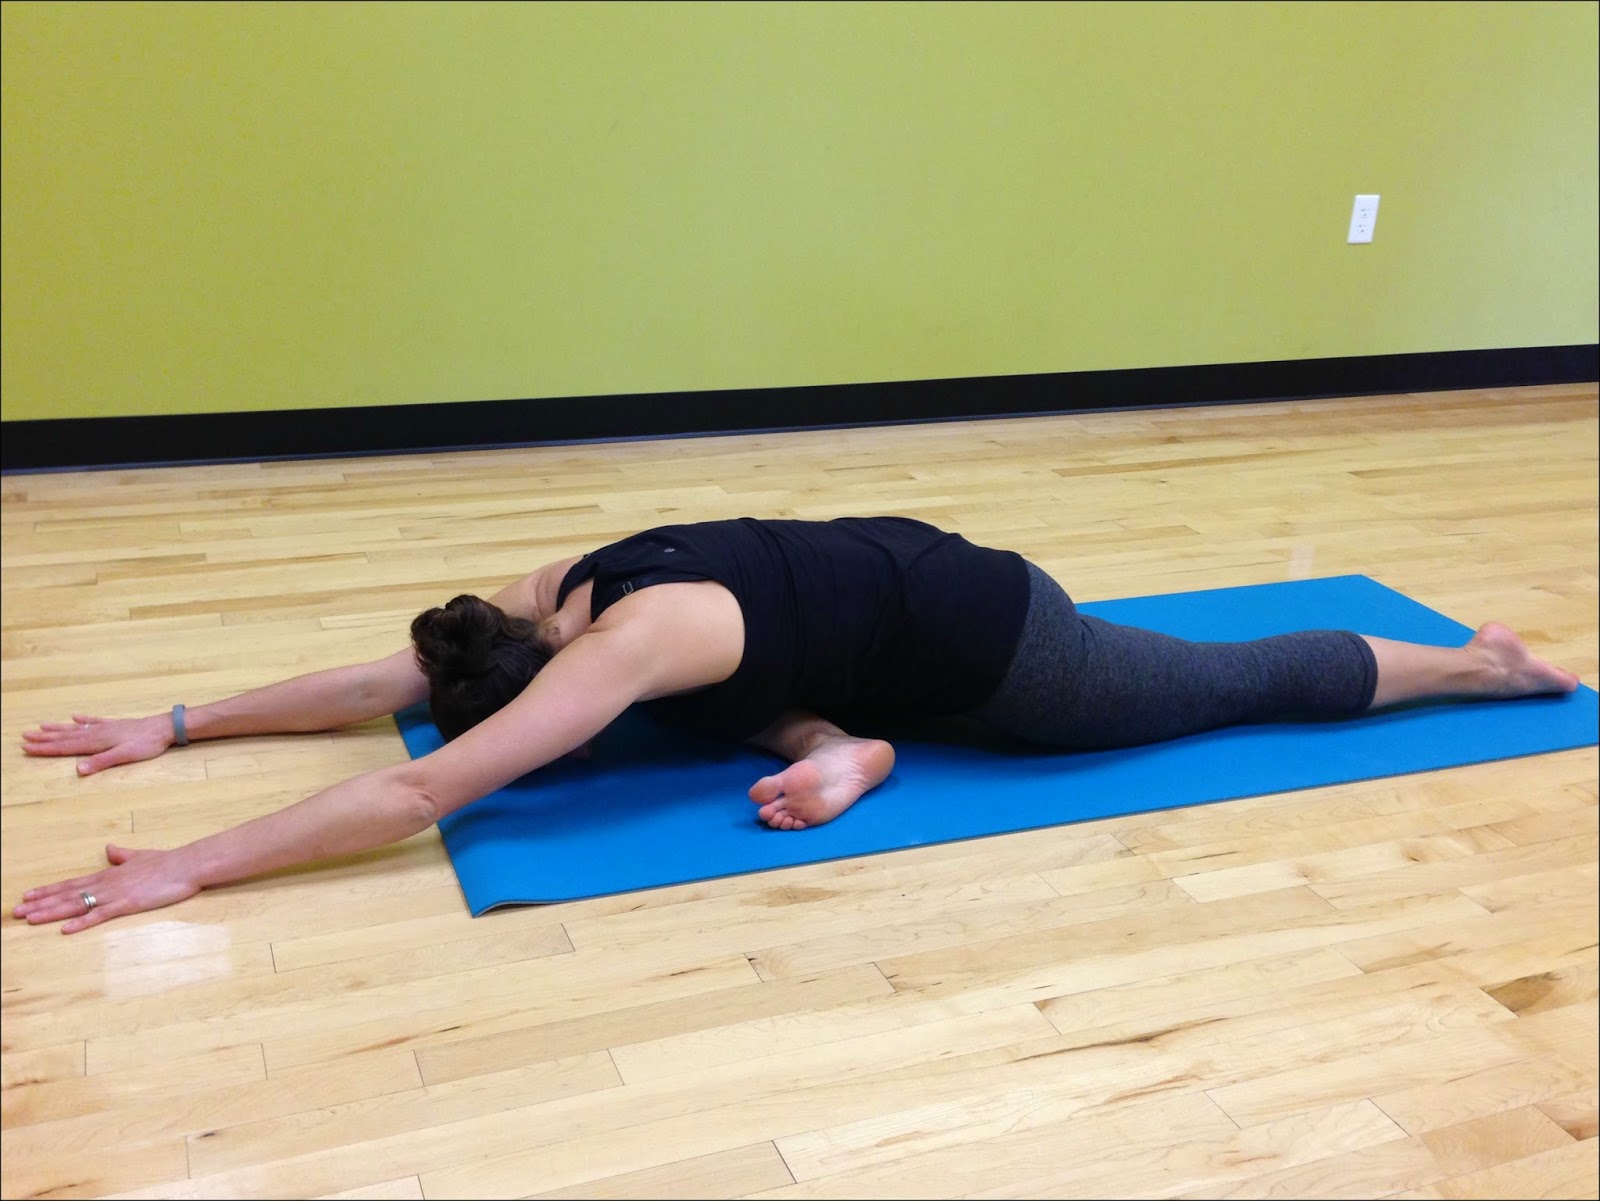
To deepen the stretch you can fold
forward over your front leg if it’s comfortable.
For a modified version that is gentler
on the knee and a less intense version of the stretch, you can do “reclined
pigeon”:
  • Begin on your back, knees bent, feet
    flat on the floor
  • Cross your right ankle on top of your
    left knee so that your legs create a “figure 4”
  • To deepen the stretch you can lift the bottom
    foot off the floor, straighten that leg up and reach your hands around your
    straight leg to hold behind your thigh

Done regularly, pigeon pose is a great
way to keep that pesky piriformis muscle happy as you build up your mileage!
Keep running and keep stretching!

Namaste
Danielle
Don’t forget you can join me for Yoga for Athletes every Thursday morning
at 7am at Mashpee Fitness!

Normal
0

false
false
false

EN-US
JA
X-NONE

Blog post by Danielle Nardi.

Sun Salutations: What are they and why do we practice them?


In the most literal sense,
a Sun Salutation or Surya Namaskar as it is called in Sanskrit, the language of
yoga, is a specific series of yoga poses performed in sequence.
While the history of the
physical practice of the Surya Namaskar sequence is a bit unclear, it is known
that it was originally a sequence of sacred words honoring the sun that would
be chanted at sunrise each morning rather than the sequence of poses we are
familiar with today.
Why do we honor the
sun?  As Shiva Rea, creator of Prana Flow
Yoga and founder of the Global Mala Project put it, “All of life on Earth
depends on the sun.” 
Sun Salutations are an
energizing sequence that links body, breath and mind in a moving meditation of
gratitude for the life force and healing energy that the sun provides.  And while they can be practiced at any time
of the day, it’s often suggested that the early morning hours are a
particularly good time for Sun Salutations since the mind is most likely calm
and clear first thing in the morning.
The Sun Salutation
sequence is an important foundation in the vinyasa (or flow) yoga
practice.  This series is used as an
energy building warm up and is repeated often throughout
a practice as a smooth transition between other sequences.  Because Sun Salutations are repeated many
times during a class it is important to practice them with proper pose
alignment and breath work.
To learn more about Sun Salutations, proper pose
alignment and transitions and how to work them into your personal practice join
me on Sunday, April 19th from 1-3pm for a special Sun Salutation Workshop at Mashpee Fitness!
Namaste
Danielle
Blog post by Danielle Nardi.

Yoga for Athletes


Most
athletes know and understand the benefits of cross training, but have you ever
considered incorporating yoga as part of your cross training?
Yoga not
only has physical benefits like flexibility, balance, coordination and
strength, but also offers the mental benefits of breath awareness and
concentration – all things athletes can benefit from!
Many
athletes don’t take the time to slow down and really focus on listening to and
taking care of their bodies, which can lead to overuse and injury – spending
time on your yoga mat can help avoid that!
While you
don’t need to be flexible to do yoga (a common misconception!), you can
definitely expect some stretching in a yoga class.  Tight muscles are more prone to injury, so
taking the time to loosen up tight spots can help increase range of motion and
avoid painful injuries in the future. 
Yoga also
focuses on mindfulness and linking breath with movement, both of which can be
taken off the yoga mat to benefit you in your everyday living and your
sport.  And if you’re looking for a great
way to relax and recovery after an intense training session, a restorative yoga
class can help you physically and mentally recover quicker.
I could
go on and on about the benefits of yoga for athletes, but the best way for you
to understand is to experience them yourself! 
Starting this week you can join me
on the mat for Yoga for Athletes on Thursday’s at 7am at Mashpee Fitness – hope
to see you there!
Namaste
Danielle

Blog post by
Danielle Nardi.

Desk Yoga – Part 2

Since I got some great feedback on my Desk Yoga post a
couple of months I figured I’d share some more great stretches you can do right
at your desk!  Today we’re going to focus
on shoulders.

Strap Shoulder
Stretch

For this pose you can use a yoga strap if you have one, but
let’s assume you don’t – you are sitting at your desk after all!  A towel, or sweater will work just fine!
Bring your right arm up overhead holding the strap/towel/
sweater and bend your elbow so that your hand comes behind your head.  Begin with your left arm at your side and bend
your arm so that your left hand comes to your mid-back, reach for and grab the
strap/towel/sweater and allow the weight of your left hand to gently pull and
open your right shoulder. 
Hold for 3-5 breaths and repeat on the other side!

Desk Dolphin

Clasp your hands together in front of you and place your
elbows on the desk shoulder distance apart. 
Fold forward and lower your head keeping it in a neutral position until
your back is even with your upper arms. 
For an added stretch drop your clasped hands behind your neck.
Hold for 3-5 breaths and repeat.

Seated Half Locust

Clasp your hands behind your back keeping your neck in a
neutral position and your spine long. 
Inhale and lift your hands off your back opening through the chest and
front of the shoulders.  For an added
stretch keep the palms of the hands together.
Hold for 2-3 breaths then change the clasp of the hands
(opposite thumb on top) and repeat.
Just because you spend much of your day sitting at a desk
doesn’t mean you can’t give your shoulders a good stretch!
And if you can get away from you desk I hope you’ll join me
on the mat for yoga at Mashpee Fitness Monday and Thursday mornings at 8:30am!
Namaste
Danielle

Blog post by Danielle Nardi.

Yoga: Make it Your Own

If you’ve taken one of my
yoga classes you’ve probably heard me say that I love looking around the room
and seeing everyone doing something different!
It’s not that I don’t want
people following along with the poses and sequences that I’m offering, but I
know that not every pose works for every person and if something doesn’t work
for you then you shouldn’t do it!  We
each come to our yoga mat with different expectations, backgrounds and
limitations and we need to respect those and work within our own comfort zone.
One of the most important,
and often most difficult, things yoga students need to learn is to listen to
your own body and do what’s right for YOU (which
may not necessarily be what’s right for the person on the mat next to
you!). 
Most yoga teachers will offer
different variations of poses giving the student the power to choose what’s
right for them whether it’s a modification or taking a pose to it’s fullest
expression – and just because you may have practiced the fullest expression in
class last week doesn’t mean you need to do it again today! 
And don’t forget if you
ever need a break, child’s pose is always there for you!  (I
promise no one is judging you if you take a child’s pose in the middle of
class, in fact, I silently applaud those that do because I know they’re
listening to what their bodies need!)
One of the things I love
about yoga is that between the many different styles, the modifications
available and the use or props, it really can be accessible to everyone.  So listen to your body, listen to the options
the teacher is offering and make your practice your own!
I hope to see you soon in my Monday and Thursday
8:30am classes at Mashpee Fitness!
Namaste
Danielle
Blog post by Danielle Nardi.

Yoga: Hamstring & IT Band Stretch

Tight hamstrings and IT bands are an issue for
many people (especially athletes!), so today I’m sharing a great way to take
care of those areas with a simple stretch you can do right at home!
For this stretch you’ll need a yoga strap if
you have one, if not a belt, dog leash or rolled up towel will work perfectly
fine.  As always remember to listen to
your body and only go to the point where you feel a gentle stretch, if you feel
pain you went too far.

PROPS

  • A yoga strap, belt or towel


HAMSTRING STRETCH

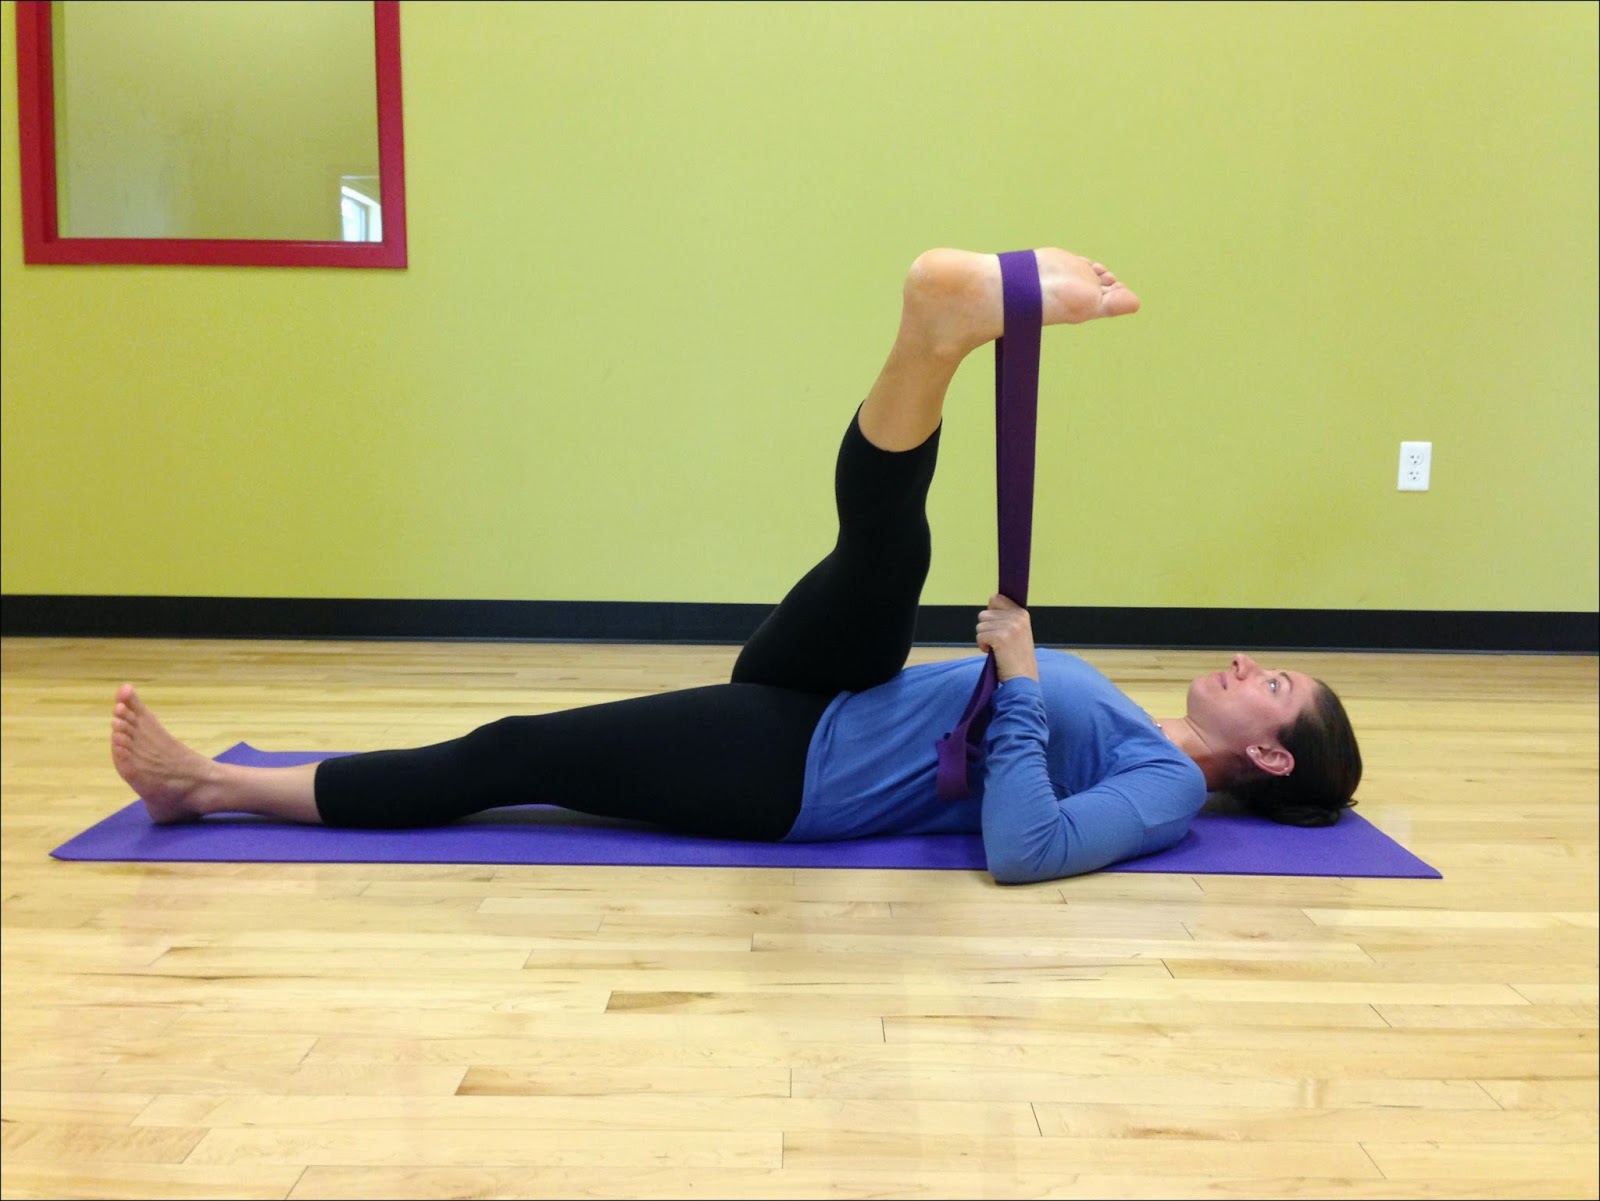
  • Begin laying on your back with both legs extended out on the ground
  • Bend up your right leg and place the strap, blanket or a rolled up towel
    around the ball or arch of your right foot
  • Extend the leg with the strap straight up towards the ceiling keeping the
    foot flexed and leg active
  • Hold and take 3-5 breaths here to lengthen and stretch the hamstring muscle


IT BAND STRETCH

  • Move the strap to your left hand
    and slowly cross the right leg towards the left side of the body until you feel
    a gentle stretch on the outside of your right leg (that’s your IT band!)
  • Hold and take 3-5 breaths here to stretch the
    IT band

  
Repeat the sequence on the
other side.
Done regularly these
simple stretches can do wonders for that pesky hamstring and IT band tightness!
Don’t forget you can join me on the mat Monday and
Thursday mornings at 8:30am at Mashpee Fitness!

Blog post by Danielle Nardi.

Yoga For Your Feet

We spend so much time on our feet, yet
ironically we don’t usually think to stretch them at all!
Here are a few simple yoga poses that can help
keep your feet healthy and pain free!

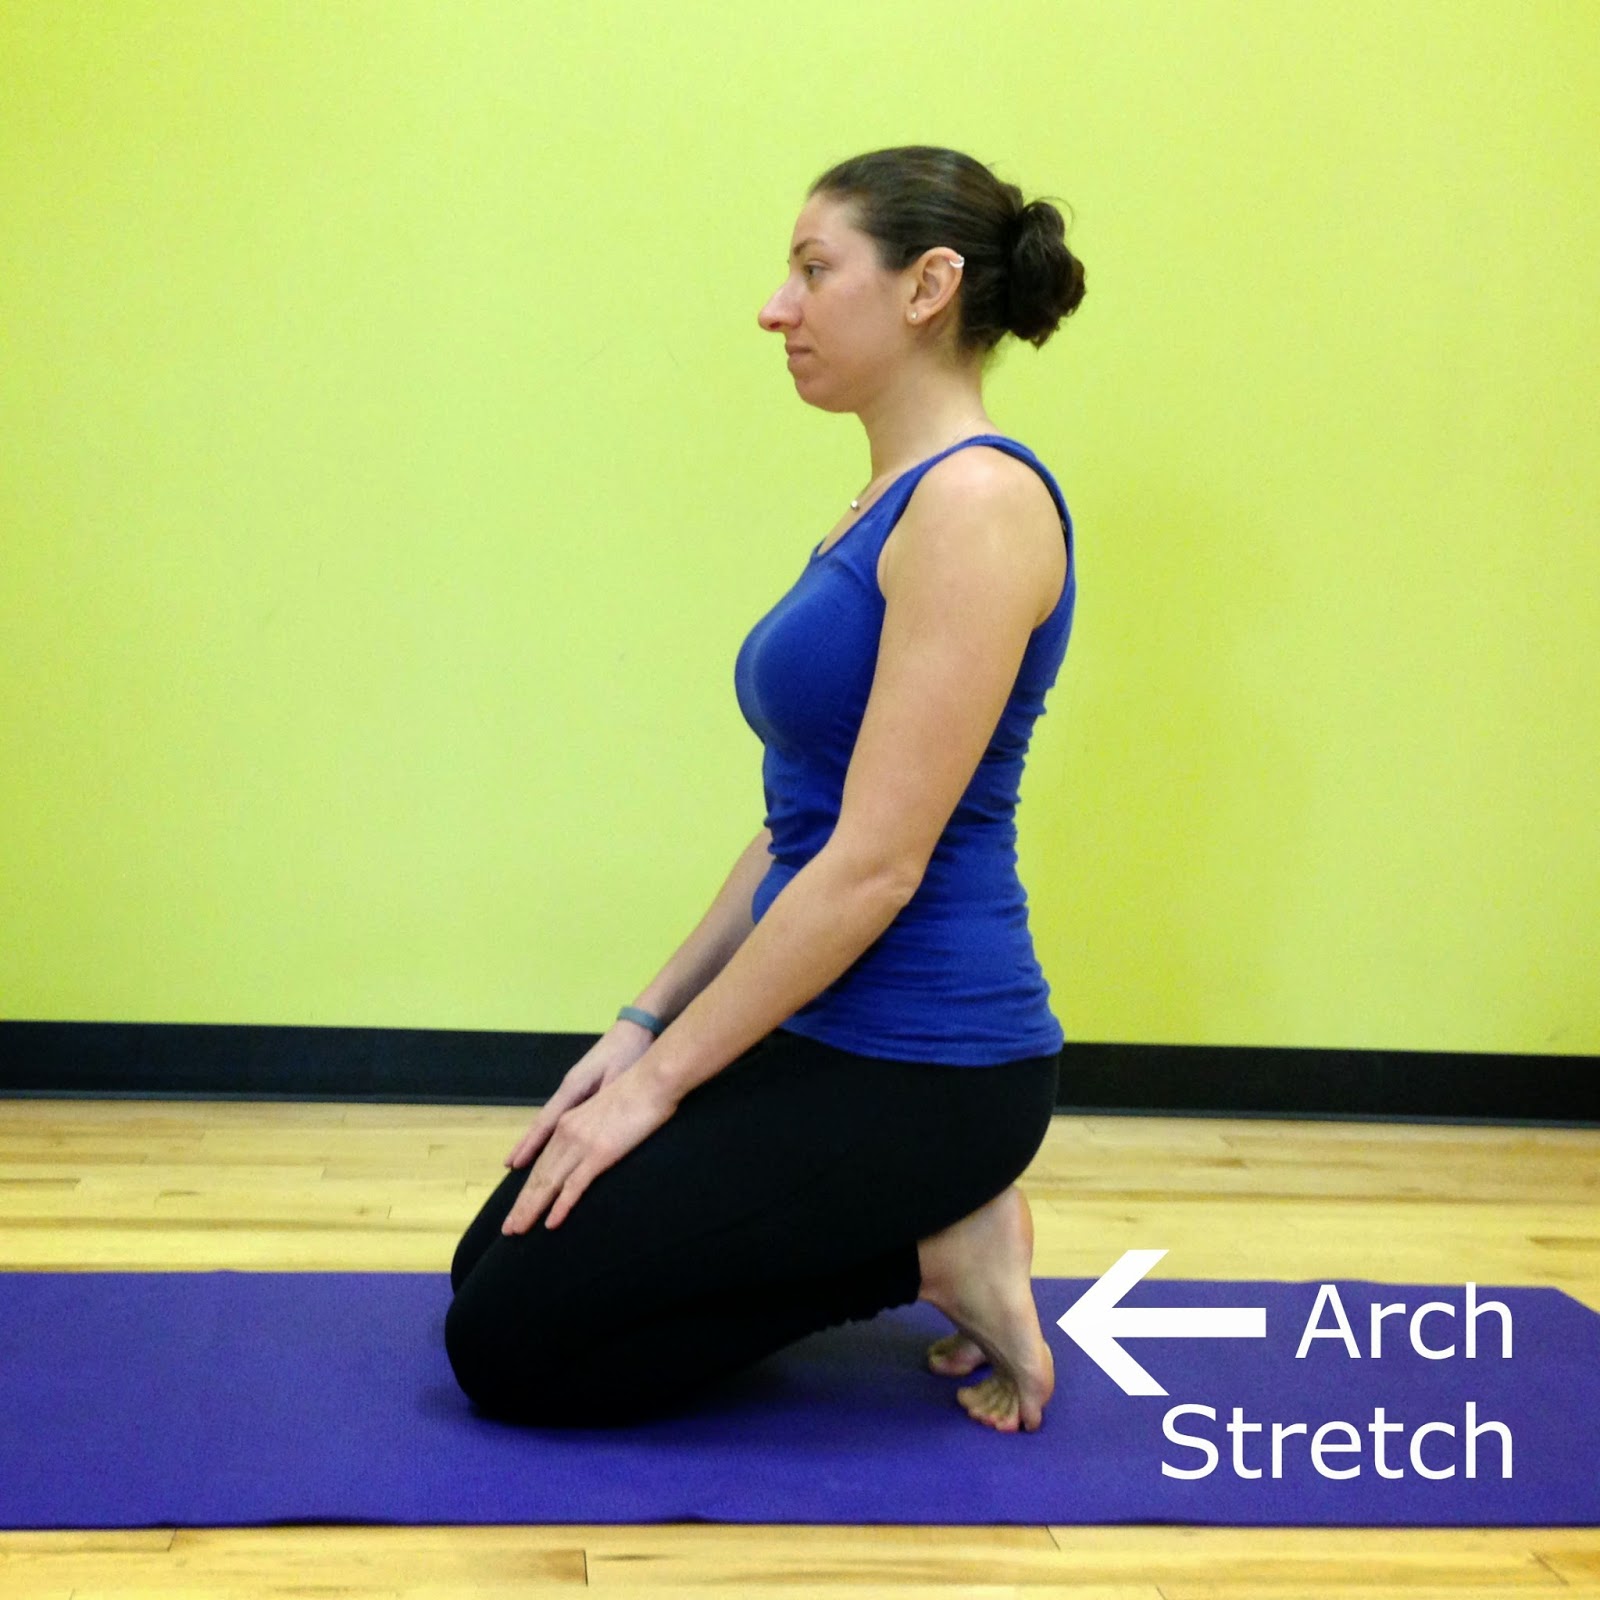
ARCH STRETCH


Begin on your knees with your toes curled
under.  Slowly sit back on to your heels
until you feel a gentle stretch in your arches. 
Hold for 3-5 breaths and then uncurl your toes. 
*It is very important in this pose to listen to your body and find the
variation of this pose that works best for you – you should feel a gentle
stretch, NOT pain!

ALTERNATE ARCH STRETCH


If the above stretch is too much you can start
off with a less intense version.  Begin
seated on the floor with your legs straight out in front of you, feet
flexed.  Using your hands or a strap
reach around your toes or the ball of your foot and gently pull back until you
feel a stretch in your arches.

TOP OF THE FOOT STRETCH


Now that we’ve stretched the bottom of our feet,
let’s not forget the top!
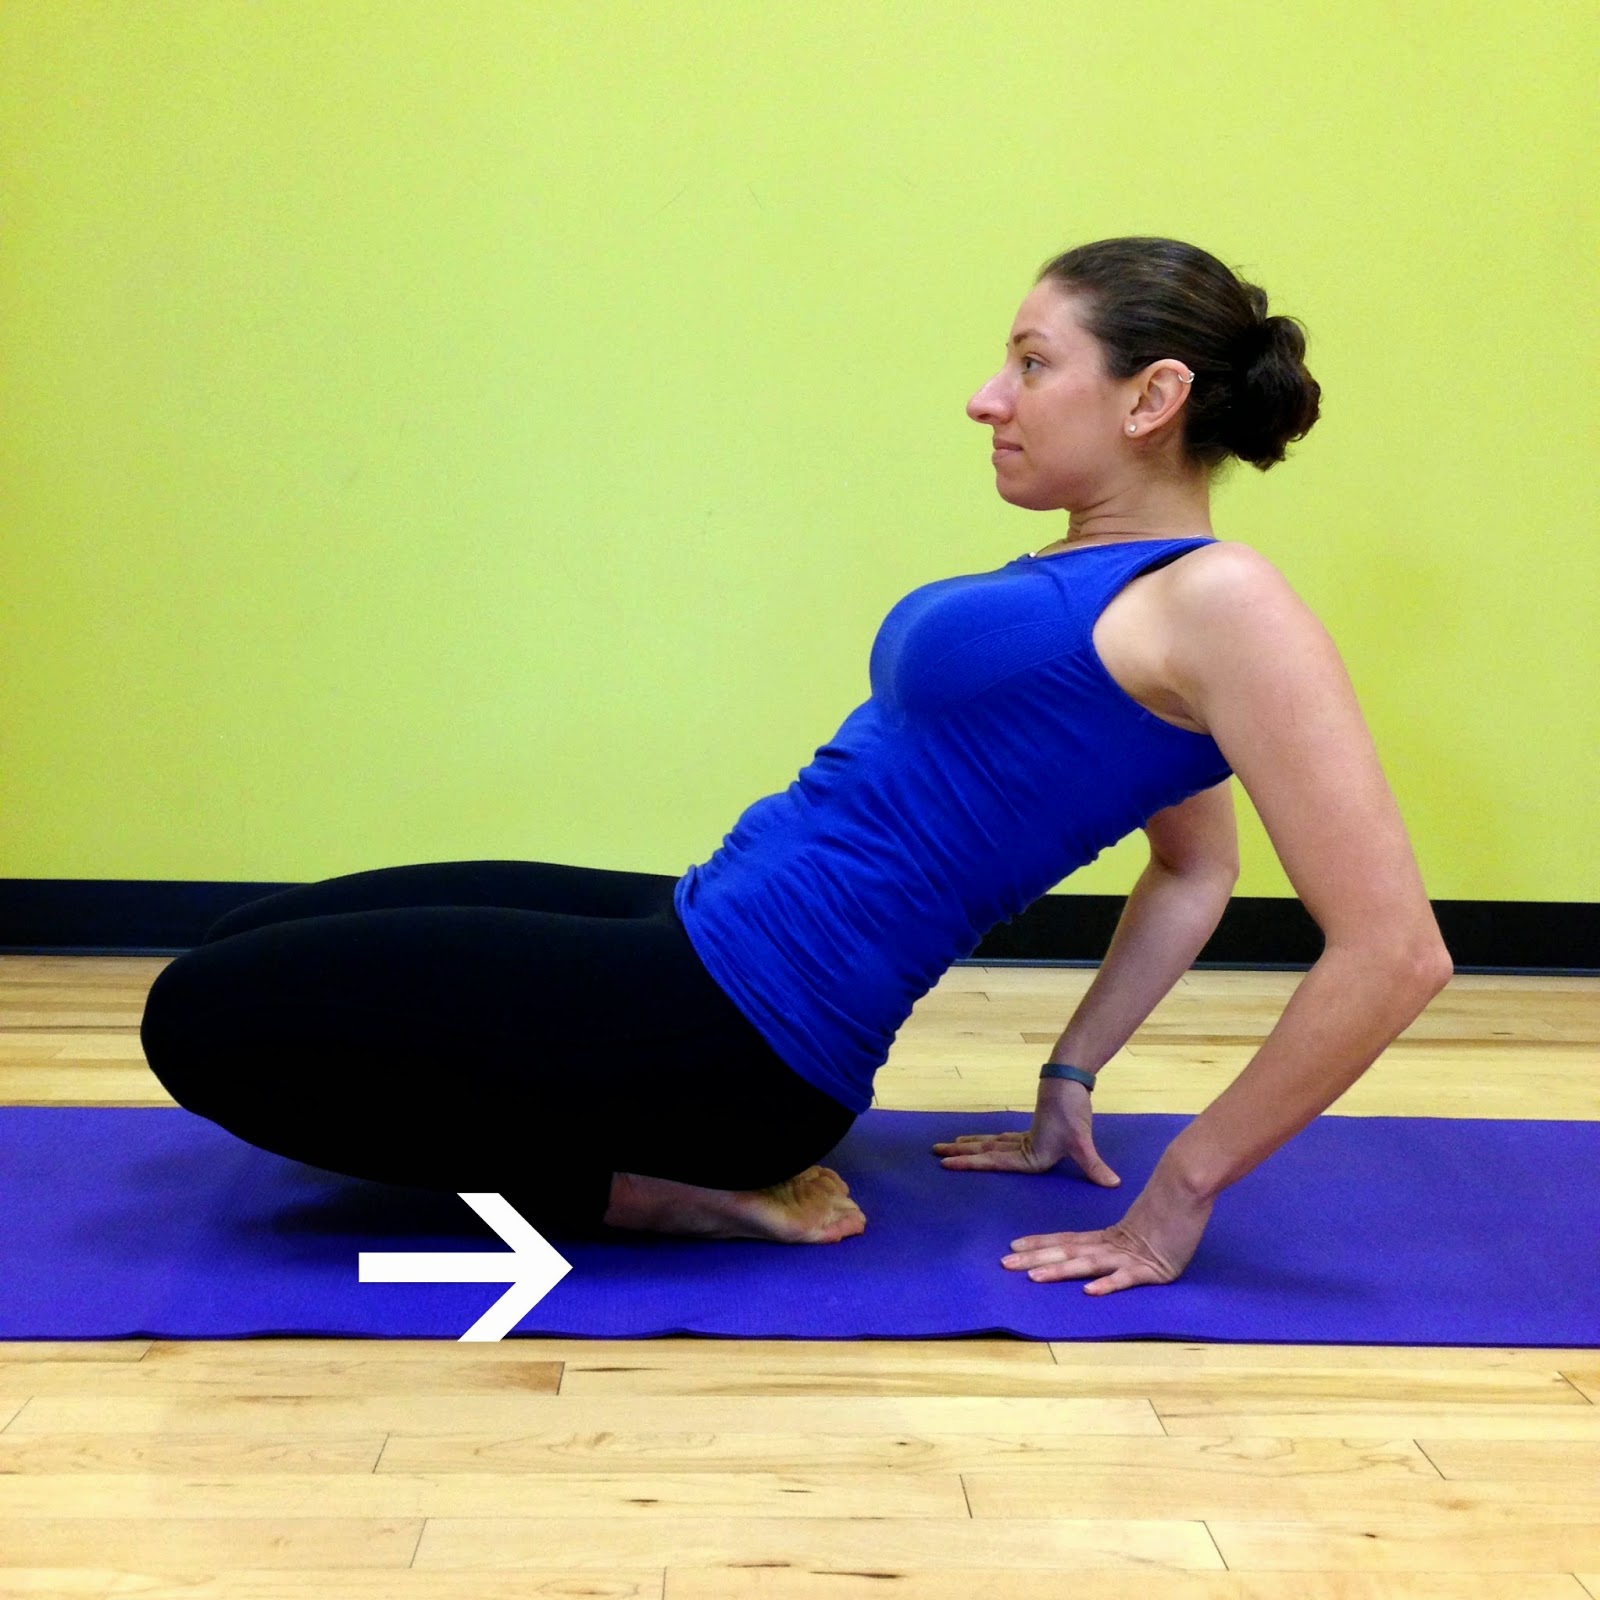
Begin kneeling with the tops of your feet flat
on the floor.  Slowly lift your knees and
rock backwards until you feel a gentle stretch on the top of your feet. 
To help alleviate arch tightness you can also
roll your foot on a tennis ball or golf ball using your own body weight to
control the pressure.  Make sure to roll
out all parts of your foot working from your heel to the ball of your foot.
What better way to keep your feet happy than
incorporating these simple stretches into your daily routine or yoga practice!
Don’t forget you can join me on the mat at Mashpee Fitness Thursday
mornings at 8:30am!

Blog post by Danielle Nardi.

Yoga: Where to Begin

I love introducing yoga to
beginners but I also know that starting any sort of new fitness routine can be
intimidating if you don’t know what to expect! 
Here are a few tips for
making it to and through your first yoga class.
Find the Right Class
There are many different
types of yoga, so before you head out to a class do a little research and make
sure you find the class that’s going to be best for you.  
While most classes can be
modified to be suitable for any level, if you’re totally new to yoga you’ll
likely feel most comfortable in a beginner or foundations class where the pace
will be a little slower and the teacher will break down each pose step by step.
What to Wear
You want to be able to use
your full range of motion in yoga, so be sure to wear something that allows you
to move freely but isn’t so loose that it’s getting in your way during your
practice.  Yoga is traditionally done
barefoot, so be prepared to leave your socks and sneakers at the door!
What to Bring
Many yoga studios and gyms
have yoga props such as mats, blocks and straps that you can use, but if you’re
going to be practicing regularly I’d suggest looking into getting your own
mat.  Mats vary in their cushioning and
“stickiness” (non-slip feature), so it’s helpful to find one that works best
for you.
You may also want to bring
a towel (especially for hot yoga!) and a water bottle to stay hydrated during
your practice.
Talk to the Teacher
When you arrive at class,
be sure to let the teacher know this is your first time or that you’re new to
yoga – it’s helpful to know when there are new students to make sure the class
is paced correctly and the poses are appropriate.
Also be sure to let the
teacher know about any injuries you may be working with so they can suggest
modifications or alternatives to poses that may not be right for you to
practice.
Make it your own
Instructors will often
offer modifications or different versions of poses as they are teaching – make
sure to find and practice the version of the pose that is appropriate for your
body and your experience level – remember, it’s more important to make sure the
alignment of the pose is correct rather than trying to do the deepest
expression of the pose!

Incorporating yoga into
your fitness routine offers many benefits as long as you listen to your body
and make your practice right for you!
I’ll be teaching at
Mashpee Fitness at 8:30am on Thursday mornings – hope to see you there!

Blog post by Danielle Nardi.

Yoga Pose of the Week: Plank Pose


Plank pose is a staple to any yoga practice or
workout routine and while it may seem simple, it works many different muscles
groups and it’s important to make sure you’re doing it correctly!
Benefits of plank include strengthening the
arms, core and lower back and doing this pose regularly can help lengthen the
spine and improve posture.


Plank Pose


HOW TO:

  • Begin on hands and knees making sure your hands are aligned directly under
    your shoulders, fingers spread wide.
  • Engage your core and keep your head in a neutral position.  (Don’t allow your
    chest or stomach to sink down!)
  • Step back one foot at a time, toes curled under and pressing back through
    your heels.
  • Your body should be in one straight line from the top of your head down to
    your heels.
  • Hold the pose for 3-5 breaths, lower down and repeat.

Modified Plank

If you are working with any wrist issues, this
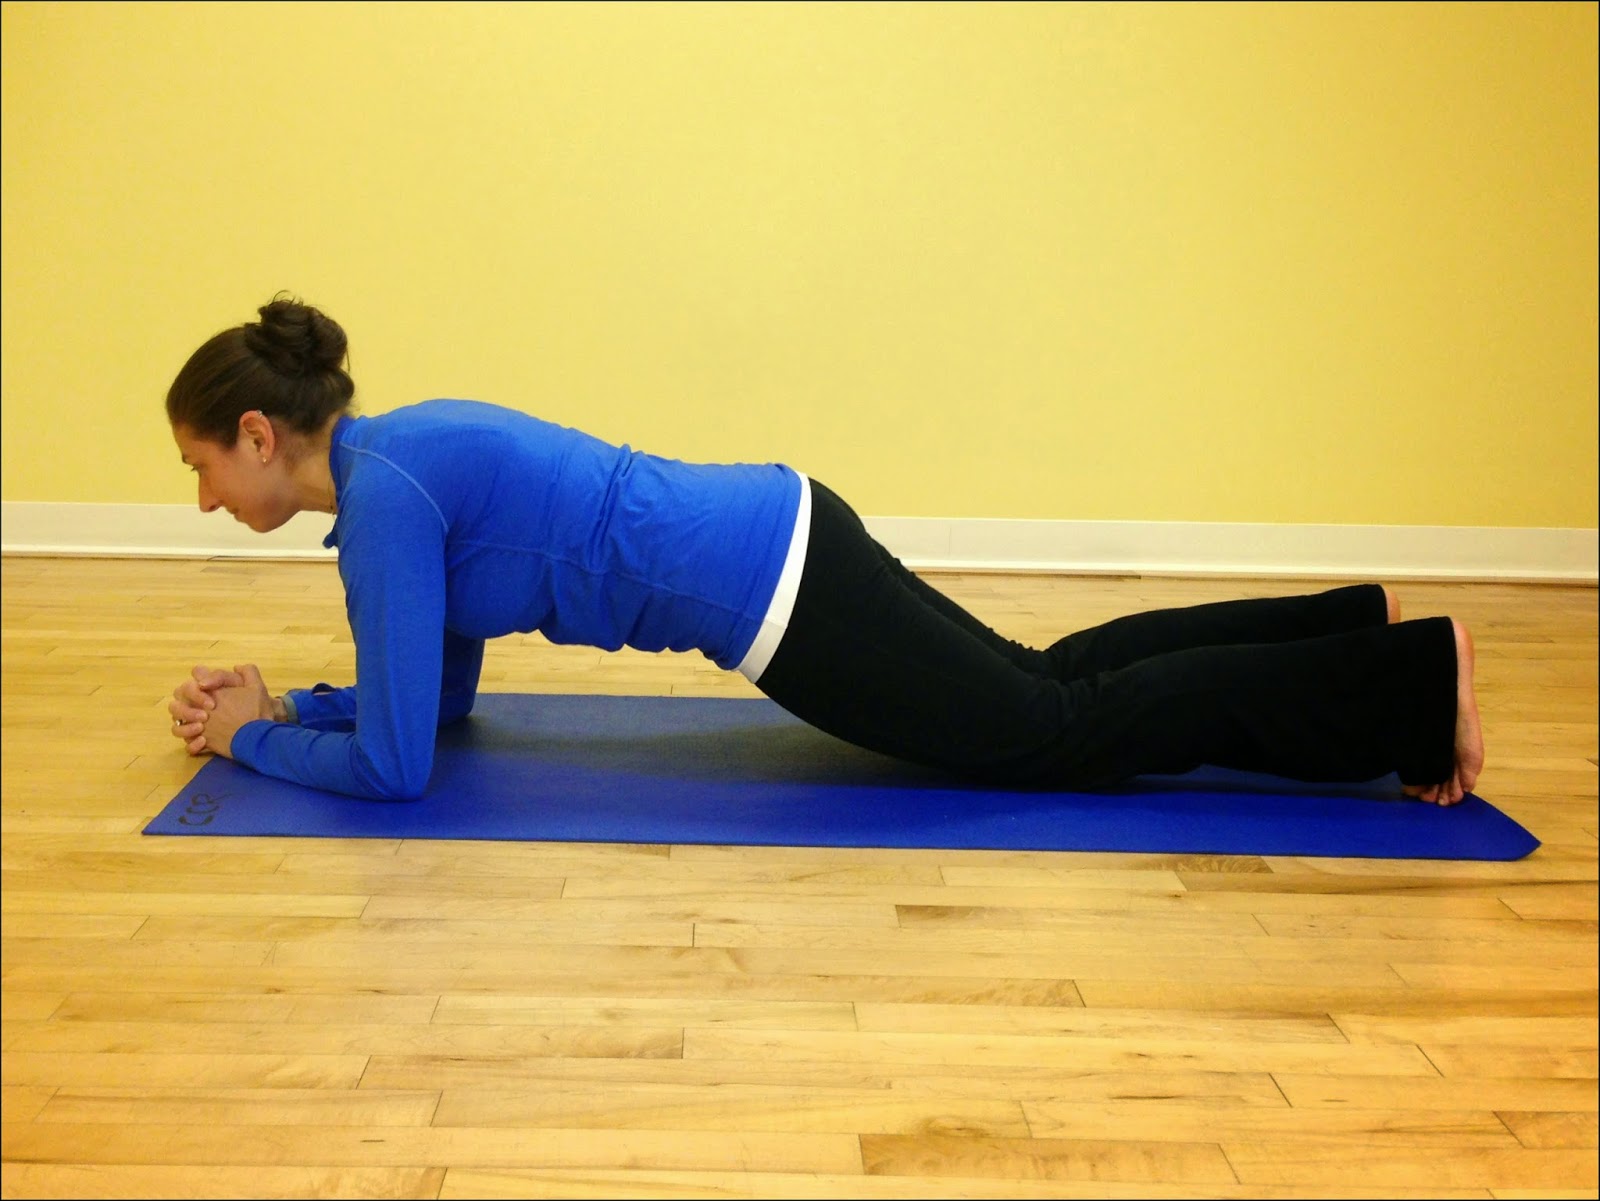
pose can be done on the forearms.  In
this variation your elbows should be lined up under your shoulders – it’s also
a great shoulder stretch!
If you are working on building up your core and
back strength, a good place to start is a plank variation with your knees on
the ground – if you’re knees are sensitive place a folded towel or blanket
under them.

Challenge Yourself

To add some additional strengthening to your
plank pose try some crunches! 
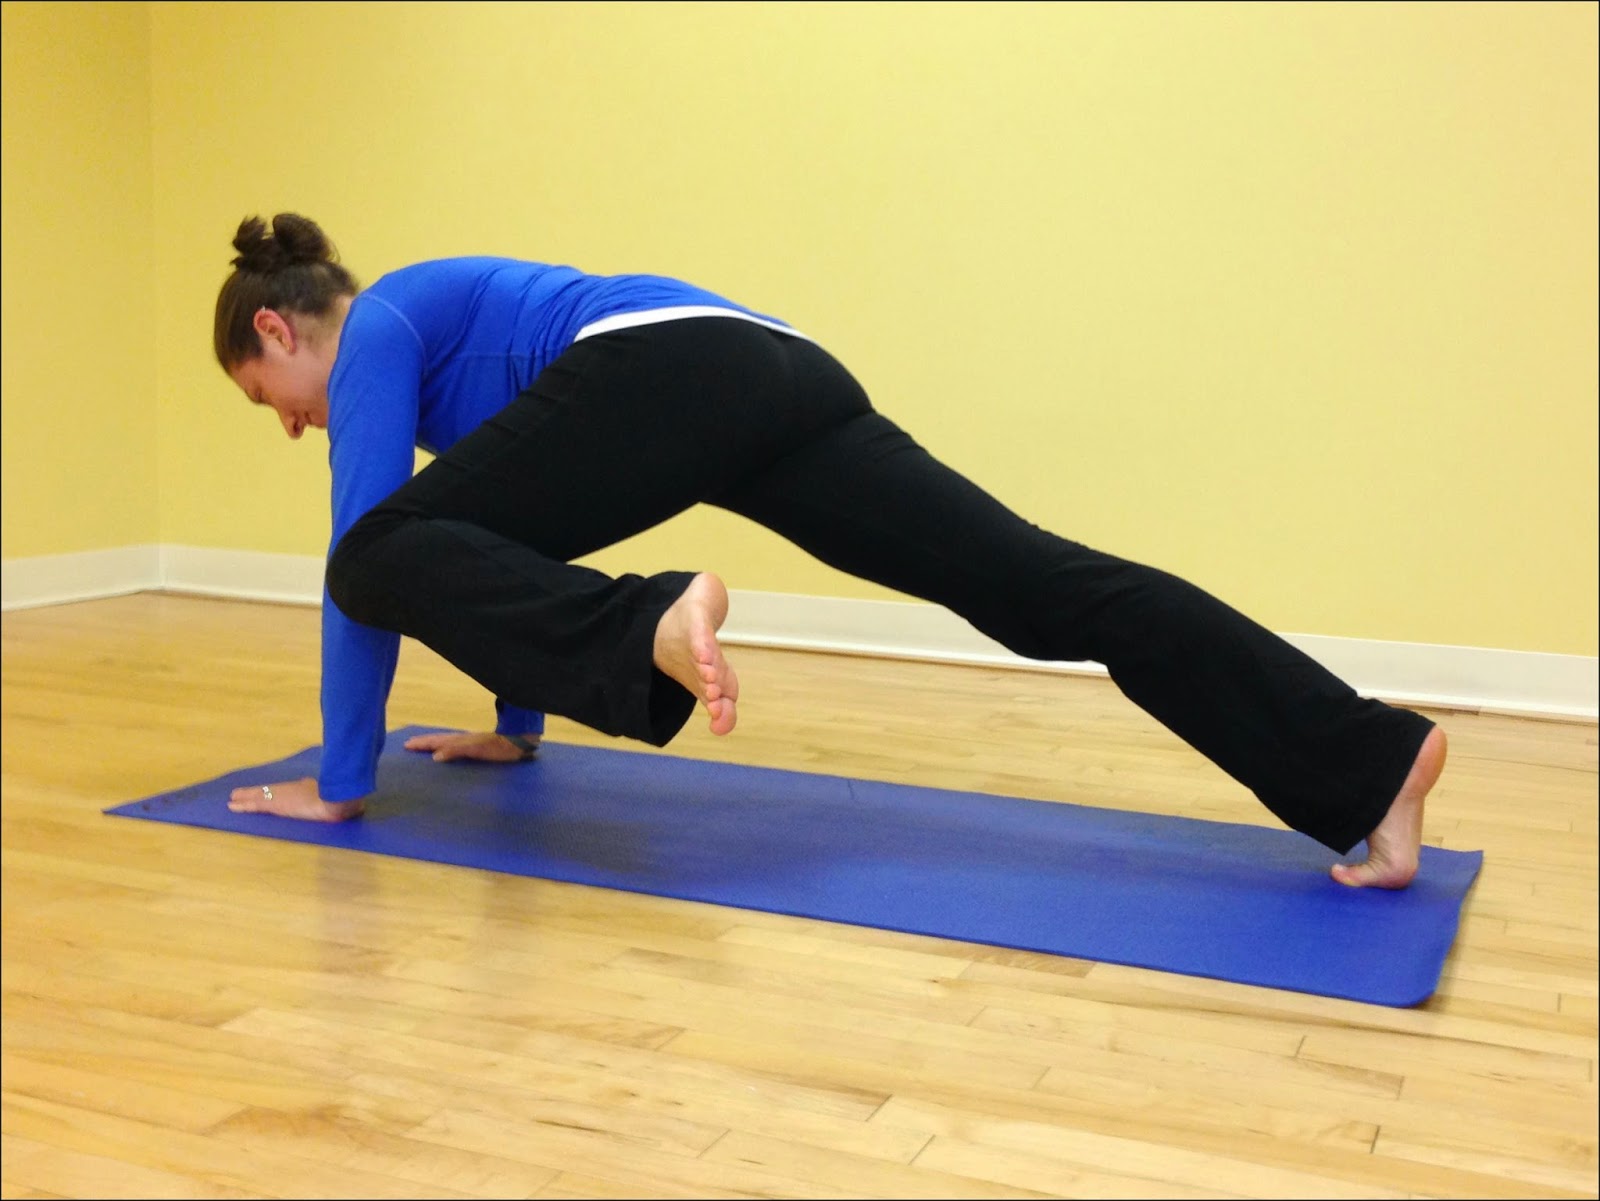
Begin in a plank position, lift your right leg a
few inches and bring your right knee towards your nose.  Extend it back to the starting position.  Bring your right knee towards your right
elbow, extend it back and then bring your right knee towards your left
elbow.  Extend it back, lower it down to
the original plank position and repeat on the other side.


Planks are a simple pose, but done correctly and
regularly it offers tremendous benefits and is a great addition to any workout
routine!
Blog post by Danielle Nardi.

Desk Yoga

Unfortunately many of us spend hours each day sitting at a
desk, which can have negative effects on personal health.  In addition to just getting up and standing
or walking around periodically, there are some great stretches you can do
sitting right at your desk!
Hold each of these poses for 10-15 seconds and then repeat
on the other side.

Desk Downward Dog

Place hands on your desk in front of you shoulder width
apart.  Push your chair back until you
feel a gentle stretch in your shoulders and back. 

Seated Twist

Begin seated in your chair with both feet firmly placed on
the ground.  Twist at the waist in one
direction placing your opposite hand on your upper leg to assist you in the
twist. 

Seated Pigeon

Begin seated at your desk and cross one leg over the other
ankle to knee as show in the picture above. 
You should feel a gentle stretch in your hip and piriformis.  To deepen the stretch, gently fold
forward. 

Seated Triangle Forward Fold

Move forward towards the edge of your seat.  Keep one leg bent with your foot planted on
the ground and extend the other leg out straight with your heel on the ground
and toe pointed up.  You should feel a
gentle stretch in the hamstring of your straight leg.  To deepen the stretch, slowly fold forward.

Eagle Arms

Sit straight up in your chair and cross your arms placing
the elbow of one arm into the bend of the other arm as show in the picture above.   If it’s comfortable on your
shoulders, bring the back of your hands together and lift your elbows for a
stretch across your shoulders and upper back.
Don’t let sitting at a desk keep you from staying healthy
and active!  Get up and take a short walk
and get in a quick stretch with some desk yoga!
Blog post by Danielle Nardi.

Yoga Pose of the Week: Bridge Pose

Not only is bridge
pose a wonderful part of any yoga practice, but because of it’s many
strengthening and stretching benefits we often see it used in physical therapy
and as part of exercise routines!
One of the nice
things about bridge pose is that there are many ways to modify it to make it
either accessible or more challenging for all levels.
HOW TO:
·        
Lie down
on your back with your knees bent, feet flat hips distance apart
·        
Arms
should be along your side
·        
Engage
your core and press in to your feet and arms to lift the hips
·        
Hold for
3-5 breaths and lower down in a controlled motion

RESTORATIVE BRIDGE:
This modified
version of the pose allows you to experience the benefits of a bridge in a more
relaxed, passive way.  To do it, place a
small block or folded blanket under your sacrum and allow your pelvis to relax
on the prop.  A restorative bridge should
be held for at least 5 minutes.
CHALLENGE YOURSELF:
To add some
additional strengthening to your bridge pose, begin with your heels on a physio
ball.  Keeping your legs straight and
your core tight, raise your hips off the ground, hold for 3-5 breaths and lower
controlled.  

Blog post by Danielle Nardi.

Yoga Pose of the Week: Legs Up the Wall

Legs Up the Wall, or Viparita Karani as it is
called in Sanskrit (the language yoga is often taught in) is a wonderful
relaxing and restorative yoga pose – and it’s as simple as it sounds!

This is a great pose to do when you’ve been on your
feet a lot or even if your legs are just feeling tired and heavy. It will
refresh your legs and feet by getting the lymph and other fluids that cause
swelling to flow in the opposite direction, increasing blood circulation and it
will gently stretch the backs of your legs. After a run or workout is an especially
good time to do this pose since it will help to drain the lactic acid from your
legs and decrease soreness.


To get into position begin sitting on the
floor with one side of your body up against the wall. Slowly roll down to the
floor so that your bottom is scooted up against the base
of the wall and your legs are extended up the wall. You may want to have a pillow
for under your head for comfort. I’ll typically set a timer and stay here for
10 minutes.

When coming down from the pose, roll over to
one side and take a moment or two on your side before you sit up so that you
don’t get lightheaded after being inverted for so long!
This pose is also very calming and is a great
time for a few minutes of quiet reflection or meditation – and for all you
migraine and headache sufferers, it’s been known to help alleviate headaches!
Legs Up the Wall is a simple pose that anyone can do
anywhere, but the benefits are amazing and well worth the few minutes of your
time!

Blog post by Danielle Nardi.